Getting
Ready for the Tutorial Setup
Setting-up
Sample Data Sources
Schema
Descriptions of the Sample Databases
Creating
ODBC Data Source Names (DSN) for the Sample Data Sources
Preparing
For The Tutorial
Prerequisite
Software
Before proceeding with the scenarios in the document, make sure all required software is installed on the test machine:
- SmartData Fabric®
- Microsoft SQL Server (for hosting the sample data sources supplied with the EIQ Product Suite install)
- MSMQ (Microsoft Message Queue for real-time updates)
- MS Office Suite (for document conversion)
For the full list of hardware/software prerequisites for this installation, refer to the latest Release Notes.txt.
Getting
Ready for the Tutorial Setup
Review the following documents before starting the tutorial for an understanding of the tools and concepts behind the EIQ Products.
SmartData Fabric® Quick Start Guide
SmartData Fabric® Introduction
SmartData Fabric® Configurations Introduction
Setting-up
Sample Data Sources
SDF
Installation media comes with four sample data sources required for this
tutorial. They are referred to as POLICE, INS, FBI and Documents. The
POLICE, INS, and FBI data sources are SQL Server relational databases. The
Documents data source is a collection of MS Word, HTML, Adobe, and Excel files
grouped in a folder named "docs". These documents are used to
demonstrate basic EIQ Product document processing features.
- Copy
the 'docs' folder from the SDF media to your local system drive ('C:\'
drive).
The SQL
Server database files need to be attached to the Microsoft SQL Server before
they can be available for use. Depending on the installed Microsoft SQL Server
version, attach the corresponding sample data sources from "Sample
Datasources\Sample Datasources - SQL Server 2000" or "Sample
Datasources\Sample Datasources - SQL Server 2005/2008" folder.
- Copy
the '.MDF' and related files ('.LDF') for the three sample SQL Server
databases from the EIQ Product Suite media on to your local system drive
('C:\' drive).
- In
Microsoft SQL Server 2005/2008, go to SQL Server Management Studio and
connect to the system.

· Attach each of the three sample databases (POLICE, INS and FBI) as described below:
Attaching
FBI database
· Go to databases folder, right-click and select 'Attach' from the menu.
· Browse for the FILE by pressing "Add".
· Select the folder where the FBI.MDF file is located.
· Select the file "FBI.MDF"
· Press 'OK'.
· The FBI database will appear in the Object Explorer of the SQL Server Management Studio.
Attaching POLICE database
· Go to databases folder, right-click and select 'Attach' menu item.
· Browse for the FILE by pressing "Add".
· Select the folder where the POLICE.MDF file is located.
· Select the file "POLICE.MDF".
· Press 'OK'.
· The POLICE database will appear in the Object Explorer of the SQL Server Management Studio.
Attaching
INS database
· Go to databases folder, right-click and select 'Attach' menu item.
· Browse for the FILE by pressing "Add".
· Select the folder where the INS.MDF file is located.
· Select the file "INS.MDF".
· Press 'OK'.
· The INS database will appear in the Object Explorer of the SQL Server Management Studio.
Schema
Descriptions of the Sample Databases
Before proceeding further, take a look at the schema/tables in the sample data sources.
Open the SQL Server Management Studio and connect to the machine where the data source is located (Local). Then, go to the database and their related tables for INS, FBI, or POLICE. For example, to go to the PERSON table of the FBI database using Object Explorer, traverse Databases->FBI->Tables. Right-click on the table in right pane and select 'Modify' or 'Design' to see the table design.
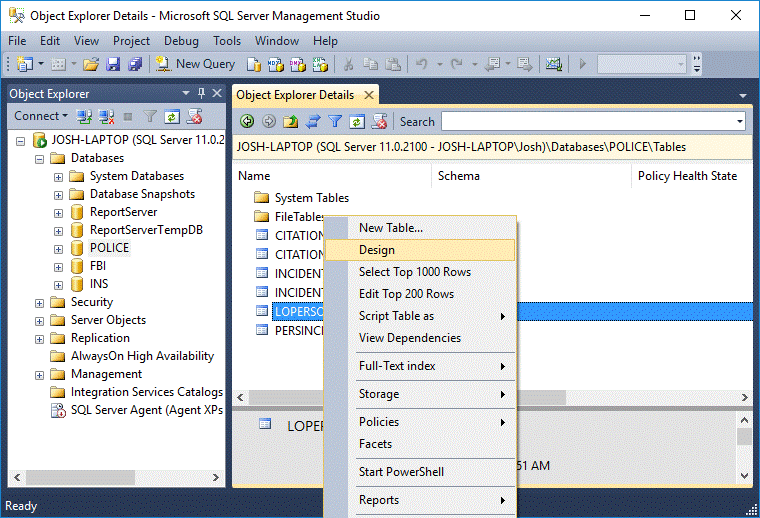
Now you should see the table design. You can see only one table description in one window.
POLICE
Database
The POLICE data source has three user tables: LOPERSON, PERSINCIDENT, and INCIDENT. These tables are related by PERSON_ID and INCIDENT_ID fields, which are the primary keys for LOPERSON and INCIDENT tables respectively. PERSON_ID and INCIDENT_ID are the foreign key fields in PERSINCIDENT table and they refer to the primary keys in LOPERSON and INCIDENT tables respectively.
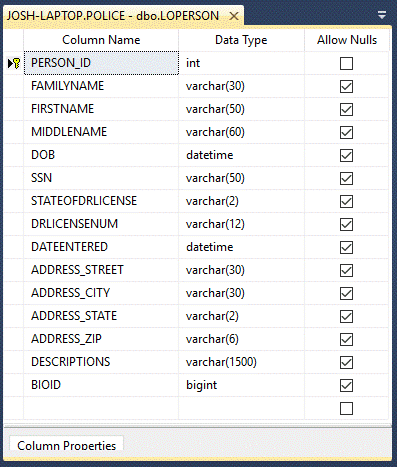
LOPERSON Table
The LOPERSON table contains information about persons such as person identification number (PERSON_ID), first name, family name, date of birth, address street, address state, address city, etc. PERSON_ID is the primary key and is a non-nullable column.
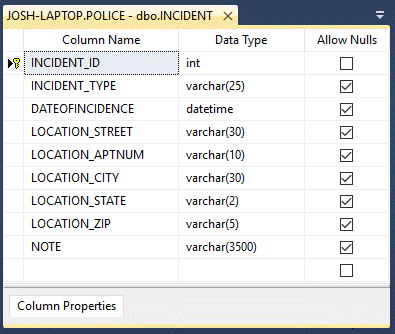
INCIDENT Table
The INCIDENT table contains information about police incidents. Each incident is distinguished by an incident id (INCIDENT_ID column). Other information stored in the table includes incident type, date of incident, location of the incident, and the description of the incident (NOTE column).
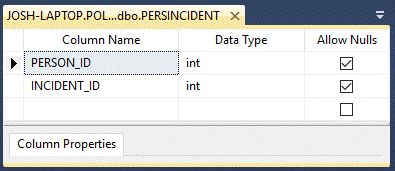
PERSINCIDENT Table
The PERSINCIDENT table associates the PERSON and INCIDENT tables through PERSON_ID and INCIDENT_ID values.
FBI Database
The FBI database contains 8 user tables: PERSON, DESCRIPTION, ADDRESS, ORGANIZATION, VEHICLE, ORGANIZATION_LINK, VEHICLE_LINK, and PERSONALIAS. PER_ID in PERSON table is the primary key and it acts as a foreign key for 5 other tables.
PERSON Table
The PERSON table contains information about persons, such as person identification number (PER_ID), first name, family name, date of birth, passport number of the person, and nationality of the person (per_citizenof).

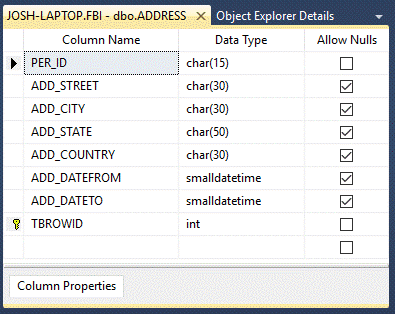
ADDRESS Table
The ADDRESS table contains information about addresses of persons, such as city name, street name, state name, country name, and dates at this address.
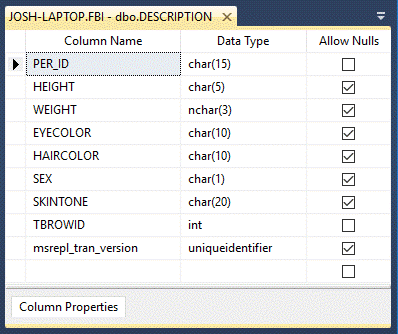
DESCRIPTION Table
The DESCRIPTION table has information describing persons with attributes, such as eye color, hair color, weight, height, and skin color.
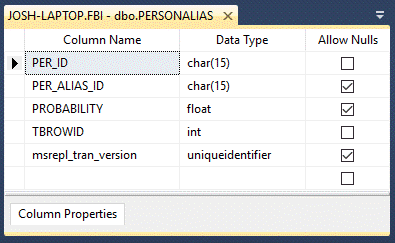
PERSONALIAS Table
The PERSONALIAS table links persons in the PERSON table with their alias names in the same table through PER_ID primary key. It also gives a probability that a person is the same as an alias.
VEHICLE Table
The VEHICLE table contains information about vehicles, such as vehicle id, vehicle license number, and vehicle license state.
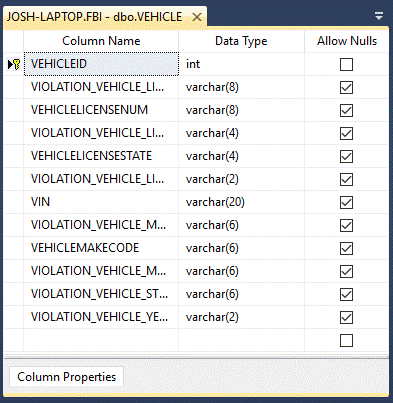
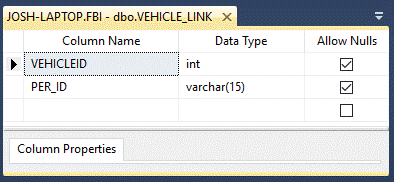
VEHICLE_LINK Table
The VEHICLE_LINK table associates persons with their vehicles through the PER_ID and VEHICLEID columns.
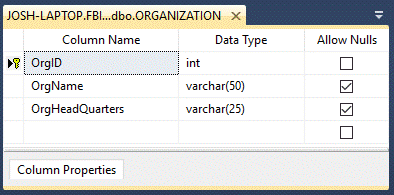
ORGANIZATION Table
The ORGANIZATION table contains information about organizations, such as id and name.
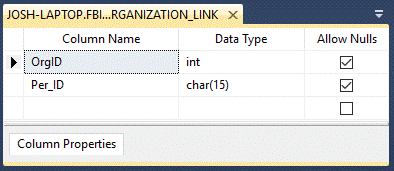
ORGANIZATION_LINK Table
The ORGANIZATION_LINK table associates organizations with persons through the OrgID and PER_ID columns.
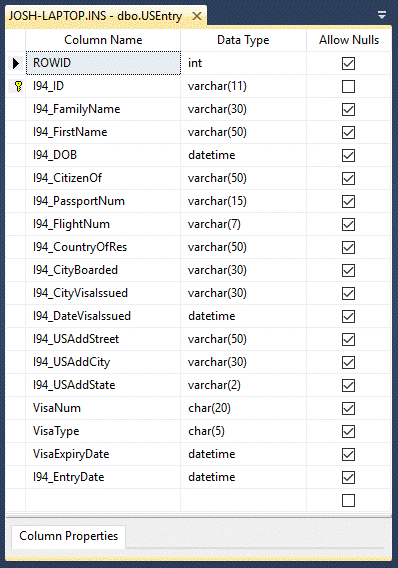
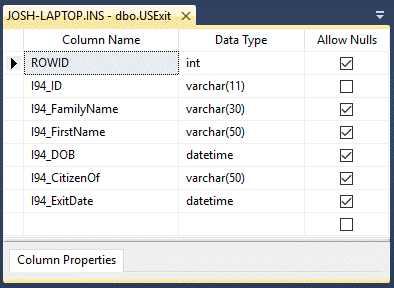
INS
Database
The INS database contains 2 tables: USEXIT and USENTRY. I94_ID column is the primary key in both the columns and it relates the two tables.
USENTRY Table
The USENTRY table contains information about the person who
enters the country, such as I94_ID, name, date of birth, passport number, date
visa issued,
USEXIT Table
The USEXIT table contains information about the person who leaves the country, such as I94_ID, name, date of birth, nationality, and exit date.
Creating ODBC Data Source
Names (DSN) for the Sample Data Sources
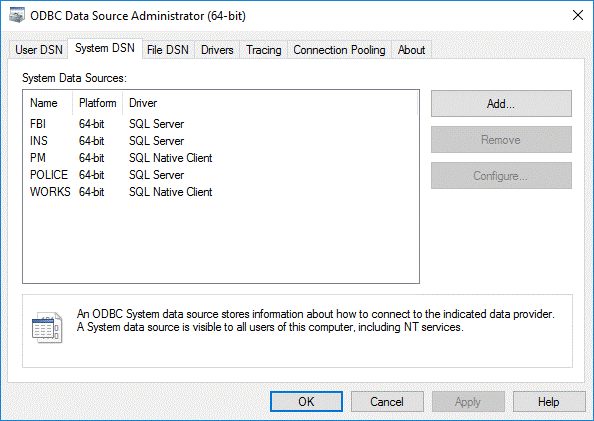
Before SDF can access the sample databases, you need to create ODBC DSNs for the sample databases attached to your SQL Server. Follow the steps provided below to create three DSNs; one for each database.
· Select 'Administrative Tools' from Windows Start->Control Panel menu.
· Open 'Administrative Tools', and then Data Sources (ODBC).
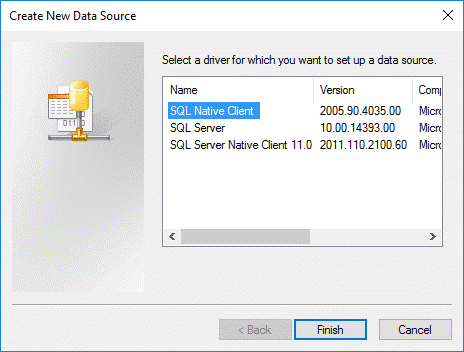
· In the System DSN tab or the User DSN tab, click 'ADD' to create a new data source.
· Create New Data Source window pops-up.
· If you are using SQL Server 2000, select 'SQL Server' as the ODBC driver. For SQL Server 2005, select 'SQL Native Client'. For SQL Server 2008, select 'SQL Server Native Client 10.0'.
· Click 'Finish'.
· The "Create a New Data Source for SQL Server" window will open. Enter the appropriate information for the data source:
For FBI
Database
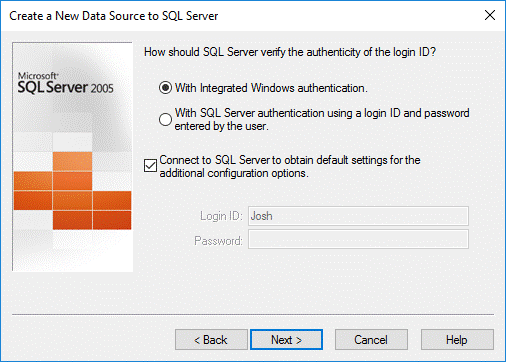
· Enter 'FBI' for the Name; the Description field is optional. Select the server. If it is a local system, select '(local)' and click 'Next'.
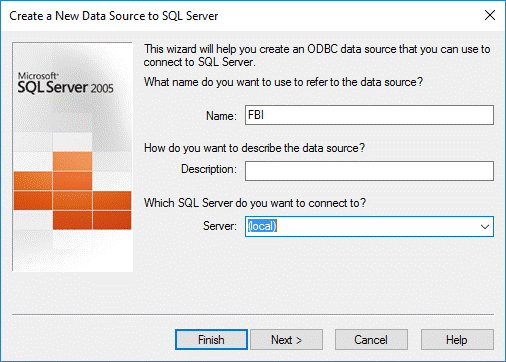
· Select a method of authentication for SQL Server and click 'Next'.
· Select "Change the default database to".
· Change the default database from 'master' to 'FBI' and click 'Next'.
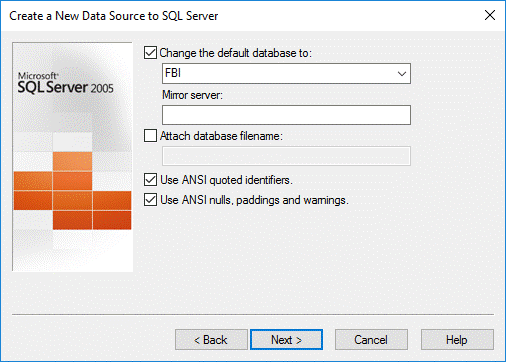
· Don't select or deselect anything in the next window. Click 'Finish'.
For
POLICE Database
Creating a DSN for the POLICE database is similar to creating the FBI database.
Once the "Create New Data Source to SQL Server" window pops-up, follow these steps:
· Enter 'POLICE' for the Name; the Description field is optional.
· Select the server. If it is a local system, select '(local)' and click 'Next'.
· Select a method of authentication for SQL Server and click 'Next'.
· Select "Change the default database to" and select 'POLICE'.
· Click 'Next'.
·
Don't
select or deselect anything in next window. Click 'Finish'.
For INS Database
Similarly, for the INS database, once the "Create New Data Source to SQL Server" window pops-up follow these steps:
· Enter 'INS' for the Name; the Description field is optional. Select the server.
· If it is local a system, select '(local)'. Click 'Next'.
· Select a method of authentication for SQL Server and click 'Next'.
· Select "Change the default database to" and select 'INS'.
· Click 'Next'.
· Don't select or deselect anything in next window. Click 'Finish'.
Now you should see the DSNs you created in the System DSN tab (or User DSN tab) of the ODBC Data Source Administrator.
· Click 'OK'.