EIQ
Server RTI Tool Features. 2
Launching
RTI Sessions. 2
Data
Profiling. 10
Profiling
Mode. 11
Adding
Columns for Profiling. 12
Building
Profile Data. 12
Profile
Build Options. 13
Analyze
Profile Data. 15
Cleansing
Data. 19
Changing
Column Data Types. 19
Column
Transformations. 20
Previewing
Transformed Data. 23
Defining
and Applying User Transforms. 25
Changing
to RTI Mode for Building EIQ Indexes. 29
Building
EIQ Indexes. 33
Designating
ROWID Columns. 35
Designating
Key Type for Columns. 36
Designating
PRIMARY KEY and FOREIGN KEY Columns. 38
Designating
Text Search Fields. 40
Building
the Index. 41
Advanced
Features. 43
Indexed
Views. 43
Creating
Indexed Views in EIQ Indexes. 43
RTI
Apply Changes. 46
RTI
Index Refresh. 47
RTI
Server Build. 47
RTI
Test Build. 48
Text
Search Groups. 49
Entity
Extraction from Text Columns. 54
Appendix
A: Column Data Type Mappings. 54
Modifying
Data Type Map. 55
Modifying
Global Data Type Map. 55
Modifying
Table Data Type Map. 55
Modifying
Column Data Type Map. 55
Appendix
B: Available Column Data Type Mappings. 55
For
DECIMAL data type. 55
For
NUMERIC data type. 56
For
SMALLINT data type. 56
For
BIGINT data type. 56
For
INT data type. 56
For
REAL data type. 56
For
FLOAT/DOUBLE data type. 56
For
DATE data type. 56
For
DATETIME data type. 56
For
BYTE data type. 56
For
CLOB data type. 57
For
CHAR data type. 57
For VARCHAR
data type. 57
Appendix
C: Available Transformations. 57
For
DECIMAL data type. 57
For
NUMERIC data type. 57
For
SMALLINT data type. 57
For
BIGINT data type. 57
For
INT data type. 57
For
REAL data type. 57
For
FLOAT/DOUBLE data type. 57
For
CHAR data type. 58
For
VARCHAR data type. 58
Appendix
D: RTI Reserved Words. 58
Appendix
E: ROWID Column Data Types. 60
The EIQ Server RTI Tool is used to build EIQ Indexes for
data sources. The tool connects to data sources; reads and transforms data; and
builds clean, standardized indexes for use by EIQ Product servers. The data
sources can be relational data sources, such as SQL Server, Oracle, and DB2, or
document files of various types including text, html, XML, Word, and Excel
formatted files.
The RTI tool includes the following functions:
- Data
Profiling
- Data
standardization and cleansing
- Data-type
mapping for columns
- Predefined
and user defined data transforms
- SDK
for building user transforms in C/C++ and Perl
- Building
EIQ Indexes
- Building
text search indexes
- Building
Indexed Views on data source base tables
- Defining
relationships between tables (primary key - foreign key) for automatic
query processing
- Saving
the session workspace in map files for Profile and Index modes
EIQ Server RTI Tool has two modes: Profile and RTI mode. In
Profile mode, users can build profile indexes on data sources in order to
analyze the data and test and apply transforms. Users can switch from Profile
to RTI mode once they are ready to start building the full EIQ Indexes for the
data source.
Note: Profile
indexes should not be used for configuring EIQ Product Servers because
they have limited indexing structures. Only EIQ Indexes built in RTI mode are
valid for EIQ Product configuration.
The RTI tool can build EIQ Indexes for the following data
source types:
· Any data
source that provides an ODBC or JDBC interface to clients (SQL Server, Oracle,
DB2, etc.).
· Various
document files (text, html, XML, Word, Excel, etc.)
· RSS Feeds
Accessing JDBC
data sources requires WhamTech's Java Gateway server.
EIQ Server RTI Tool presents a wizard-like interface that
guides users through several of the initial steps for opening a work session
to profile a data source or build EIQ Indexes. Users are asked to
select the data source type, enter information required for data source
connection, provide the name and path for the EIQ Index, and etc.. Once
connected to the data source and the data source metadata is loaded, depending
on the data source type, users enter Profile or Index mode. Here, they can
select the data source elements (tables and columns or documents) for profiling
or building EIQ Indexes.
Once a session is loaded, users can save the session
information to the hard drive as map files. They can open saved
map files later to continue their work or to make any changes. The map files
save work session details, such as the data source connection information;
selected schemas, tables, and columns (or document files); index properties;
data transforms; and primary key-foreign key relationships. There are two types
of map files: Profiling mode uses the extension '.rtip.xml' and
Indexing mode uses the extension '.rti.xml'.
To start building data source profiles or indexes, start
the EIQ Server RTI Tool from the Start Menu. Select 'Create a new EIQ
Index RTI map' from the startup dialog.
Figure 1: RTI startup dialog.
Click 'OK' to configure the data source and EIQ Index
information.
Figure 2: Configure the data source and
enter adapter information.
Select the 'Data Source Connection String' option. This will
enable the DSN, UID and PWD edit fields, and the 'Build' button.
Select 'Build' and select the 'Machine Data Source'
tab or enter an ODBC DSN. Then, enter a UID and PWD if required.
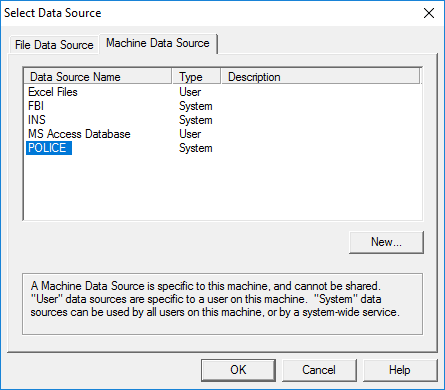
Figure 3: Select the data source.
Click 'OK' and log in to the database server if required. If
you typed the name of the DSN and did not provide the credentials, a login
dialog will appear for you to do so now.
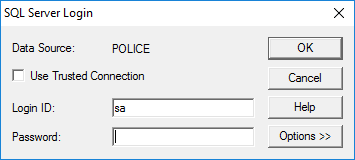
Figure 4: Enter the password for the data source.
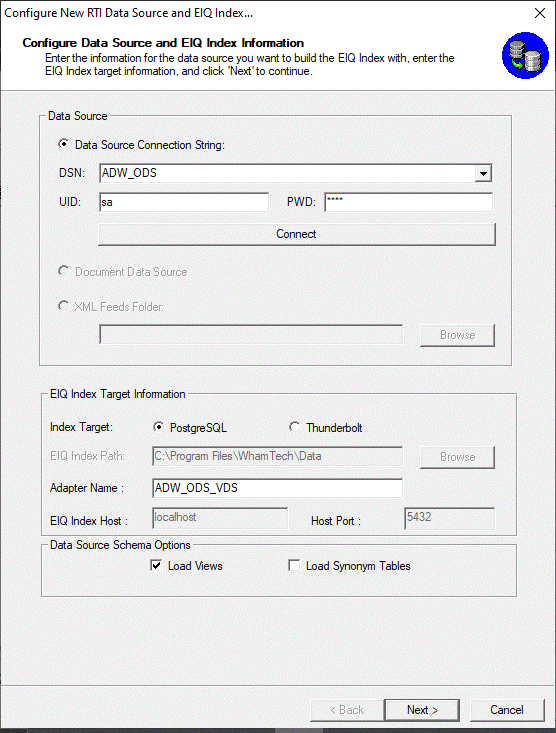
Figure 4: Fully configured EIQ Adapter index
properties.
Users may find it necessary to change the data type of a
data source column while indexing it in an EIQ Index. For example, a data
source column of the 'CHAR' type may contain only integer values. In order to
improve the query flexibility, users may want to build indexes in the 'INT'
type.
The global data type map dialog allows you to globally
change the mapping of a data type.

Figure 6: Configure the global data type map.
You can leave the defaults during this step and click
'Finish' to proceed. A progress dialog is displayed while the database schema
loads. You can still change the default data type mappings at any time after
this point. See section 'Data Type Conversion'
for details.

Figure 7: Schema loading is complete.
After the database schema loads, click 'OK'.
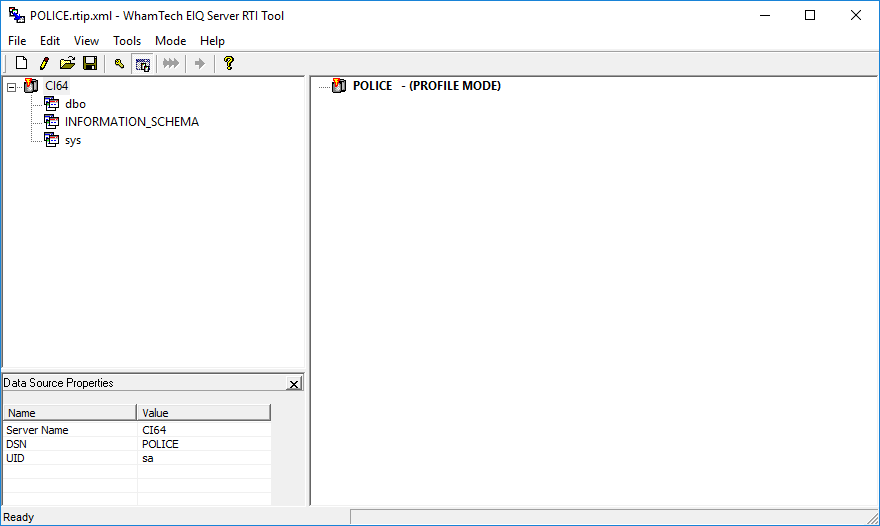
Figure 8: New RTI sessions start in 'Profiling' mode.
All new sessions for relational data sources start in
Profiling mode. The RTI tool shows the data source metadata information in a
tree structure on the left side pane (the data source pane). The right pane
(Index pane) will be empty at this point. The RTI tool holds an internal map
(Profile map or RTI map) of all the information entered by the user during
this session along with data source metadata. Users can start saving the map at
any time by clicking 'Save' or 'Save As' in the 'File' menu.
|
Note: The current mode is displayed
in the status bar at the bottom-right of the window. Depending on the size of
the window, this may be obscured.
|
Expand the data source tree to see the table and column
information. Then, select the columns from the left pane and add them to the
map on the right side for building indexes. The RTI tool builds indexes for the
columns shown in the right pane.
To add a column to the map, double-click on that column. To
add all the columns in a table, right-click on the table and select 'Add All'.
To remove unwanted columns from the index map, right-click on the unwanted
column and select 'Remove'. A whole table can be removed by right clicking on a
table and selecting 'Remove'.
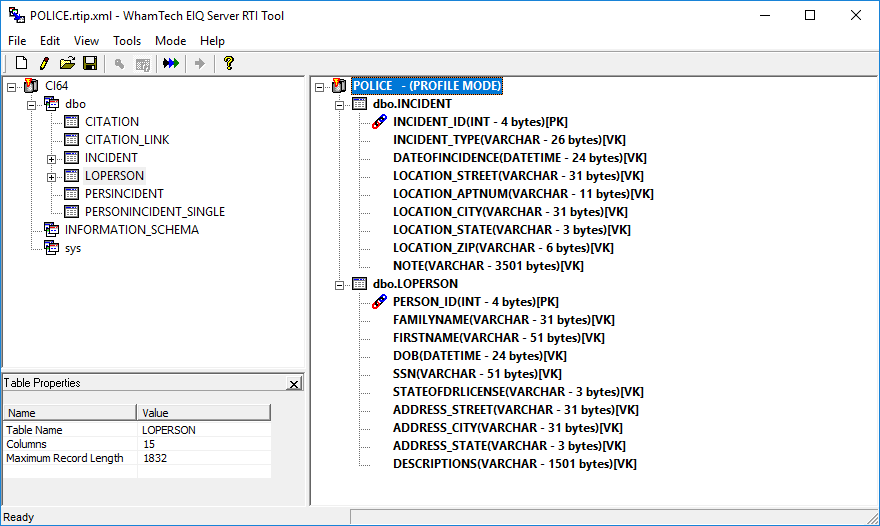
Figure 9: Tables and columns added to the index map.
Save the map. In this case, it's a Profile map
('.rtip.xml'). You can now profile the selected data source columns or build
an EIQ Index by skipping data profiling.
The RTI Tool's data profiling feature allows users to
profile selected data in data sources and develop transforms for cleansing and
standardizing EIQ Indexes. Profiling mode is only available for relational data
sources.
Here, users can build profiles on the selected columns and
analyze the data. The RTI tool provides a quick snapshot analysis of selected
columns including unique values, frequency distribution, top and bottom
frequency values, and minimum and maximum values for an understanding of
the data as it exists in the data source. Users can further analyze the data
using Microsoft Excel files generated by the profiling feature.
Many data sources contain issues such as unclean data,
missing data, insufficient indexes, non-standardized values, and incompatible
formats. Using the results of the analysis, users can identify any data issues
at the data source. Users can then apply appropriate data type mappings and
transforms and test them using the preview feature. In addition, they can also
define additional indexes (rich text search indexes on text columns, indexed
views with pre-aggregated and pre-joined data) as needed for building clean,
standardized, and richer EIQ Indexes.
|
Note: The indexes built while in
'Profiling' mode are useful only for profiling purposes. You must change from
'Profiling' mode to 'RTI' mode and build EIQ Indexes useful to EIQ Product
servers.
|
Note: The current EIQ Product Suite build does not
support profiling mode. This mode will be re-enabled in a future update but it
may still be worthwhile to read from an informational perspective.
When a new session for relational data sources is loaded,
the default mode is 'Profiling'.
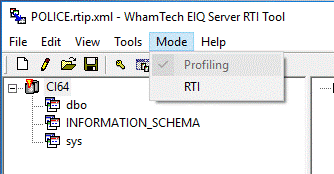
Figure 10: Data Profiling mode.
You will notice the map file extension is '.rtip ' to indicate this file contains information for
Profiling mode. The 'Mode' menu shows that 'Profiling" is selected. The
status line in the lower-right pane displays 'Profiling' to indicate the
current mode.
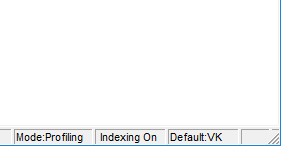
Figure 11: Status line. Depending on the size of the
window, the status line may not appear. If you do not see the status line, make
your window bigger.
Select the tables and columns you want to profile and add
them to the right pane.
|
Note: If you do not want to perform
data profiling and want to build EIQ Indexes directly, you must change the
mode to 'RTI' (Indexing mode) from the Mode menu before continuing. Any of
the columns already selected in profiling mode will be automatically selected
in RTI mode.
|
Select the
columns from the left pane and add them to the map on the right side to build
indexes. The RTI tool builds indexes for the columns in the right pane.
To add a column
to the map, double-click on that column. To add all the columns in a table,
right-click on the table and select 'Add All'. To remove unwanted columns from
the index map, right-click on the unwanted column and select 'Remove'. A whole
table can be removed by right-clicking on a table and selecting 'Remove'.
Note that while
in Profiling mode character data type columns of 256 or greater length cannot
be added to the index map. The 'Add All' command at the table level would
not add any such columns to the map. Any such columns need to be added after
switching to RTI mode for building indexes.
The next step is to build profiling indexes and files. These
contain profile data for all the columns selected in the profile map.
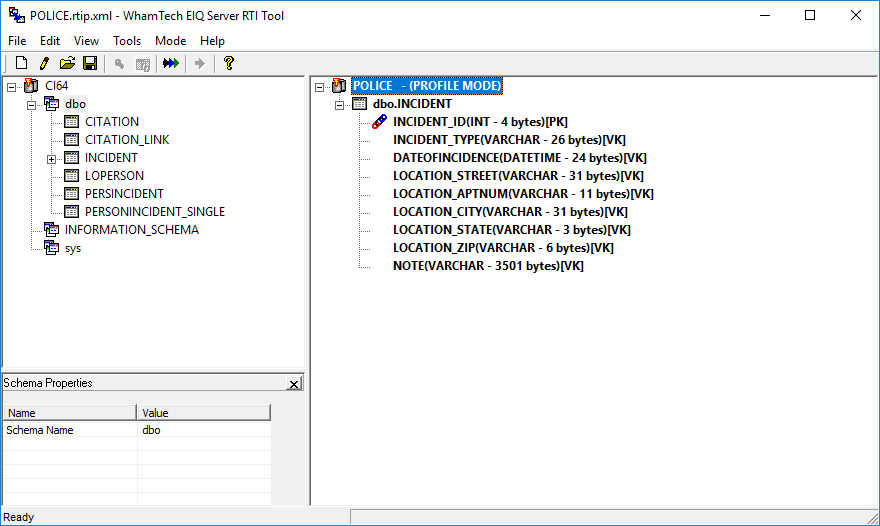
Figure 12: Create data profile indexes.
Click 'Build Profile' on the toolbar and select 'Full
Build'.
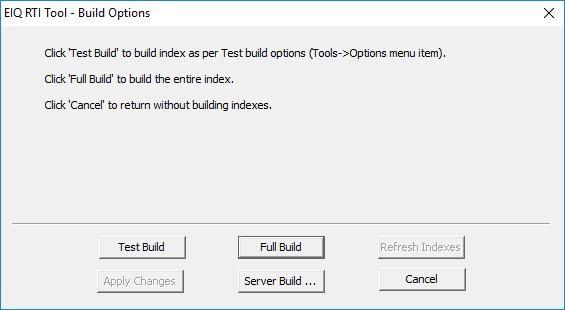
Figure 13: Building the data profile.
The build process generates profile indexes and files which
are written to a predefined folder as follows.
INSTALL_FOLDER\WhamTech\Profiling\INDEXPATH_INDEXNAME
INSTALL_FOLDER is the base folder where the EIQ Server Suite
is installed. INDEXPATH is the subfolder name where the indexes are stored and
INDEXNAME is the name of the index used.
A separate data profile file is generated for each column
with a file extension of '.CSV'. From the example shown above, the profiling
file path is as follows:
INSTALL_FOLDER\WhamTech\Profiling\Data\POLICE
The
'Options' item in the 'Tools' menu allows you to change certain aspects of
data profiling. Select 'Options' from the 'Tools' menu.
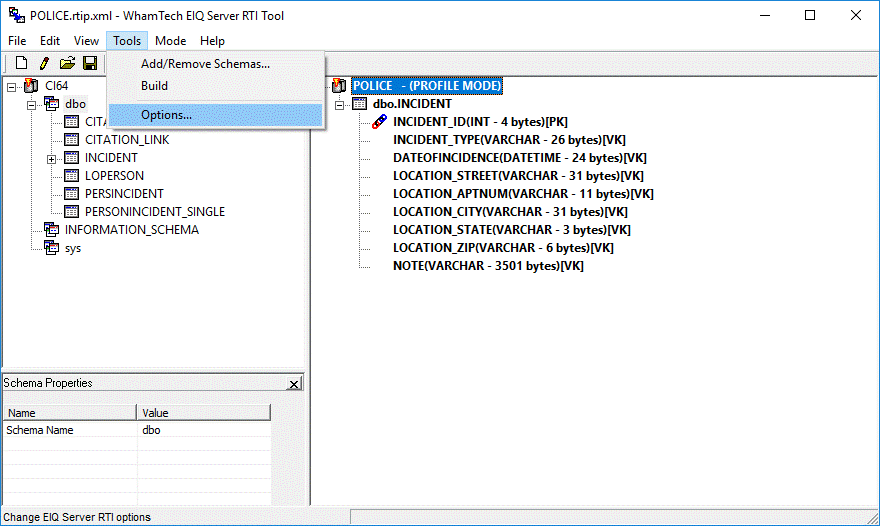
Figure 14:
Data Profiling Options menu.
The
'Options' properties sheet is displayed. Select the 'Data Profiling' tab.
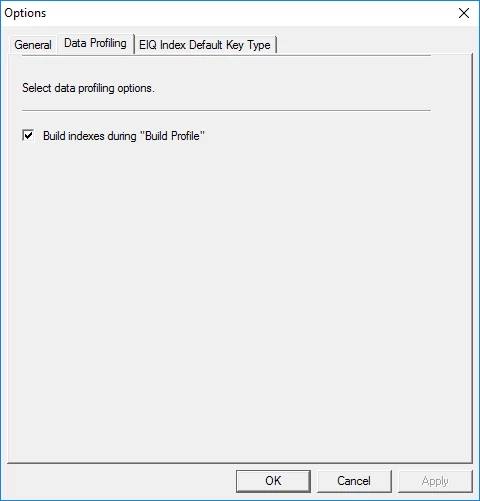
Figure 15:
Data Profiling Options.
The option
'Build indexes during "Build Profile"' is always set when creating a
new session or loading a session from a file. This value does not persist
across sessions. When this option is selected, 'Tools->Build' builds both
the data profiling indexes and data profiling files (the '.CSV' files
corresponding to each profiling index column used for analysis using Microsoft
Excel; see below for more details).
If you have
lost the profiling files, but you know the profile indexes are
up-to-date and you only need to regenerate the associated data profiling
files without rebuilding the indexes, you can un-select this option. This saves
time while building the index.
The analyze feature allows users to view the original data
before any transforms. Users can analyze in two ways: using the 'Analyze Data'
feature within the RTI tool and using Microsoft Excel.
Indexes must be built in order to analyze data.
To analyze data using the RTI tool, select and right-click
on the column you want to preview. Select 'Analyze Data' from the context menu.
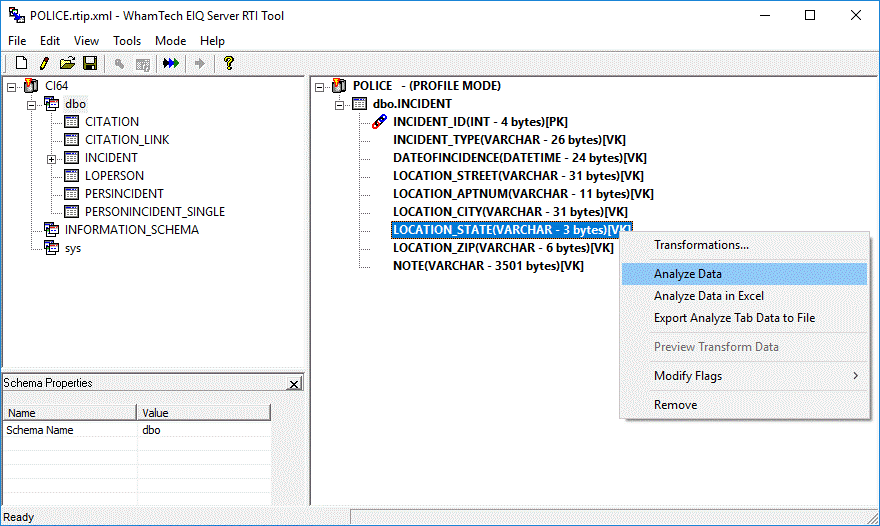
Figure 16: Previewing data.
A dialog opens below the index pane that displays profile
information for the column.
Figure 17: Previewing profiling data for a column.
This is a preview of the data as it exists in the data
source before applying any transforms.
To view and analyze profile data in Excel files, select the
column you want to analyze from the index pane. Right-click and select 'Analyze
Data using Excel' from the context menu.
Figure 18: Analyzing data profiling files.
The profile data files have the following name format: SCHEMANAME_TABLENAME_COLUMNNAME.csv
Microsoft Excel opens to display the corresponding CSV file.
Figure 19: Viewing a data profile file in Excel.
Note: The current EIQ Product Suite build does not
support profiling mode. This mode will be re-enabled in a future update but it
may still be worthwhile to read from an informational perspective. Some of the
following figures may display a functionality available in the supported RTI
mode of the EIQ RTI Tool.
One of the main benefits of using EIQ Indexes for query
processing is the ability to build clean indexes without changing the data
source. If any data in the data source required cleansing or standardization,
you can apply transforms to build clean, standardized, and more useful indexes.
For the purposes of standardization and cleansing, the RTI
tool provides column data type mappings and both predefined and user defined
transforms. Developers can also create additional user defined transforms using
C/C++ and Perl scripts.
Users may find it necessary to change the data type of a
data source column while indexing it in an EIQ Index. The 'Column Data Type
Mappings' tab in the 'Transformations' dialog allows users to
accomplish this.
To map a different data type for a column, right-click on
the column in the index map (right pane) and select 'Transformations.' from the
context menu. For mode details, See Data Type Conversion.
To apply data transforms to a column, right-click on the
column and select 'Transformations…' from the context menu.

Figure 20: Selecting transformations property sheet.
The 'Transformations' property sheet is displayed as
follows:

Figure 21: Transformations property sheet.
Select the 'Transformations' tab. It allows users to select
the transform(s) for this column. On the right side of the tab it shows all the
available transforms for this column under 'Default Transforms' and 'User
Defined' lists. It displays only those transformations that are relevant to the
selected column's data type.
The 'Transformations' tab provides features to select
one or more transforms. Selected transforms are applied in the order they
appear in the list on the left-side of the tab. Some transforms may
require additional parameters and users can enter the information by clicking
'Edit'.
Figure 22: Transformations tab.
|
Note: The transformations applied to
columns can result in unique values being transformed into non-unique values.
Therefore, a column designated as a ROWID column may result in duplicate
values.
For
example a transformation that removes numbers from the column values could
transform previously unique values to duplicates, e.g. if we have Test1 and
Test2 before a transformation; we get Test and Test after
a transformation. Also, using the 'RemoveCharacters(-())'
transform, values like '-b' and 'b-' will be transformed to 'b' and 'b'.
Therefore, the user should be careful while applying transformations.
|
Figure 23: The status bar updates to display the
transform for the selected column.
|
Note: After a transform is added, you
must rebuild the profile for the changes to be applied. This is not required
for edit changes.
|
Note: The current EIQ Product Suite build does not
support profiling mode. This mode will be re-enabled in a future update but it
may still be worthwhile to read from an informational perspective.
The preview feature is useful for testing transforms and
verifying the results.
To view the profile data after a transform is applied,
right-click the column and select 'Preview Transform Data' from the context
menu..
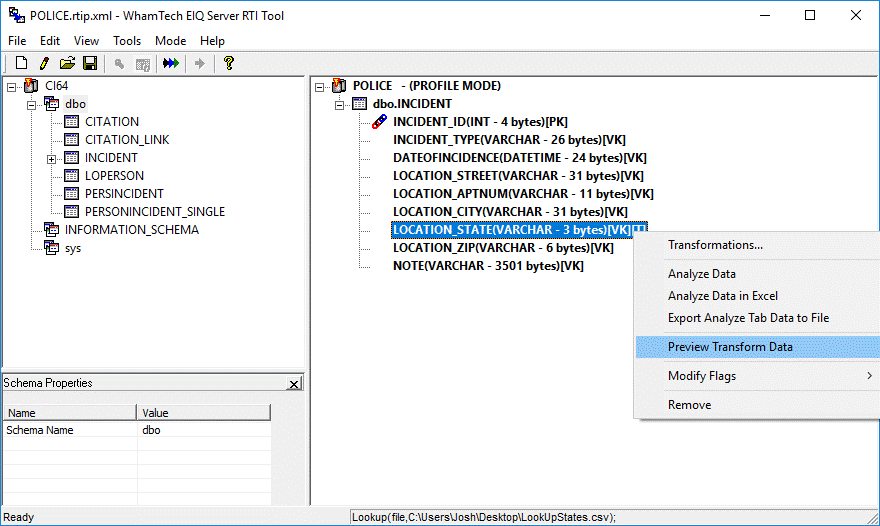
Figure 24: 'Preview Transform Data' context menu.
This gives a preview of how the data looks after the
transform has been applied. The dialog below the index pane shows the transformed
data.
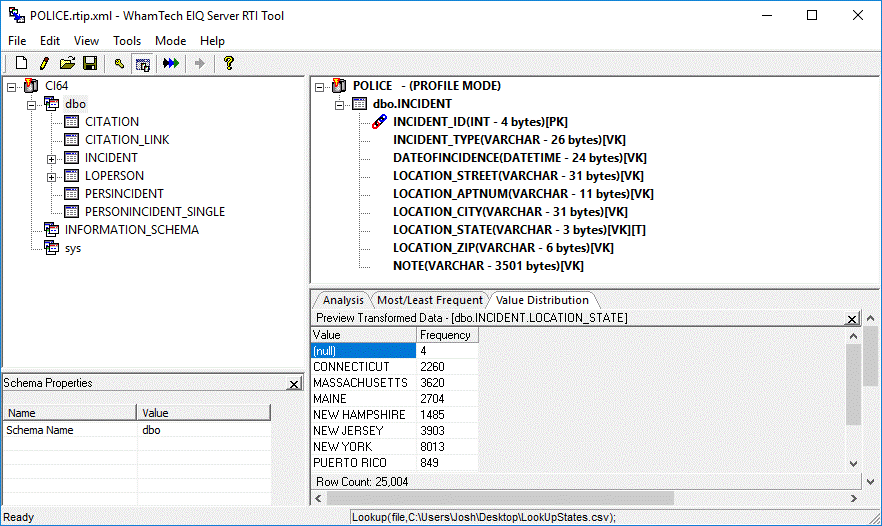
Figure 25: Previewing transformed data.
Defining and Applying User Transforms
Note: The current EIQ Product Suite build does not
support profiling mode. This mode will be re-enabled in a future update but it
may still be worthwhile to read from an informational perspective. Some of the
following figures may display a functionality available in the supported RTI
mode of the EIQ RTI Tool.
Users can create additional transforms using Perl scripts
and C/C++.
To use transforms written in perl,
make sure the script file with subroutines (named as 'perl_transforms.pl')
and the library file 'perl510.dll' are present in the '.\WhamTech\bin'
folder on your local machine. A sample perl script
file 'perl_transforms.pl' should be present in your local installation 'bin'
folder already.
Open RTI tool and connect to the POLICE database (one of the
sample data sources on the EIQ Server Suite Installation CD). In profiling
mode, right-click on the column where the transform should be
applied, for instance, the FamilyName column of the
LOPERSON table. Select 'Transformations' from the context menu.
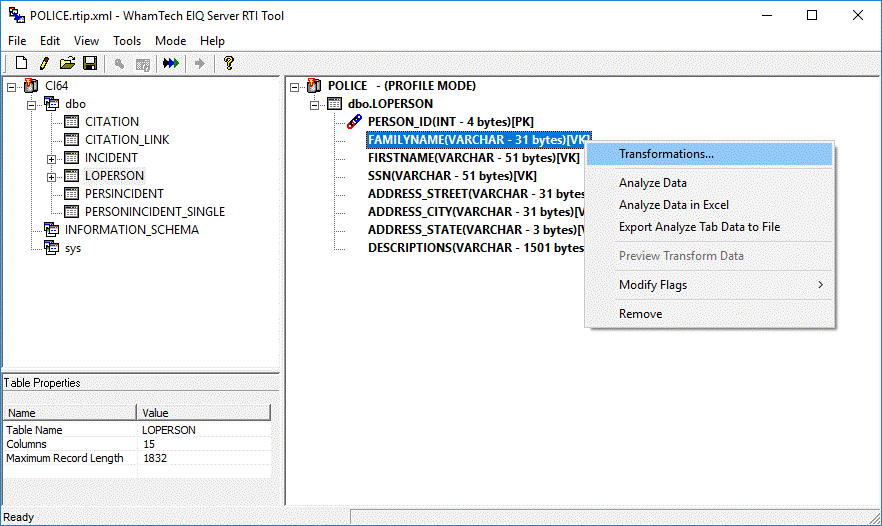
Figure 26: Opening the 'Transformations'
Property sheet for the FamilyName column.
The 'Transformations'
property sheet is displayed as follows:
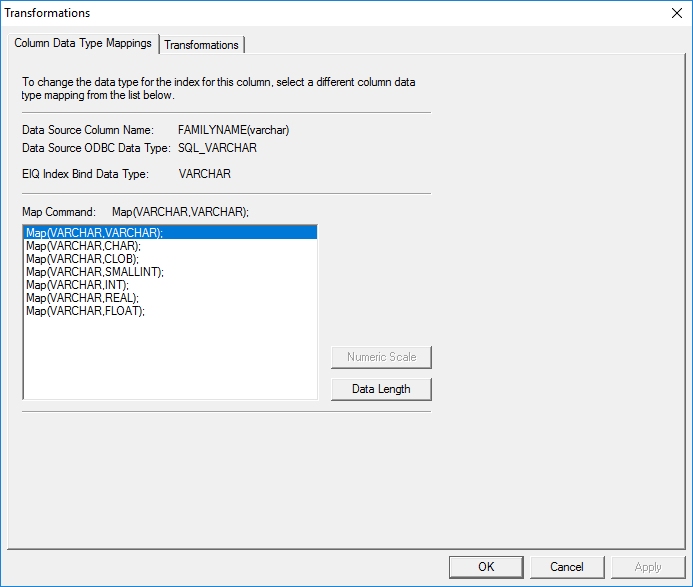
Figure 27: Transformations Property Sheet.
Select the 'Transformations' tab:
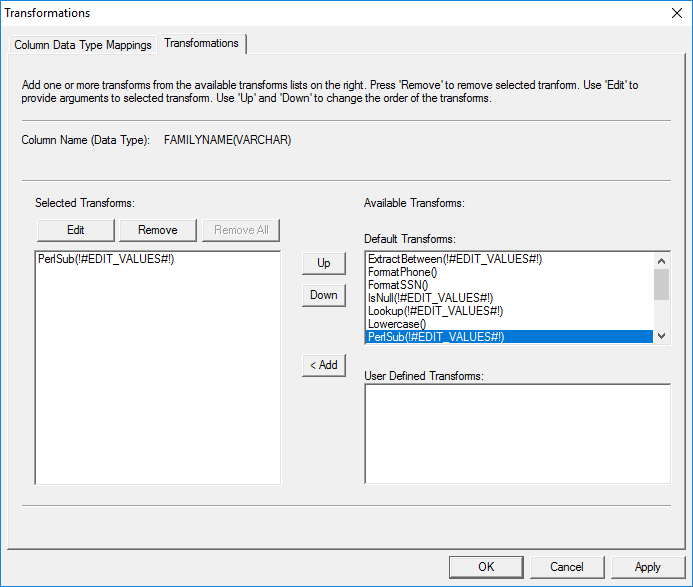
Figure 28: 'Transformations' Tab.
Click the Perlsub() transform
from the 'Default Transforms' list and add it to the left pane.
Select the PerlSub()
transform in the 'Selected Transforms' list on the left side and
click 'Edit' to specify the 'Perlsub' transform
properties. Enter the name of the subroutine from the ‘perl_transforms.pl’
file, for example, 'testsub'. This will apply the
transform(s) written in the testsub subroutine to the
selected column data. Click ‘OK’ to exit the Transformations Property Sheet.
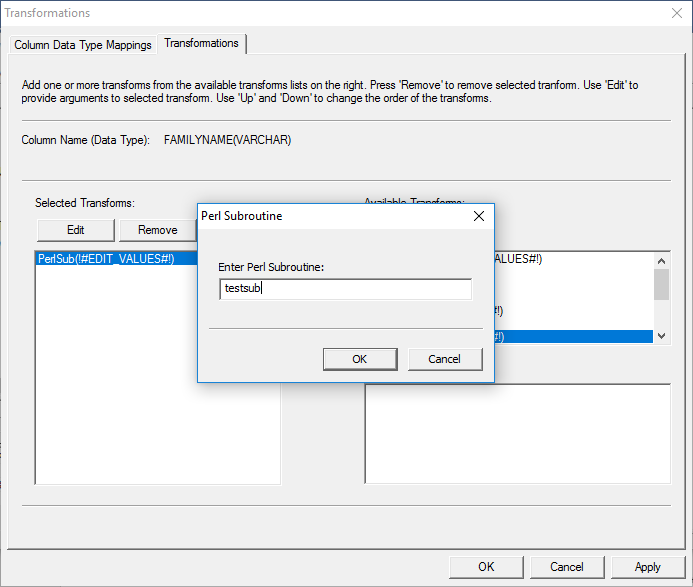
Figure 29: Entering the name of the Perl
subroutine.
Before building EIQ Indexes, in Profiling mode users can
analyze the data as it exists in the data source, build and test transforms,
and apply transforms and column data type mappings for cleansing and
standardizing data.
To build EIQ Indexes users must change from Profiling to RTI
mode.
Select RTI from the 'Mode' menu.
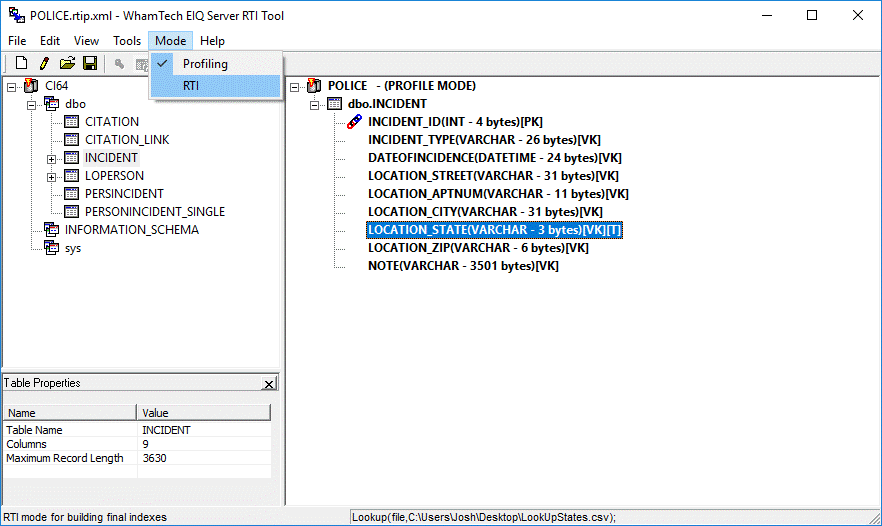
Figure 30: Changing to RTI mode.
If the current Profiling mode session has not been saved,
the following message box is displayed.
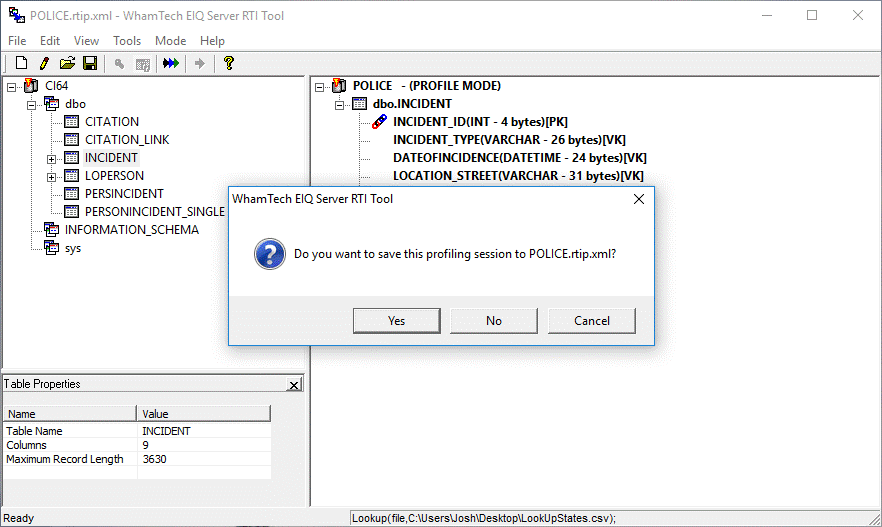
Figure 31: Save current profiling session file
message box.
To save the current profiling session click 'Yes'. To skip
saving the file and continue, click 'No'. To remain in profiling mode press
'Cancel'. It is recommended to save the profiling session. Once in RTI mode you
cannot change back to 'Profiling' mode. You can however reload the profiling '.rtip' file.
Clicking 'Yes' will display the 'Save As' dialog if this is
a new session and not loaded from a saved file.
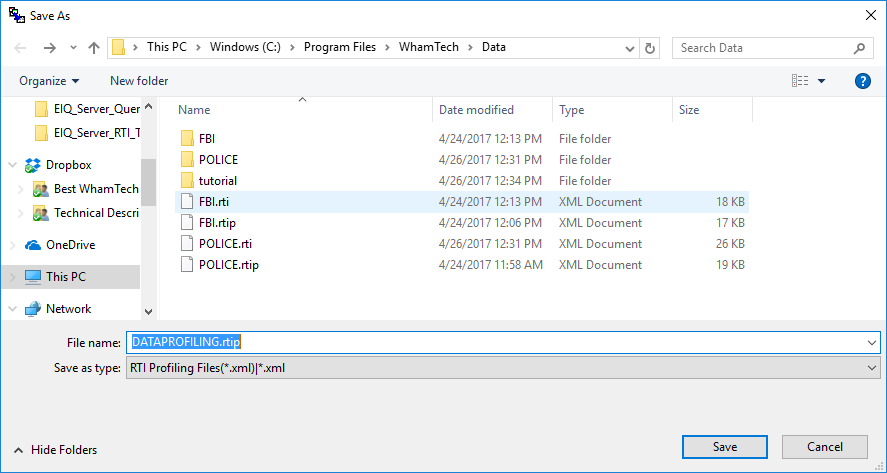
Figure 32: The 'Save As' dialog.
Click 'Save' to save the file in the current folder with the
default name. The status bar now displays the mode as RTI and the file
extension is now .rti, as shown below. You can now
continue to modify the index map for building the EIQ index.
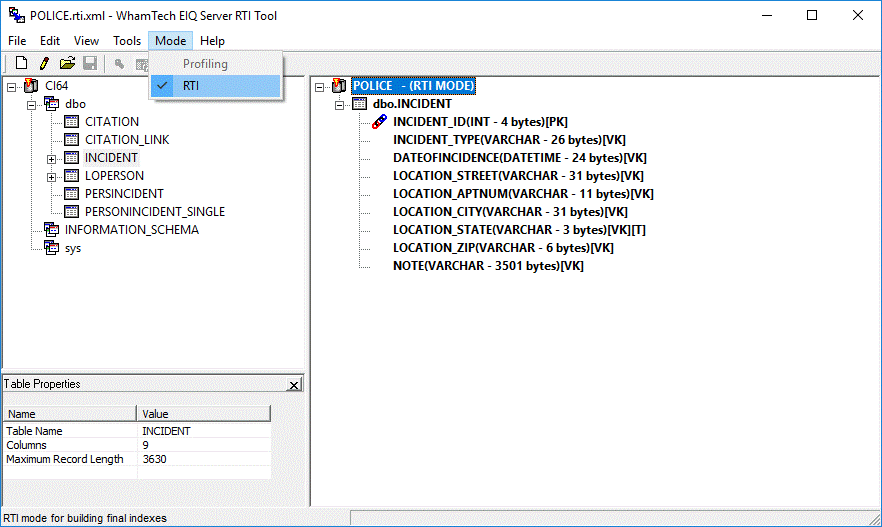
Figure 33: Once the mode is changed to RTI, Profiling
mode is disabled.
|
Note: To work in 'Profiling' mode
after changing to RTI mode, you must load a saved .rtip
file.
|
You can now setup a complete index map and build an EIQ
Index for use with the EIQ Server Suite.
EIQ Indexes are built in RTI mode. Unlike profile indexes,
EIQ Indexes are used by EIQ Product servers to execute queries for data sources
To build an EIQ Index for a relational data source,
first create a relational data source session.
When a new session is created, the initial mode is
profiling. To learn more about profiling, see 'Data
Profiling'. To build an EIQ Index, switch from 'Profiling' to 'RTI' mode.
Now expand the data source tree in the left pane and add
items to the index map in the right pane by selecting tables/columns. Indexes
are built for the tables/columns added to the right pane (index pane).
To add a column to the index map, double-click on that
column. To add all the columns in a table, right-click on the table and select
'Add All'. To remove unwanted columns from the map, right-click on the unwanted
column and select 'Remove'. A whole table can be removed by right clicking on a
table and selecting 'Remove'.
Note that if the 'Add All' command was used in Profile
mode to add all the columns in a table, it would leave out any character type
columns of 256 or greater length. Add those columns to the map as desired.
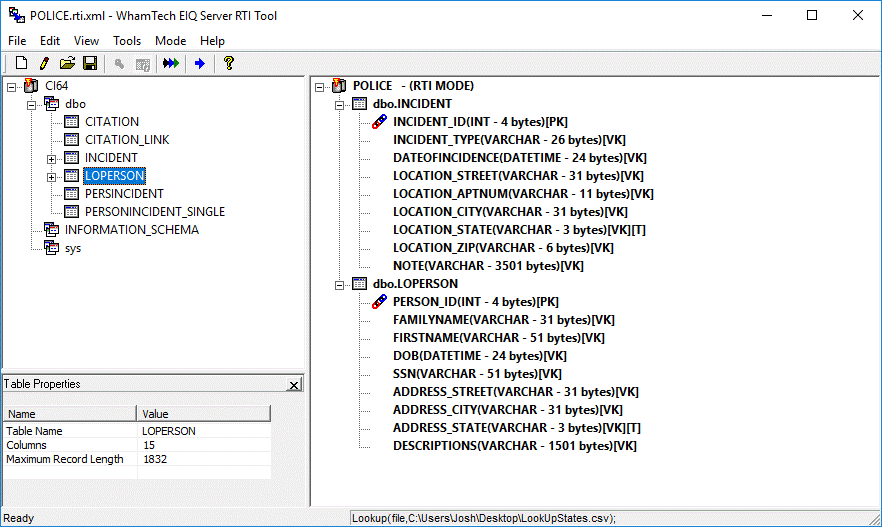
Figure 34: Tables and columns added to the index map.
Figure 35: Assign a 'Row ID' and primary key to a
column.
Proceed to assign 'ROW ID' columns for each table in the
index map. Next, designate key types, text search fields, and primary and
foreign key columns.
In order to retrieve results data from the data source after
a query is executed on EIQ Indexes, the EIQ Server needs a way to match
EIQ Index result rows with corresponding rows in the data source. For this,
the EIQ Server uses ROWID columns. A 'ROWID' column is a data source
column that has a unique value for each row in that table. Usually the primary
key column for a table serves as its ROWID column.
In cases where a single column is not sufficient to serve as
a ROWID column, a combination of columns that make up the unique values can be
designated as ROWID columns. In this case, one column would serve as a
primary ROWID column, a second column as a secondary ROWID column, and
all other columns as extra ROWIDs.
See Appendix E for the
allowed data types for ROWID columns.
Each table that is selected in the RTI map for building EIQ
Indexes must have at least one ROWID column specified. The RTI
tool lets you specify as many as five columns as ROWID columns for a single
table.
To designate a field as a ROWID field, follow these steps:
1.
Right-click a selected field.
2.
Expand the "Modify Flags" submenu.
3.
Select "Row ID (PRIMARY)" or "Row ID (SECONDARY)" or
"Row ID (Extra)".
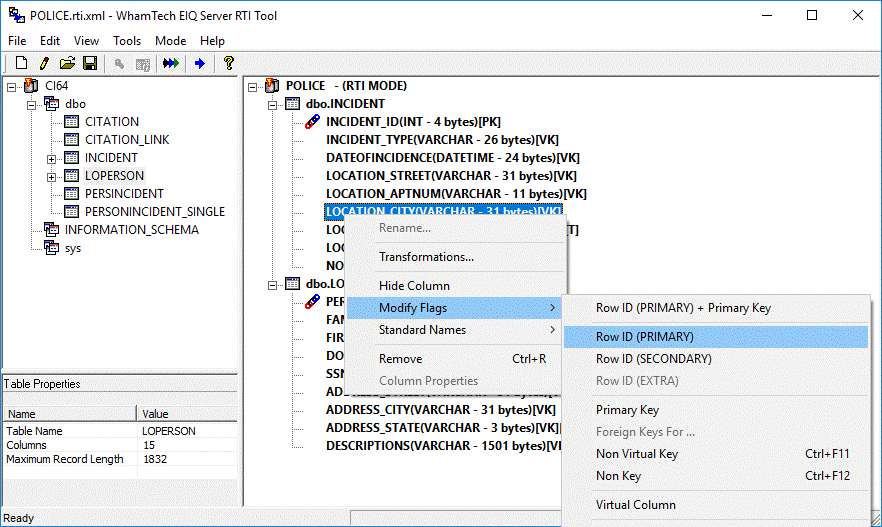
Figure 36: Assign a column as RowID
field.
The ROWID column designation will
be shown through special icons to the left of the column name in the index map.
A column key in an EIQ Index can be defined as one of
the following types:
- Virtual
Key: Virtual keys do not store any column data; only the trees and record
lists are maintained for these keys. Most queries can be executed entirely
on virtual keys. However, some queries such as aggregation queries may
require column data to be fetched from the original data source.
- Non-Virtual
Key: Non-virtual keys store column data; the trees, record lists and
column data are all maintained for these keys. Any queries can be executed
entirely on non-virtual keys.
- Non-Key:
Non-keys store only data for the column and will not have associated trees
or lists. Any queries can be executed entirely on non-key columns but they
will be inefficient as there are no tree and list structures that speed up
query execution. The Non-Key option is disabled in most EIQ Product Suite
configurations.
To set the default key type for all the columns of an Index,
follow these steps:
- Click
on the "Tools" menu-bar item.
- Select
"Options" from the "Tools" menu.
- Select
the "Default Key" tab.
- Select
the desired option from the three available flags: Virtual Key,
Non-Virtual Key, and Non Key.
- Click
"OK" to save the changes.

Figure 37: Default Key options tab.
To designate a key type for a specific field, follow these
steps:
1.
Right click on a selected field.
2.
Expand the "Modify Flags" submenu.
3.
Select "Non-Virtual Key" or "Non Key".
Alternatively, use acceleration keys:
1.
Select the desired field and press:
- Ctrl+F11
for Non-Virtual Key
- Ctrl+F12
for Non-Key
Note: The column key type
by default is 'Virtual Key' for a newly created index.
The key designations ([VK] for
Virtual Key, [NVK] for Non-Virtual Key) will be shown to the right of the
column name in the index map.
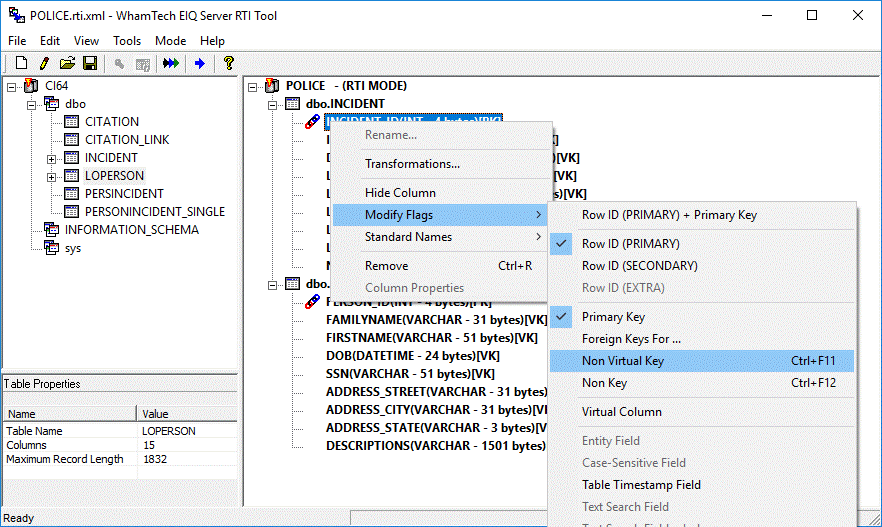
Figure 38: Assigning a specific column as
'Non-Virtual Key'.
This step involves designating primary key/foreign key
relationships between selected tables in the RTI tool to allow EIQ Product
servers to perform automatic joins across multiple data source tables. This is
an optional step if you are indexing columns from just a single table or if EIQ
Product servers are not going to be used with AutoJoins.
Columns in the RTI Map can be designated as either
'PRIMARY KEY' or 'FOREIGN KEY' or as both. The key designation affects how data
is stored in the EIQ Indexes. For these designated columns, the RTI tool
saves column data along with index structures in EIQ Index for query
processing. For virtual columns data will be discarded once index structures
are built.
To designate a field as 'PRIMARY KEY'/ 'FOREIGN KEY', follow
these steps:
1.
Right-click a selected field.
2.
Expand the "Modify Flags" submenu.
3.
Select "PRIMARY KEY " or "FOREIGN KEY" or
"PRIMARY KEY + FOREIGN KEY"
4.
To enable automatic table joins for each primary key column in a table,
assign a corresponding foreign key from a different table. You can do this by
right-clicking on the desired foreign key field, using the 'Modify Flags' >
'Foreign Key For' submenu, and then clicking on the Primary Key column name.
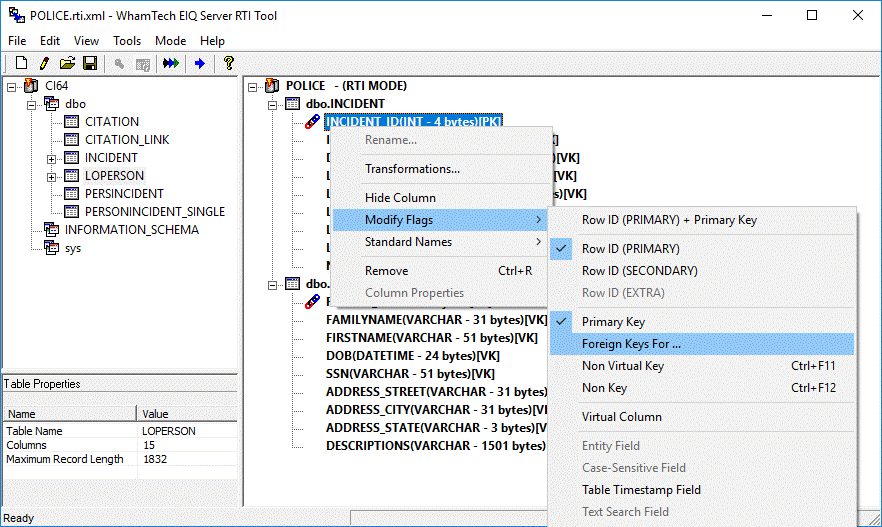
Figure 39: The RTI Map with ROWID, Primary, and
Foreign keys specified.
Note that any column designated as ROWID, Primary key, or
Foreign key will be automatically designated as a Non-Virtual Key.
Users can designate any column of a character data type as a
'Text Search Field' and build text search indexes.
To designate a column as 'Text Search Field', right-click on
the column and select 'Modify Flags'->'Text Search Field' from the context
menu.
The text search field designation will be indicated by
'[TSF]' to the right of the column name.
Note: Any character
type column of 256 or greater length will be automatically designated as a text
search field when added to the index map. For these columns, regular character
indexes can also be built by designating them with 'Text Search Field + Index'
flag. Regular character indexes differ from text search indexes in that they
let users query on the full string or partial strings contained by the column.
This designation will be indicated by '[TSF+]' to the right of the column name.
Setting Text Search Options
Users have options to build various text search indexes for
text search fields.
Users can build the following types of text search indexes.
Regular text search indexes:
- Raw
word indexes (indexes on words as they are without applying operations
such as Stemming and Synonyms.)
- Word
stem indexes
- Synonyms
indexes (applies Stemming first)
- MetaPhone indexes
- Soundex
indexes
- Proximity
indexes (for searching words in proximity of 1 or 2 words; these indexes
enable proximity and phrase search)
Users can also build associated weighted indexes for each of
the regular text search indexes except for Proximity indexes. Unlike
regular text search indexes, weighted indexes incorporate the relative weight
of the words in a document considering various criteria such as the number of
times a word appeared in the document, word context (where in the document the
word appeared - titles, headings, normal text, etc.) and font size and style
(bold, italics, foot note, etc.).
Weighted indexes can apply stemming, synonyms etc. functions
before the weights are calculated. The supported weighted index options for
each of the regular text search index are as follows:
- Raw
word indexes: Weighted indexes on raw words, weighted indexes using stems,
weighted indexes using synonyms
- Word
stem indexes: Weighted indexes using stems
- Synonyms
indexes: Weighted indexes using synonyms
- MetaPhone indexes: Weighted indexes using MetaPhone
- Soundex
indexes: Weighted indexes using Soundex
Users can set text search options at the global level,
which will be applied to all text search columns, and
at the individual column level. Any column level options would take
precedence over the global settings.
To get to the 'Text Search Options' dialog, right-click on
the top item in the right pane, for instance, 'POLICE - (RTI
MODE)', and select the 'Text Search Options.' menu item.

Figure 40: Text Search Options dialog.
Note that selecting any weighted index (on the right) would
automatically enable building the corresponding non-weighted regular text
search index.
·
Now click 'OK' to close the dialogs.
Only the selected columns from the data source as described
in the index map get built. Depending on the amount of data to be indexed, the
indexing process can take some time and can be resource intensive.
·
To build an EIQ Index for EIQ Indexed Adapters,
select "Build EIQ Index" from the toolbar.
Figure 41a: EIQ Index build for EIQ Indexed Adapters.
·
To build an EIQ Index for EIQ Conventional Adapters,
select “Build EIQ Adapter Information” from the toolbar.
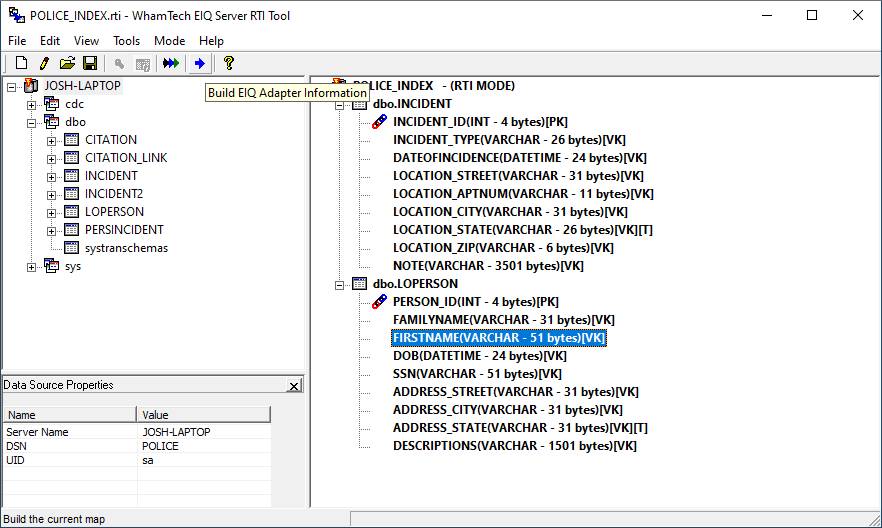
Figure 41b:
EIQ Index build for EIQ Conventional Adapters.
Indexed Views
Indexed views provide predefined 'views' of data in base
tables where they are built. A 'view' can contain pre-aggregated or pre-joined
information from base tables for ready access to client applications. By doing
heavy duty tasks ahead of query execution time, Indexed views can improve query
execution speed exponentially. Indexed views can be created either from the EIQ
Server RTI Tool or from any query client through EIQ Server. Some types of
views, such as the ones involving multiple tables and virtual columns, can only
be created through EIQ Server.
Using the EIQ Server RTI Tool, indexed views can be added
while building EIQ Indexes for data sources. An indexed view is defined in the
EIQ Server RTI Tool by specifying the SQL statement to create the
view.
Creating Indexed Views in EIQ Indexes
First, create a new EIQ Index for an ODBC data source
through the EIQ Server RTI Tool, or open an existing RTI map. Right-click on
the index name at the top of the right pane, and click on 'Add Indexed View'.
For example, in the figure below, the index name is "FBI_VIEW_INDEX".
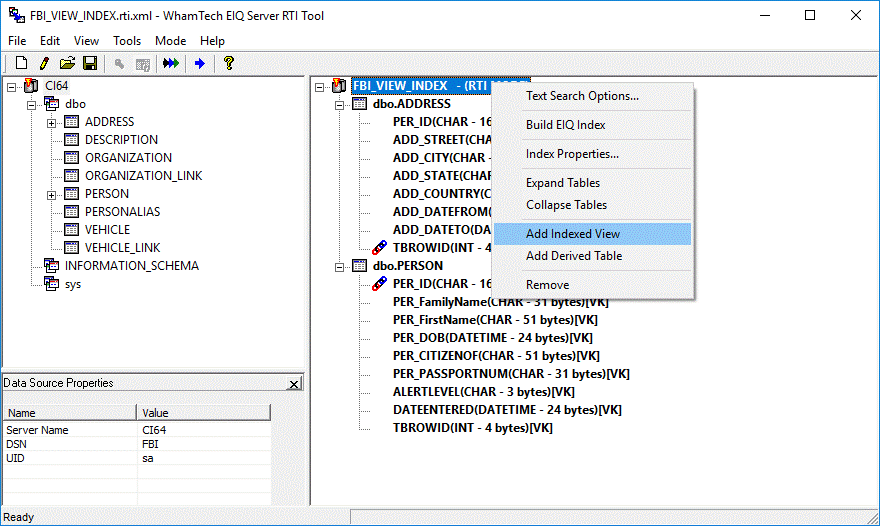
Figure 42: Creating an Indexed View
The 'Add Indexed View definition' window opens. Enter a
name for the indexed view you wish to create, and define the view using a SQL
query such as:
"select count(add_state)
as cls, add_state from
address group by add_state"
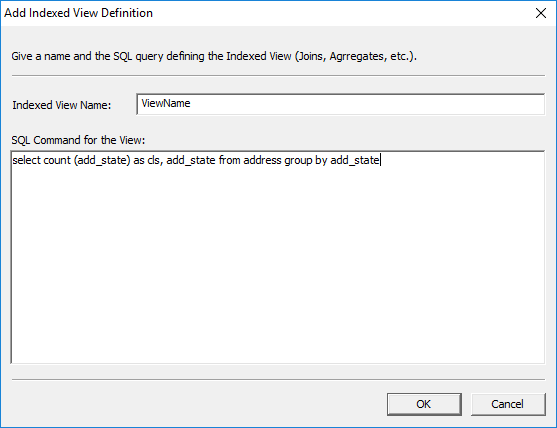
Figure 43: Defining an Indexed View.
Click 'OK'. On the next screen,
enter the initial size (number of rows) of the indexed view; for example, 1000.
Enter the maximum size (number of
rows) of the indexed view; for example, 10000. As long as the
initial size is not larger than the maximum, there should not be an issue.
The maximum and the initial size can be the same number.
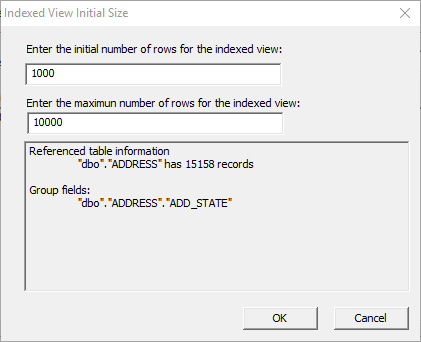
Figure 44: Initial size of
the Indexed View.
You should see the new indexed
view in the right pane of the EIQ Server RTI Tool as shown below.
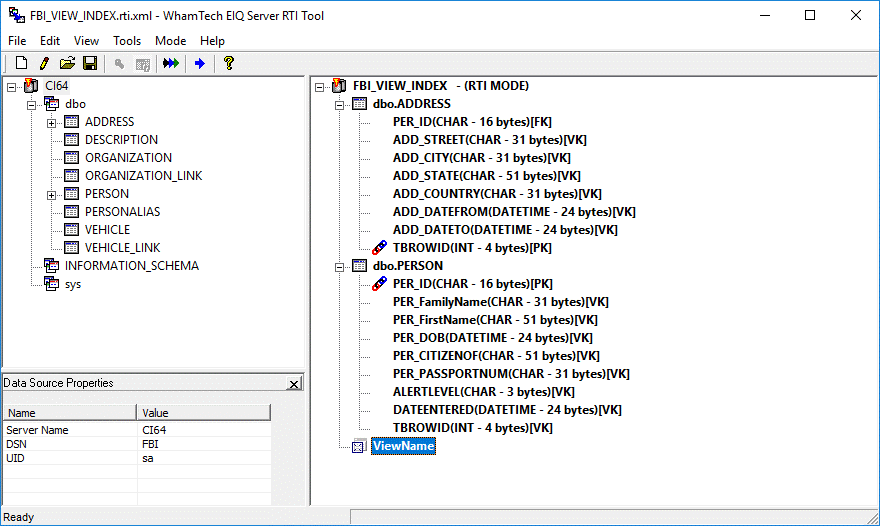
Figure 45: Seeing the
new indexed view in the right pane.
Proceed to
build the index by clicking 'Build EIQ Index' on the toolbar.
RTI Apply Changes
The EIQ Server RTI Tool allows users to modify existing
indexes and apply only the changes without rebuilding existing index structures.
‘Apply Changes’ builds may include adding one or more tables to the
index, adding columns to existing tables, removing columns, and changing the
key type of an existing index from Virtual to Non-virtual or vice-versa.
To modify an existing index, open a saved RTI map file (.RTI.XML
format). Add new tables/columns or make changes to existing columns as desired.
The EIQ Server RTI Tool detects these actions and saves them. Click 'Build' on
the toolbar. If the applied actions are supported by the apply changes
process, a dialog will appear asking you to choose a full
rebuild or apply only the changes since the last save.
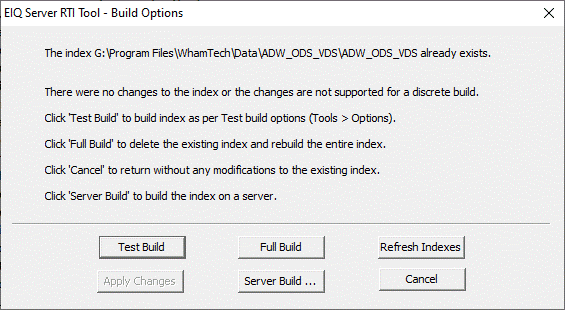
Figure 46a: Build
Options: Rebuild versus 'Apply changes'.
If you click 'Full Build',
the existing index files will be deleted and the index will be rebuilt from
scratch. Clicking on 'Apply Changes' will only build the new and changed index
structures and hence would generally be faster than a complete rebuild.
The EIQ Server Tool
also allows users to update indexes when the data in source has changed without
completely re-building the indexes. This is done through the ‘Refresh Indexes’
option in the Build Options dialog. ‘Refresh Indexes’ performs a small update
to the indexes without altering or changing the system catalog information.
This is also much faster than a ‘Full Build’
In some cases, the
EIQ RTI Tool may need to be built using the RTIS server instead of through the
RTI Tool. The ‘Server Build’ button will open a configuration window to specify
the server build settings.

Figure 46b: EIQ
RTI Tool Server Build configuration window.
This window makes
the EIQ RTI Tool function as a GUI. Specify the location of the rti.xml map
file, if the file is local or remote, the index type, the build type, where the
RTIS instance is located, and then enter the appropriate port. These options
can be configured in multiple ways to fit specific needs.
In certain
situations, it can be beneficial to test the index build before performing a
‘Full Build’. This can root out any issues before they happen. Test Build
options can be set using Tools>Options and selecting the ‘Test Build’ tab.
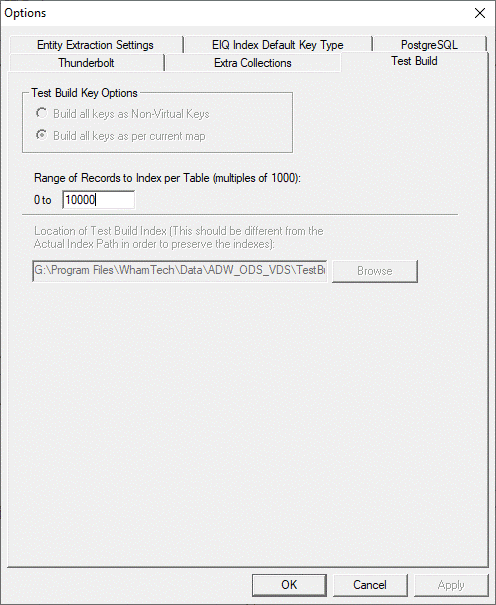
Figure 76c: EIQ RTI Tool Test Build settings configuration
window.
These options allow users to set the number of records to build
during the test, and shows users where the test build folder will go. It can
also let users change the key options for the map just during the test.
The
Text Search Groups feature allows users to group several columns from a table
into one text search index. Queries on text search group indexes find matching
text across all the columns in the group. The name of the group is used for the
group index that contains data for all the columns selected.
To
create a text search group, right-click on a table and select 'Group Text
Search Indexes' from the context menu to open the Text Search Groups
dialog.

Figure 47: Select
'Group Text Search Indexes' from the context menu.
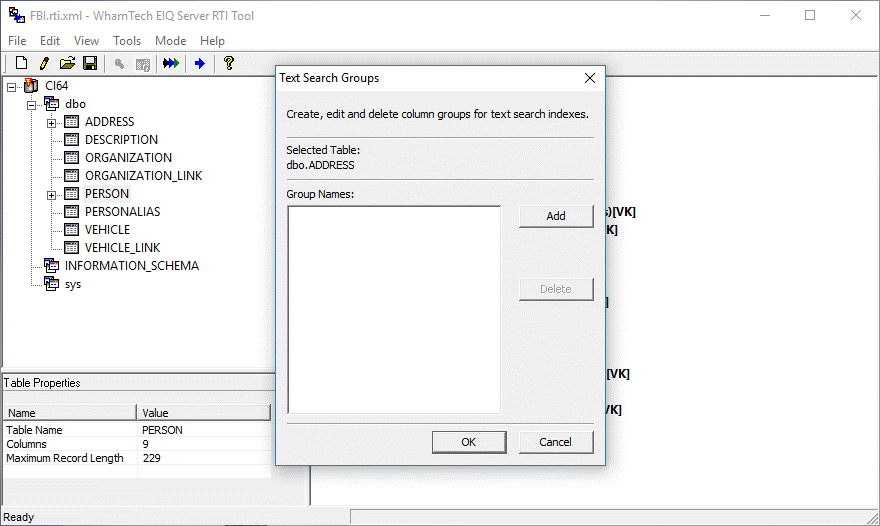
Figure 48: Text
Search Groups dialog.
To add a text
search group, click 'Add' to open the 'Text Search Group - Add' dialog.
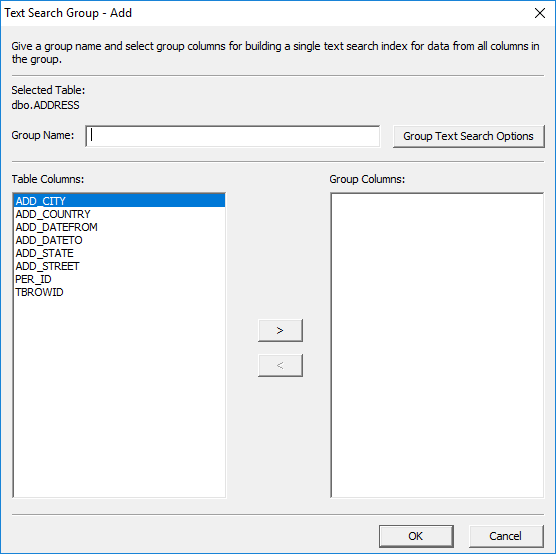
Figure 49: Text
Search Groups - Add dialog.
Enter the name
of the text search group in the 'Group Name' edit field. Then, select the Table
Columns you want associated with the group. Click the arrows or
double-click to move them to the Group Columns box.
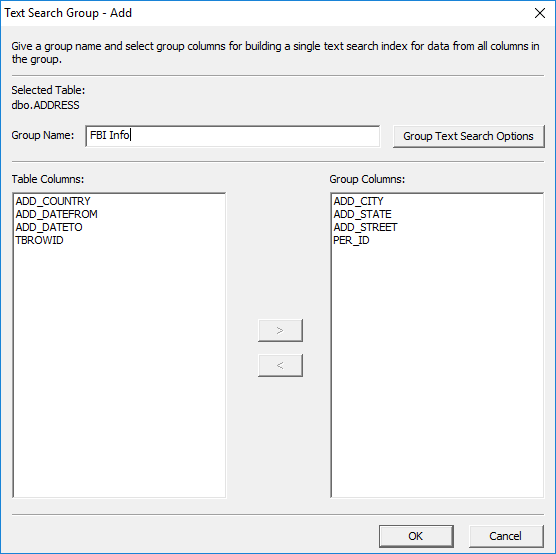
Figure 50: Text
Search Groups information.
Next, click
'Group Text Search Options' to open the 'Text Search Options' dialog.
Then, select the options as shown:
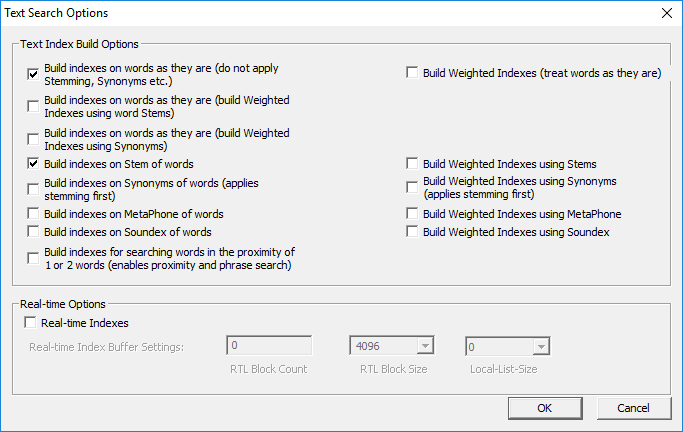
Figure 51: Group Text
Search Options dialog.
Now click 'OK'
to close the dialogs. The group name now appears in the Group Names box. Click
'OK' to save the new group or 'Cancel' to discard all changes.

Figure 52: Completed
adding the Text Search Group
Repeat the
above steps to add additional groups that contain other columns.
See Entity Extraction Help for additional information.
Appendix
A: Column Data Type Mappings
The EIQ Server RTI Tool
supports data type mappings for columns while building EIQ Indexes. This
feature helps RTI users build standardized indexes that are compatible with
their target standard data model. A data source column data type may not be
compatible with standard data model data types that require a data
type conversion in EIQ Indexes. For example, a character type column may
contain only integer values in the data source, and the standard model may
require those values to be queried in numeric format. Data type mapping enables
queries on EIQ Indexes as per the standard data model.
Using RTI column data
type mapping, non-string data types can be converted to character strings if
needed.
Data type conversion is supported on three levels:
· Globally
· At Table
level
· At Column
level
The levels take
precedence over one another in that order.
The global data type map is specified before
creating a new map, but can be changed at any time during the RTI map
creation process. Modifying the global data type map will affect all selected
tables and columns regardless of overridden table or column data type maps.
To modify the global data type map, follow these steps:
1.
From the main menu, select "Edit --> Global Data Type Map"
-or-
2.
Right-click the root item of the index map (right pane) and select
"Modify Datatype Map."
3.
Configure the data type map.
4.
Select "OK" to apply the new global data type map.
Table data type maps can be configured for any table
selected for indexing. The default table data type map is identical to the
global data type map. Modifying the table data type map
will override the global and column data type maps for the specified
table.
To modify a table data type map, follow these steps:
1.
From the index map (right pane), right-click the table whose map is to
be modified, and select "Modify Datatype Map".
2.
Configure the data type map.
3.
Select "OK" to apply the new table data type map.
Column data type maps can be configured for any column that
is selected for indexing. Modifying a column data type will
override the global or table data type map for the specified column.
To modify a column data type map, follow these steps:
1.
From the index map (right pane), right-click the column whose data type
map is to be modified and select "Transformations..." menu item
2.
Select the new data type map for the column in the Mappings tab.
The available column data type mappings are listed below
with an explanation of their function. These mappings are available from the
'Mappings' tab of the Transformations dialog for a given column data type.
The default mapping in RTI for the DECIMAL data type column
is NUMERIC.
Map(decimal,decimal) - Map decimal
to decimal.
Map(decimal,int) - Map decimal to
int.
Map(decimal,real) - Map decimal to
real.
Map(decimal,float) - Map decimal
to float.
Map(decimal,bigint) - Map decimal
to bigint.
Map(decimal,char) - Map decimal to
char.
Map(numeric,numeric) -
(default)
Map(numeric,int) - Map numeric to
int.
Map(numeric,bigint) - Map numeric
to bigint.
Map(numeric,real) - Map numeric to
real.
Map(numeric,float) - Map numeric
to float.
Map(numeric,char) - Map numeric to
char.
Map(smallint,smallint) -
(default).
Map(smallint,char) - Map smallint to char.
Map(bigint,bigint) - (default).
Map(bigint,char) - Map bigint to char.
Map(int,int) - (default).
Map(int,char) - Map int to char.
Map(real,real) - (default).
Map(real,char) - Map real to char.
Map(double,float) - (default).
Map(double,char) - Map double to
char.
Map(double,int) - Map double to
int.
Map(double,bigint) - Map double to
bigint.
Map(date,date) - (default).
Map(date,char) - Map date to char.
Map(datetime,datetime) -
(default).
Map(datetime,date) - Map datetime
to date.
Map(datetime,char) - Map datetime
to char.
Map(byte,byte) - (default).
Map(byte,blob) - Map byte to blob.
Map(clob,clob) - (default)
Map(clob,char) - Map clob to char.
Map(char,char) - (default).
Map(char,smallint) - Map char to smallint.
Map(char,int) - Map char to int.
Map(char,real) - Map char to real.
Map(char,float) - Map char to
float.
Map(varchar,varchar) - (default)
Map(varchar,char) - Map varchar to
char.
Map(varchar,clob) - Map varchar to
clob.
Map(varchar,smallint) - Map
varchar to smallint.
Map(varchar,int) - Map varchar to
int.
Map(varchar,real) - Map varchar to
real.
Map(varchar,float) - Map varchar
to float.
The available transformations for a given data type are
listed below with an explanation of their function. Additional user-defined
transformations can be developed and added for use. Refer to 'Defining and Applying User Transforms' for
more information.
Convert(C,F) - This is a demo transform that converts data
from Celsius to Fahrenheit.
IsNull() - This transform replaces
null values with a specified value.
Convert(C,F) - This is a demo transform that converts data
from Celsius to Fahrenheit.
IsNull() - This transform replaces
null values with a specified value.
Convert(C,F) - This is a demo transform that converts data
from Celsius to Fahrenheit.
IsNull() - This transform replaces
null values with a specified value.
Convert(C,F) - This is a demo transform that converts data
from Celsius to Fahrenheit.
IsNull() - This transform replaces
null values with a specified value.
Convert(C,F) - This is a demo transform that converts data
from Celsius to Fahrenheit.
IsNull() - This transform replaces
null values with a specified value.
Convert(C,F) - This is a demo transform that converts data
from Celsius to Fahrenheit.
IsNull() - This transform replaces
null values with a specified value.
Convert(C,F) - This is a demo transform that converts data
from Celsius to Fahrenheit.
IsNull() - This transform replaces
null values with a specified value.
FormatPhone() - This transform
standardizes phone numbers as (XXX) XXX-XXXX.
FormatSSN() - This transform
standardizes social security numbers as XXX-XX-XXXX.
IsNull() - This transform replaces
null values with a specified value.
Lookup() - This transform replaces values with specified
values from a file.
Lowercase() - This transform converts the column data to
lowercase.
PerlSub() - This transform applies
a transformation defined in the specified subroutine.
Uppercase() - This transform converts the column data to
uppercase.
FormatPhone()
- This transform standardizes phone numbers as (XXX) XXX-XXXX.
FormatSSN() - This transform
standardizes social security numbers as XXX-XX-XXXX.
IsNull() - This transform replaces
null values with a specified value.
Lookup() - This transform replaces values with specified
values from a file.
Lowercase() - This transform converts the column data to
lowercase.
PerlSub() - This transform applies
a transformation defined in the specified subroutine.
Uppercase() - This transform converts the column data to
uppercase.
For more details on the available transforms in the EIQ Server
RTI Tool, see EIQ RTI Tool Transformations.
The RTI tool uses auto name mapping to avoid conflicts
between EIQ Index reserved words and data source table and column names. If the
auto name mapping option needs to be turned off for any reason, these reserved
words will result in a conflict and are not allowed for table and column names
in the EIQ Index map.
Any
Column/Table names starting with numeric character
Any
Column/Table names starting with ":" or "#" or
"_"
@
ACCORDING
ADD
ALIAS
ALL
ALTER
AND
ARE
ASC
ASV
AV
BEGIN
BETWEEN
BY
CHAR
COLUMN
COMMIT
COUNT
CREATE
CRTSPEC
D_CHAR
D_DATE
D_FLOAT
D_LONGINT
D_NUMERIC
D_REAL
D_SHORTINT
DATABASE
DATE
DATETIME
DBOPTION
DELETE
DELIMITED
DELIMITER
DESC
DETAIL
DG
DISCRETE
DISTINCT
DROP
EQ
ERROR
EXCEPT
EXPORT
EXTERNAL
EXTRA
FILE
FIXED
FIXED_ETL
FLOAT
FROM
GE
GROUP
GT
HAVING
IMPORT
IN
INNER
INSERT
INT
INTO
INTO_COLLECTION
IS
ISOLATE
JOIN
KEY
LAYOUT
LE
LIKE
LT
MAXRECORDS
NE
NOT
NUMERIC
ON
OR
ORDER
OVER
PAGE
PAGESPEC
PROTECT
QUOTE
RD
REAL
REALTIME
RECORD
RECORDS
SELECT
SET
SKIPCOUNT
SMALLINT
SUPPRESS
SV
TABLE
TD
THEN
THRU
TIME
TO
TRUNCATE
UNIQUE
UNIQUERTB
UNIQUERTL
UPDATE
VALUES
WHERE
WITH
Appendix E: ROWID Column Data Types
Only the following data typed columns are allowed to be
designated as RowID columns.
- SMALLINT
- INT
- BIGINT
- CHAR
- DATE
- DATETIME
- REAL
- FLOAT
- VARCHAR
- NUMERIC