Trigger
Message Driver Setup.. 1
Setting-up
Trigger Message Driver for SQL Server 2
Insert
Trigger 2
Delete
Trigger 3
Update
Trigger 4
Requirements
for DATE type (SQL Server) 5
Requirements
for MONEY type (SQL Server) 6
Setting-up
Trigger Message Driver for Oracle. 7
Insert
Trigger 8
Delete
Trigger 8
Update
Trigger 8
Requirements
for DATE type (Oracle) 9
Issue
with Updates from Oracle Client Tools. 10
Sending
Messages to Multiple Message Queues. 10
General
Setup for SQL Server and Oracle. 11
The
Message Format 12
Debugging
the Trigger Message Driver 12
For
Developers of the Driver 12
Scenario:
Using Triggers for EIQ Index Real-time Update. 12
Step
1: Set-up Data Source Monitoring for POLICE.. 13
Setup
Trigger Messages SQL Extended Stored Procedure Driver 15
Create
Database Triggers. 18
Step
2: Set-up MSMQ for Messaging. 25
Step
3: Configure EIQ RTIS for updating the EIQ Index. 29
Step
4: Execute sample queries before and after the changes. 36
This document describes the steps to setup WhamTech's database trigger message driver for SQL Server
and Oracle data sources.
Most database systems, including SQL Server and Oracle,
support trigger procedures that are called before or after INSERT, UPDATE, and
DELETE operations. Triggers monitor changes made to data sources by database
operations. Trigger procedures call external procedures to form and send update
messages to messaging systems. WhamTech's trigger
message DLLs contain the custom procedures that get change data from trigger
procedures and send them to a messaging system for EIQ RTIS to receive.
|
Note:
Data source triggers are NOT the preferred method to capture changed
data in the real-time update process because they require
installation on data source systems and impose an operational overhead. EIQ
RTIS is the preferred method to read transaction, change, and redo logs.
For more information on EIQ RTIS, see EIQ Server Update Process,
EIQ RTIS and EIQ Update Configuration Tool.
|
First, locate the 'xpWhamTx.dll' file under the install folder
path, for example, "Install-path\txdrivers\SQL
Server", and copy it to SQL Server's 'Binn'
folder. The usual path for the 'Binn' folder is as
follows:
'\Program
Files\Microsoft SQL Server\MSSQL\Binn'
Next, register the extended stored procedure, defined in the
trigger message driver, with the SQL Server master table using the following
stored procedure:
sp_addextendedproc 'xp_triggermsg',
'xpwhamtx.dll'
'xp_triggermsg' is the exported
function called by the triggers and 'xpwhamtx.dll' is the name of the trigger
message driver. The stored procedure registers the function and the driver with
SQL Server.
Alternately, use the SQL Server Enterprise Manager and
select the 'master' database table. Right-click on 'Extended Stored Procedures'
and select "New Extended Stored Procedure". Then enter 'xp_triggermsg' as the stored procedure name, without
quotes, and enter or browse for the location of the driver under the 'Binn' folder.
|
Note: You must
stop and restart SQL Server after executing the stored procedure. This can be
done using the SQL Server Service Manager.
|
Once the function and driver are registered, create triggers
for the database tables like in the examples below. Items in RED are variable and must be changed depending on the
database and tables:
|
Note: Ensure
that ALL the fields that you included in the EIQ Index are referenced in the
triggers.
|
CREATE TRIGGER InsertTx
ON Categories
After Insert
As
Declare @DBNameParam varchar(128)
Declare @QueueParam varchar(128)
Declare @TableParam varchar(50)
Declare @TypeParam varchar(5)
Declare @ColumnParam1 varchar(80)
Declare @ColumnParam2 varchar(80)
Declare @ValueParam1 varchar(80)
Declare @ValueParam2 char(50)
Set @QueueParam = 'WhamDB' -- Used to create list of queues for
message target
Set @TableParam = 'Categories'
Set @TypeParam = 'I'
Set @ColumnParam1 = 'CategoryID'
Set @ColumnParam2 = 'CategoryName'
Set @DBNameParam = db_name()
Declare Table_Cursor Cursor
Forward_Only
For
Select CategoryID, CategoryName From Inserted
Open Table_Cursor
Fetch Next From Table_Cursor
Into @ValueParam1, @ValueParam2
While @@FETCH_STATUS <> -1
Begin
Set @ValueParam1 = Convert(varchar,
@ValueParam1)
If Len(@ValueParam1) > 255
Begin
Print 'Parameters are longer than 255 characters...'
Return
End
If Len(@ValueParam2) > 255
Begin
Print 'Parameters are longer than 255 characters...'
Return
End
exec master.dbo.xp_triggermsg
@DBNameParam, @QueueParam,
@TableParam, @TypeParam,
@ColumnParam1, @ValueParam1,
@ColumnParam2, @ValueParam2
Fetch Next From Table_Cursor
Into @ValueParam1, @ValueParam2
End
Close Table_Cursor
Deallocate Table_Cursor
CREATE TRIGGER DeleteTx
ON Categories
After Delete
As
Declare @DBNameParam varchar(128)
Declare @QueueParam
varchar(128)
Declare @TableParam varchar(50)
Declare @TypeParam varchar(5)
Declare @ColumnParam1 varchar(80)
Declare @ColumnParam2 varchar(80)
Declare @ValueParam1 varchar(80)
Declare
@ValueParam2 char(50)
Set @QueueParam = 'WhamDB' -- Used to create list of queues for
message target
Set @TableParam = 'Categories'
Set @TypeParam = 'D'
Set @ColumnParam1 = 'CategoryID'
Set @ColumnParam2 = 'CategoryName'
Set @DBNameParam = db_name()
Declare Table_Cursor Cursor
Forward_Only
For
Select CategoryID, CategoryName From Deleted
Open Table_Cursor
Fetch Next From Table_Cursor
Into @ValueParam1, @ValueParam2
While @@FETCH_STATUS <> -1
Begin
Set @ValueParam1 = Convert(varchar, @ValueParam1)
If Len(@ValueParam1) > 255
Begin
Print 'Parameters are longer than 255 characters...'
Return
End
If Len(@ValueParam2) > 255
Begin
Print 'Parameters are longer than 255 characters...'
Return
End
exec master.dbo.xp_triggermsg
@DBNameParam, @QueueParam,
@TableParam, @TypeParam,
@ColumnParam1, @ValueParam1,
@ColumnParam2, @ValueParam2
Fetch Next From Table_Cursor
Into @ValueParam1, @ValueParam2
End
Close Table_Cursor
Deallocate Table_Cursor
CREATE TRIGGER UpdateTx
ON Categories
After Update
As
Declare @DBNameParam varchar(128)
Declare @QueueParam
varchar(128)
Declare @TableParam varchar(50)
Declare @TypeParam varchar(5)
Declare @ColumnParam1 varchar(80)
Declare @ColumnParam2 varchar(80)
Declare @ValueParam1 varchar(80)
Declare @ValueParam2 varchar(50)
Declare @ValueParam3 varchar(80)
Declare
@ValueParam4 varchar(50)
Set @QueueParam = 'WhamDB' -- Used to create list of queues for
message target
Set @TableParam = 'Categories'
Set @TypeParam = 'U'
Set @ColumnParam1 = 'CategoryID'
Set @ColumnParam2 = 'CategoryName'
Set @DBNameParam = db_name()
Declare Table_Cursor Cursor
Forward_Only
For
Select d.CategoryID,
d.CategoryName, i.CategoryID, i.CategoryName
From Inserted i Inner Join deleted d On i.CategoryID
= d.CategoryID
Open Table_Cursor
Fetch Next From Table_Cursor
Into @ValueParam1, @ValueParam2, @ValueParam3, @ValueParam4
While @@FETCH_STATUS <> -1
Begin
Set @ValueParam1 = Convert(varchar, @ValueParam1)
If Len(@ValueParam1) > 255
Begin
Print 'Parameters are longer than 255 characters...'
Return
End
If Len(@ValueParam2) > 255
Begin
Print 'Parameters are longer than 255 characters...'
Return
End
Set @ValueParam3 = Convert(varchar, @ValueParam3)
If Len(@ValueParam3) > 255
Begin
Print 'Parameters are longer than 255 characters...'
Return
End
If Len(@ValueParam4) > 255
Begin
Print 'Parameters are longer than 255 characters...'
Return
End
exec master.dbo.xp_triggermsg
@DBNameParam, @QueueParam,
@TableParam, @TypeParam,
@ColumnParam1, @ValueParam1,
@ColumnParam2, @ValueParam2,
@ColumnParam1, @ValueParam3,
@ColumnParam2, @ValueParam4
Fetch Next From Table_Cursor
Into @ValueParam1, @ValueParam2, @ValueParam3, @ValueParam4
End
Close Table_Cursor
Deallocate Table_Cursor
The parameters for the extended stored procedure are:
Parameter1:
Database name
Parameter2:
Queue name
Parameter3:
Table name
Parameter4:
Transaction type, with possible values of U for Update, I for Insert, and D for
Delete
Parameter5:
Column Name1, column name string 1
Parameter6:
Column Value1, column value string 1
The parameters must be supplied in the above order. If one
or more of the parameters are missing, the trigger message driver exits with
the following error:
Error
executing extended stored procedure: Invalid number of
parameters.\n Must be at least 6 'DBName',
'QueueName', 'TableName', TriggerType', 'ColumnName1', 'ColumnValue1'
The parameter list is variable after parameter 6. Just add
the column name and value pairs to the parameter list for the data to be sent
to the message queue.
|
Note:
This approach places the burden of what information is sent to the message
queue on the trigger script. The script decides which columns and data are
passed to the trigger message driver after parameter 4. Therefore, the script
decides what is processed by the extended stored procedure, formatted, and
sent to the message queue. However, the extended stored procedure has a limit
of 256 characters for each parameter. This should not be a problem.
|
If a column is a 'datetime' data type, it must be converted
as follows:
CREATE TRIGGER OrdersInsertTx
ON dbo.Orders
After Insert
As
Declare @DBNameParam varchar(128)
Declare @QueueParam
varchar(128)
Declare @TableParam varchar(50)
Declare @TypeParam varchar(5)
Declare @ColumnParam1 varchar(200)
Declare
@ValueParam1 varchar(8000)
Declare @Date datetime
Set @QueueParam = 'DBLocal'
Set @TableParam = 'Orders'
Set @TypeParam = 'I'
Set @ColumnParam1 = 'OrderDate(yyyy-mm-dd hh:nn:ss.ttt)'
Set @DBNameParam = db_name()
Declare Table_Cursor Cursor
Forward_Only
For
Select OrderDate From Inserted
Open Table_Cursor
Fetch Next From Table_Cursor
Into @Date
While @@FETCH_STATUS <> -1
Begin
-- Set @ValueParam1 = Convert(varchar, @Date,
121)
-- Parameter 1 is a date so format it correctly as mm/dd/yyyy
Set @ValueParam1 = Convert(varchar, @Date, 121)
If Len(@ValueParam1) >
255
Begin
Print 'Parameters are longer than 255 characters...'
Return
End
exec master.dbo.xp_triggermsg
@DBNameParam, @QueueParam,
@TableParam, @TypeParam,
@ColumnParam1, @ValueParam1
Fetch Next From Table_Cursor
Into @Date
End
Close Table_Cursor
Deallocate Table_Cursor
If a column is a 'money' data type, it must be converted as
follows:
CREATE TRIGGER OrdersInsertTx
ON dbo.Orders
After Insert
As
Declare @DBNameParam varchar(128)
Declare @QueueParam
varchar(128)
Declare @TableParam varchar(50)
Declare @TypeParam varchar(5)
Declare @ColumnParam1 varchar(200)
Declare
@ValueParam1 varchar(800)
Declare @UnitPrice money
Set @QueueParam = 'DBLocal'
Set @TableParam = 'Orders'
Set @TypeParam = 'I'
Set @ColumnParam1 = 'UnitPrice'
Set @DBNameParam = db_name()
Declare Table_Cursor Cursor
Forward_Only
For
Select UnitPrice From Inserted
Open Table_Cursor
Fetch Next From Table_Cursor
Into @UnitPrice
While @@FETCH_STATUS <> -1
Begin
-- Set @ValueParam1 = Convert(varchar, @UnitPrice, 1)
-- Parameter 1 is money type so format it correctly as 5,080.00
Set @ValueParam1 = Convert(varchar, @UnitPrice, 1)
If Len(@ValueParam1) > 255
Begin
Print 'Parameters are longer than 255 characters...'
Return
End
exec master.dbo.xp_triggermsg
@DBNameParam, @QueueParam,
@TableParam, @TypeParam,
@ColumnParam1, @ValueParam1
Fetch Next From Table_Cursor
Into @UnitPrice
End
Close Table_Cursor
Deallocate Table_Cursor
|
Note: Due to the
way update triggers are coded you should not try to update primary key
columns. If you do you may get unexpected results.
|
First, locate the 'xpWhamTxOra.dll' file under the install
folder path, for example, "Install-path\txdrivers\Oracle,
and copy it to Oracle's 'Bin' folder. The usual path for the 'Bin' folder is as
follows:
'oracle\ora90\bin'
Next, register the external procedure with Oracle as a
shared library by executing the following command:
For an Oracle system running on a Windows platform:
CREATE OR REPLACE
LIBRARY triggerlib IS
'd:\ORACLE\ora90\bin\xpwhamtxora.dll'
Where 'd:\ORACLE\ora90\bin\xpwhamtxora.dll'
represents the path to the dll from the preceding
step.
For an Oracle system running on a Unix platform:
CREATE OR
REPLACE LIBRARY triggerlib IS '/usr/whamtech/bin/libwhamtxora.so';
|
Note: Register
under the System user so it can be defined in one place for all users of the
system.
|
To remove the library so it can be replaced with a new one,
execute the following command: DROP LIBRARY
triggerlib;
Next, create the external procedure as follows:
CREATE PROCEDURE TriggerProc(queuename IN CHAR, tablename IN
CHAR, triggertype IN CHAR,
owner IN CHAR,
colnames IN CHAR, colvalues
IN CHAR)
IS EXTERNAL
NAME "xp_triggermsg"
LIBRARY triggerlib
PARAMETERS(queuename STRING,
tablename STRING,
triggertype STRING,
owner STRING,
colnames STRING,
colvalues STRING
);
Then, create triggers for the database tables like in the example
below. Items in RED are variable and must be
changed depending on database and tables:
CREATE TRIGGER InsertTx
AFTER INSERT
ON Categories
FOR EACH ROW
DECLARE
QueueParam VARCHAR2(128);
TableParam VARCHAR2(50);
TypeParam VARCHAR2(5);
OwnerParam VARCHAR2(50);
ColumnParam VARCHAR2(8000);
ValueParam VARCHAR2(8000);
BEGIN
QueueParam
:= 'Charlesp';
-- Used to create list of queues for message target
TableParam
:= 'Categories';
TypeParam
:= 'I';
OwnerParam
:= USER; -- Or hard code specific owner/schema
ColumnParam := '';
ValueParam
:= '';
-- Build column parameter
ColumnParam := 'CategoryID;CategoryName';
-- Build value parameter
ValueParam
:= '"' || TO_CHAR(:new.CategoryID)
|| '"' || '"' || :new.CategoryName
|| '"';
System.TriggerProc(QueueParam,
TableParam, TypeParam, OwnerParam, ColumnParam, ValueParam);
END;
CREATE TRIGGER DeleteTx
AFTER DELETE
ON Categories
FOR EACH ROW
DECLARE
QueueParam VARCHAR2(128);
TableParam VARCHAR2(50);
TypeParam VARCHAR2(5);
OwnerParam VARCHAR2(50);
ColumnParam VARCHAR2(8000);
ValueParam VARCHAR2(8000);
BEGIN
QueueParam
:= 'Charlesp';
-- Used to create list of queues for message target
TableParam
:= 'Categories';
TypeParam
:= 'D';
OwnerParam
:= USER; -- Or hard code specific owner/schema
ColumnParam := '';
ValueParam
:= '';
-- Build column parameter
ColumnParam := 'CategoryID;CategoryName';
-- Build value parameter
ValueParam
:= '"' || TO_CHAR(:old.CategoryID)
|| '"' || '"' || :old.CategoryName
|| '"';
System.TriggerProc(QueueParam,
TableParam, TypeParam, OwnerParam, ColumnParam, ValueParam);
END;
CREATE TRIGGER UpdateTx
AFTER UPDATE
ON Categories
FOR EACH ROW
DECLARE
QueueParam VARCHAR2(128);
TableParam VARCHAR2(50);
TypeParam VARCHAR2(5);
OwnerParam VARCHAR2(50);
ColumnParam VARCHAR2(8000);
ValueParam VARCHAR2(8000);
BEGIN
QueueParam
:= 'Charlesp';
-- Used to create list of queues for message target
TableParam
:= 'Categories';
TypeParam
:= 'U';
OwnerParam
:= USER; -- Or hard code specific owner/schema
ColumnParam := '';
ValueParam
:= '';
-- Build column parameter
ColumnParam := 'CategoryID;CategoryName';
-- Build value parameter
ValueParam := '"' || TO_CHAR(:old.CategoryID) || '"' || '"' || :old.CategoryName || '"'
|| '"' ||
TO_CHAR(:new.CategoryID) || '"' ||
'"' || :new.CategoryName
|| '"';
System.TriggerProc(QueueParam,
TableParam, TypeParam, OwnerParam, ColumnParam, ValueParam);
END;
The parameters for the external procedure are:
- QueueParam: Queue name
- TableParam: Table name
- TypeParam: Transaction type, with possible
values of U for Update, I for Insert, and D for Delete
- OwnerParam: DB owner - if USER is used, the
client that performs the updates should be logged on as the same user
- ColumnParam: String of column names - format: ColumnName1;ColumnName2 .
- ValueParam: String of column values - format:
"ColumnValue1""ColumnValue2" .
Double quotes
(") are used as string qualifier to allow for embedded single quotes in
column values in ValueParam.
The parameters must be supplied in the above order, and all
parameter must be supplied. Otherwise, it will cause a trigger script error.
If a column is a DATE data type, it must be converted as
follows:
TO_CHAR(:new.OrderDate, 'mm/dd/yyyy')
Here is a sample trigger:
CREATE
TRIGGER InsertTx
AFTER INSERT
ON ROWIDS
FOR EACH ROW
DECLARE
QueueParam VARCHAR2(128);
TableParam VARCHAR2(50);
TypeParam VARCHAR2(5);
OwnerParam VARCHAR2(50);
ColumnParam VARCHAR2(8000);
ValueParam VARCHAR2(8000);
BEGIN
QueueParam
:= 'Charlesp'; -- Used to create list of
queues for message target
TableParam
:= 'ROWIDS';
TypeParam
:= 'I';
OwnerParam
:= 'JUIPINJ'; -- Or hard code specific owner/schema
ColumnParam := '';
ValueParam
:= '';
-- Build column parameter
ColumnParam := 'DATEID2(YYYY-MM-DD
HH:NN:SS);DATEID(MM/DD/YYYY);INTID;SMALLINTID;BIGINTID;REALID;FLAOTID;CHARID';
-- Build value parameter
ValueParam := '"' || TO_CHAR(:new.DATEID2,
'YYYY-MM-DD HH24:MI:SS') || '"' || '"' || TO_CHAR(:new.DATEID, 'MM/DD/YYYY') || '"' || '"' ||
TO_CHAR(:new.INTID) || '"' || '"' ||
TO_CHAR(:new.SMALLINTID) || '"' || '"' ||
TO_CHAR(:new.BIGINTID) || '"' || '"' ||
TO_CHAR(:new.REALID) || '"' || '"' ||
TO_CHAR(:new.FLAOTID) || '"' || '"' ||
TO_CHAR(:new.CHARID) || '"';
System.TriggerProc(QueueParam,
TableParam, TypeParam, OwnerParam, ColumnParam, ValueParam);
END;
When using Oracle client tools such as SQLPlus
Worksheet, you must follow Insert, Update, and Delete operations with a commit
statement, or, the client should turn on autocommit
for the session. Otherwise, changes are not saved to the Oracle database until
the client session ends.
This affects the queries on these triggered updates. The
updated record information is not returned if the data has not been committed
to the database.
There may be some cases where the same message should be
sent to multiple message queues. To accomplish this, modify the QueueParam in the trigger procedure as follows:
QueueParam
= 'DBLocal,2';
The format for the QueueParam is 'QueueName,n' where n can be from
1..n. If the message should be sent to only one queue, you can specify the QueueParam as 'DBLocal,1' or 'DBLocal'
without the ',n'.
If there is only one queue, the queue name is generated as:
dblocal
If the there are multiple queues, as in the above example,
the queue names are generated as:
dblocal1 and dblocal2
The queue names are generated based on the QueueParam argument to the trigger DLL. It is best to use
the database name associated with the trigger, but this value is user defined
and can be, for example:
QueueParam
= 'DBLocal_CustomerName'
This allows setting up different table triggers for the same
database/schema that targets different message queues. If the same QueueParam is used for various DB triggers, the messages
are sent to the same message queue.
When a trigger is executed, the trigger procedure script
must loop through the effected record and send the appropriate column information
to the trigger message driver by calling the extended procedure, or external
procedure, with the expected parameters. The procedure then builds the
formatted message and sends it to the message queue based on the QueueParam value (data source name).
Admins can provide the name of the queue in the Windows
Registry under the following keys:
\HKLM\SOFTWARE\WhamTech\xpWhamTx\MSMQQueues (for SQL Server)
\HKLM\SOFTWARE\WhamTech\xpWhamTxOra\MSMQQueues (for Oracle)
The procedure uses the registry to determine if a queue list
exists for the associated data source. If the list exists, the procedure opens
the queues and sends messages to the queues. If the list does not exist, the
procedure dynamically builds queue names described in the "Sending Message
to Multiple Message Queues" section above, saves the names to the
registry, and the creates the new queue. Therefore, each QueueParam
value (data source) gets its own message queue.
Note: If the
registry entry exists, it overrides the queue names sent by the trigger
procedure.
When the trigger DLL is first instantiated, it retrieves the
message queue's server name from the registry under:
\HKLM\SOFTWARE\WhamTech\xpWhamTx\QueueServer\ComputerName (for SQL
Server)
\HKLM\SOFTWARE\WhamTech\xpWhamTxOra\QueueServer\ComputerName (for Oracle)
With the value of ComputerName in
the form of:
computer_name\
for a public queue and in the form of:
computer_name\private$\
for a private queue. To use the queue on the local machine use .\ or .\private$\.
|
Note: If there
is no entry for the QueueServer key, the ComputerName defaults to the local public queue (.\).
|
|
Note:
Make sure that the account under which SQL Server is running has permission to
access MSMQ queue. Add that specific account to MSMQ along with the
appropriate permissions.
|
The messages sent to the message queue for INSERT, UPDATE,
and DELETE operations have the following format:
Header (Schema; Queue name)
Body Row (Trigger type;Table
name;Column Count;Column
Info 1;Column Info 2;.)
Where: Column Info is
Column name:Value
The following examples show message formats for the three
trigger types:
Insert
dbo;WhamDB\nI;Customers;2;Name:John
Doe;Status:Active
Update
dbo;WhamDB\nU;Customers;2;Name:John
Doe;Status:Active;Name:John Doe;Status:Non-Active
The update trigger sends the original Column Info followed
by the updated Column Info.
Delete
dbo;WhamDB\nD;Customers;2;Name:John
Doe;Status:Non-Active
Note: Following the header is a
"\n", which is the new line character.
Developers can debug the driver by going to the Visual
Studio Debug tab of the project settings dialog and making the following
changes:
Executable for debug session:
C:\Program Files\Microsoft SQL Server\MSSQL\Binn\sqlservr.exe
Working directory:
C:\Program Files\Microsoft SQL Server\MSSQL\Binn
Program arguments:
-c
To debug the driver for Oracle, they can use the EIQ
Diagnostics Tool.
This scenario demonstrates setting up near-real-time updates
of the EIQ Index for POLICE (POLICE_INDEX) as changes happen at the
database in SQL Server. This update mechanism is another way to keep EIQ
Indexes in sync with corresponding data sources so EIQ Product servers return
accurate and up-to-date results.
This scenario takes you through the following major steps:
Step 1: Setup Data Source
Monitoring for POLICE.
Step 2: Setup MSMQ for Messaging.
Step 3: Configure EIQ RTIS for
updating the EIQ Index.
Step 4: Execute sample queries
before and after the changes.
This scenario is only for demonstrating the use of
triggers to monitor the data sources. For the various options
available for monitoring and updating EIQ Indexes, refer to the EIQ Server
Update Process.
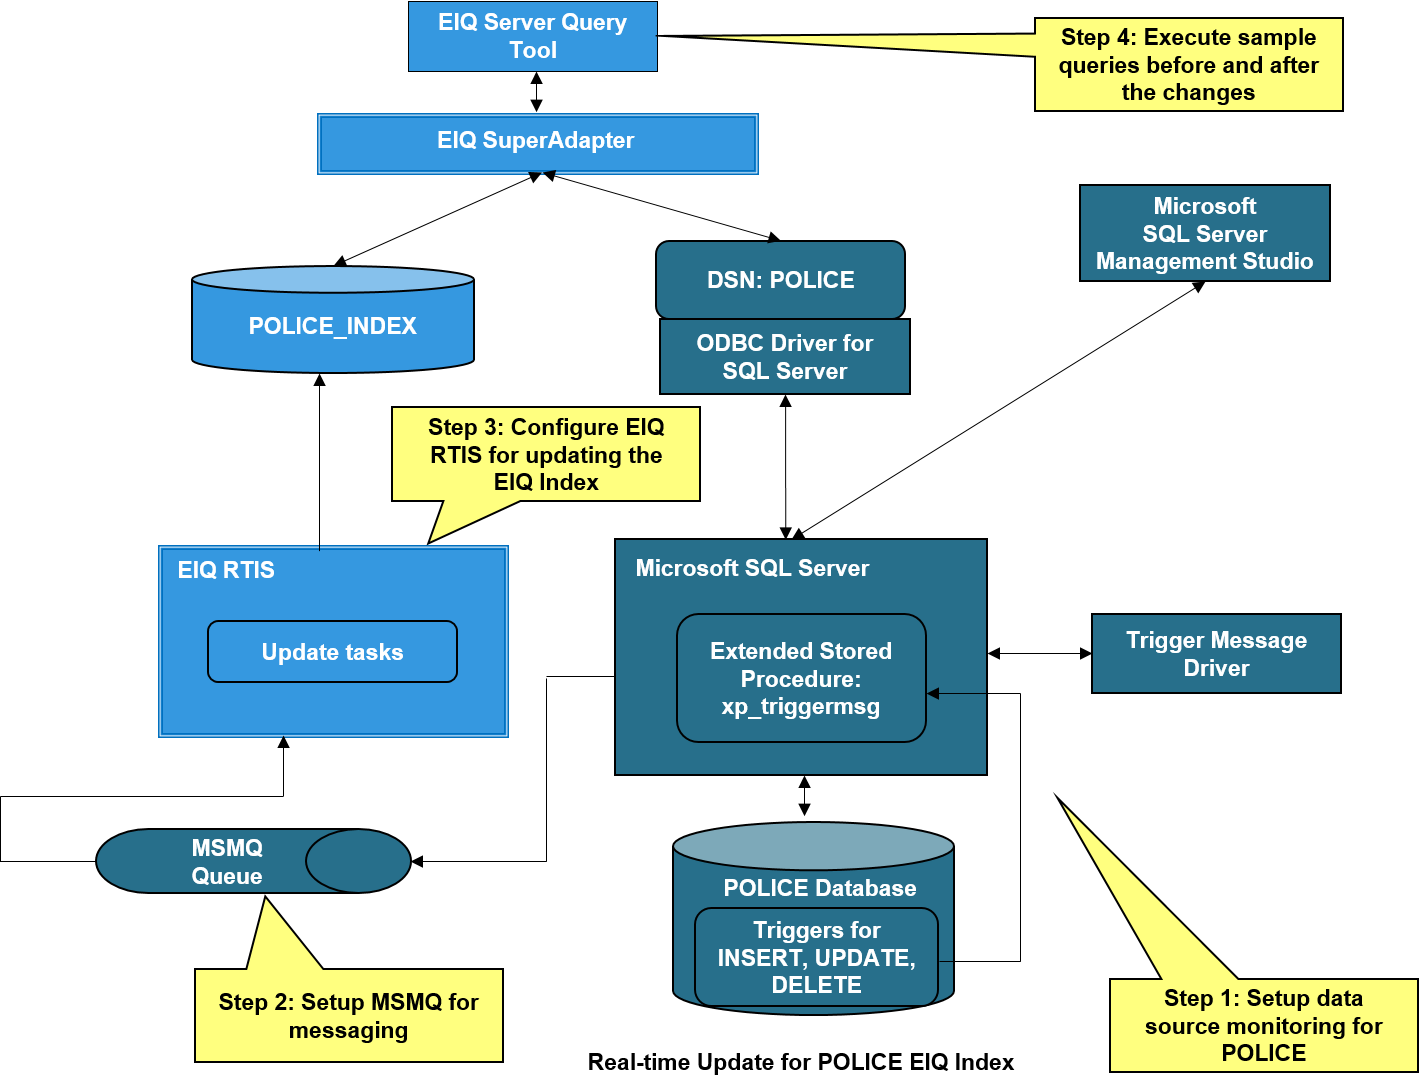
You have to setup trigger procedures in the SQL
Server POLICE database for all the indexed tables in the POLICE_INDEX. These
trigger procedures will be invoked by SQL Server whenever a change happens at
the database. The triggers then call an external stored procedure for
assembling and sending update messages to MSMQ. EIQ RTIS monitors MSMQ for
the messages to update the index. Whenever insert, delete, or update changes
are made at the data source, the EIQ Index gets updated.
The 'xpWhamTx.dll' driver contains the 'xp_triggermsg'
extended stored procedure needed for assembling and sending update messages to
MSMQ. The triggers call the extended stored procedure whenever they are
invoked.
For the triggers to work properly, setup the Trigger
Messages SQL Extended stored procedure driver as follows:
·
Copy the 'xpWhamTx.dll' file to Microsoft SQL
Server's 'Binn' folder:
The default path where you can find
the xpWhamTx.dll file is:
DRIVE_LETTER\Program
Files\WhamTech\TxDrivers\SQLServer.
The default path for the SQL
Server 'Binn' folder is:
DRIVE_LETTER\Program Files\Microsoft SQL Server\MSSQL\Binn
Next, you must register the Extended Stored Procedure with
the 'master' database of SQL Server.
This can be done through script or through SQL Server
Management Studio:
·
Right-click on 'master' database and select 'New
Query'. Run the following query:
sp_addextendedproc
'xp_triggermsg', 'xpwhamtx.dll'
Executing the above statement
registers the function and the driver DLL with the SQL Server.
Alternately, use SQL Server Management Studio as follows:
·
Select Databases->System
Databases->master->Programmability->Extended Stored Procedures.
·
Right-click and select "New Extended Stored
Procedure".
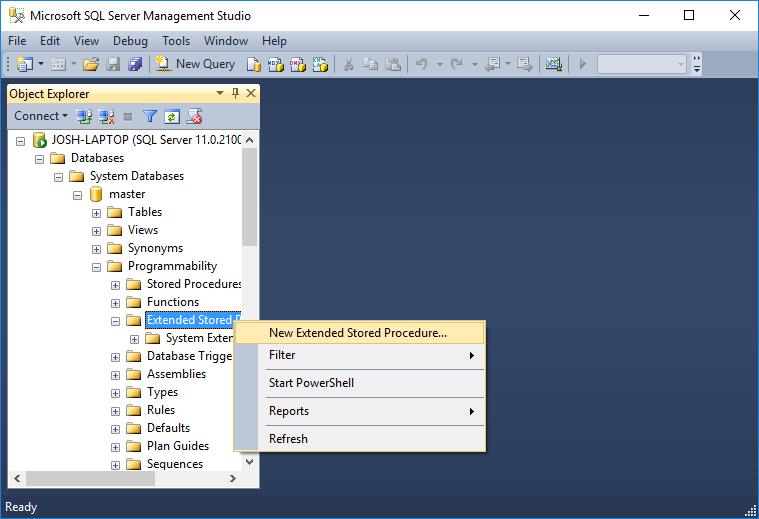
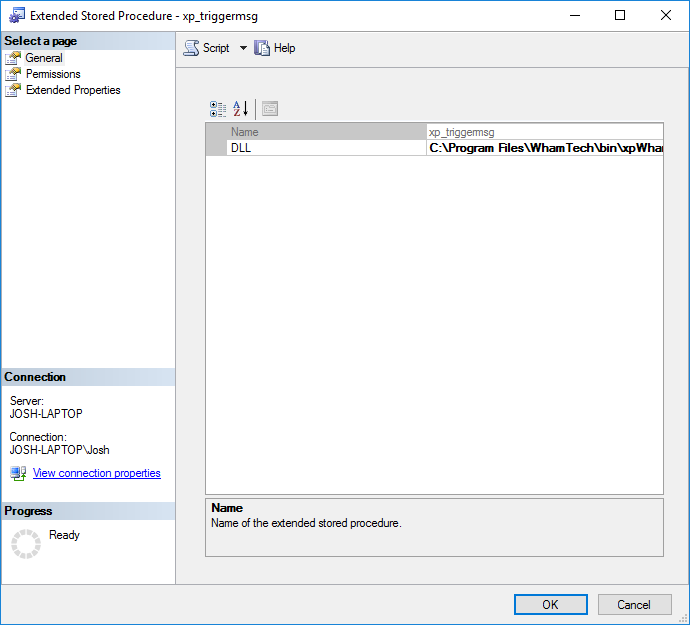
Then enter the name as "xp_triggermsg"
and enter or browse the location of the driver DLL: C:\Program
Files\WhamTech\bin.
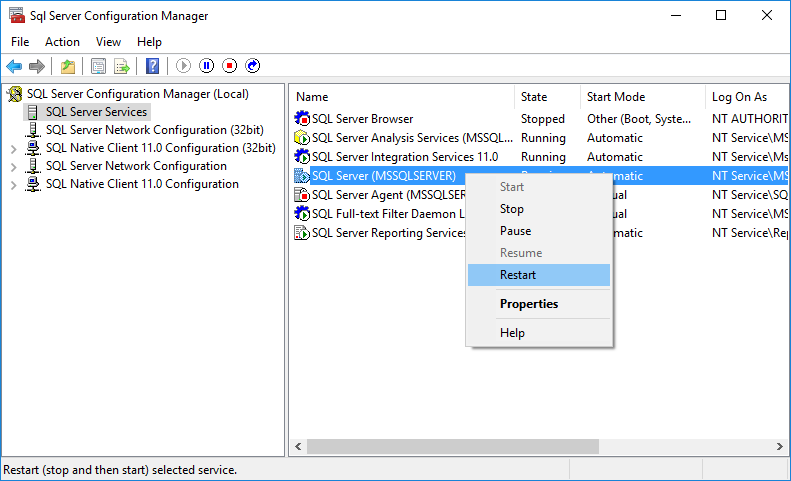
Then, you must
then stop and restart SQL Server. This can be done using the SQL Server
Configuration Manager.
·
Click Start -> All Programs -> Microsoft
SQL Server -> Configuration Tools -> SQL Server Configuration Manager.
·
Select "SQL Server 2005
Services" in the SQL Server Configuration Manager, right-click
on SQL Server, and select "Restart".
Create triggers in the POLICE database using the sample
triggers (insert/delete/update) given below.
The POLICE sample database comes with triggers already
defined for the INSERT, UPDATE, and DELETE commands. Make sure to view the
triggers:
·
Open SQL Server Management Studio.
·
Connect to the appropriate server. Expand the
Databases folder and scroll down to the POLICE database.
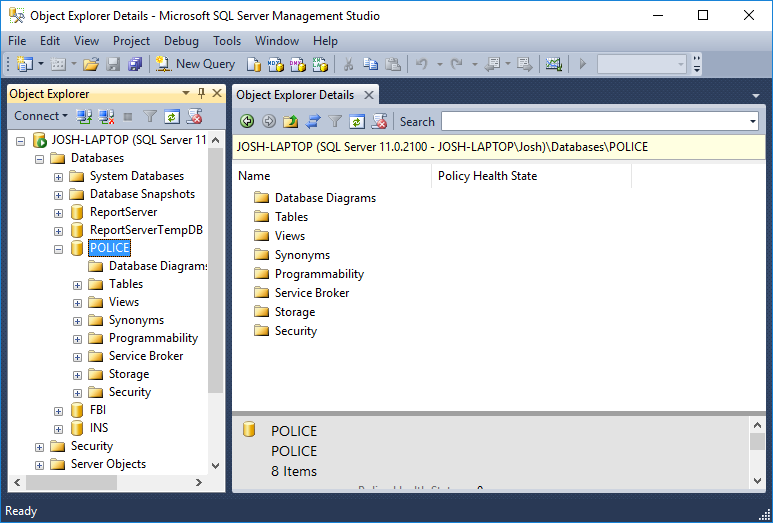
·
Select the LOPERSON table:
Databases->POLICE.dbo->Tables->LOPERSON
Here, you see the Triggers InsertLoPerson,
DeletePerson, and UpdatePerson.
·
Double click on a trigger (e.g. InsertPerson) to see the trigger steps.
·
Replace the trigger procedure text with the
trigger code given below.
You can save the trigger and the syntax checking is
done automatically. If there are any errors, you should be notified while
saving. It is important to ensure that ALL the columns that are part of the
index are added to the triggers.
The following describes the parameters used in the triggers:
Parameter1:
Database name - In the below triggers, this is
referred to as DBNameParam. The value of this
should be the return value from db_name(). db_name()
is a stored procedure which returns the Database name.
Parameter2:
Queue name - In the below triggers, this is referred
as QueueParam. This is used to create a MSMQ/JMS
queue with the name specified as value.
Parameter3:
Table name - In the example triggers, this is
referred as TableParam. The value of this will be the
table name for which the trigger is made.
Parameter4:
Transaction type - The possible values are
U - for Update, I - for Insert and D - for Delete. This is referred
to as TypeParam in the example triggers given
below.
Parameter5:
Column Name1, column name string 1 - This is
referred to as ColumnParam in the triggers given
below. This is for columns in the tables.
Parameter6:
Column Value1, column value string 1 - This is
referred to as ValueParam in the triggers given
below. This is to get the value of the column from the table.
|
Note: It is
mandatory to include ALL the indexed columns in the trigger body.
|
Insert
Trigger:
CREATE TRIGGER [dbo].[InsertLoPerson]
ON
[dbo].[LOPERSON]
After Insert
As
Declare @DBNameParam
varchar(128)
Declare @QueueParam
Varchar(128)
Declare @TableParam
varchar(50)
Declare @TypeParam varchar(5)
Declare @ColumnParam1 varchar(8000)
Declare @ColumnParam2 varchar(8000)
Declare @ColumnParam3 varchar(8000)
Declare @ColumnParam4 varchar(8000)
Declare @ColumnParam5 varchar(8000)
Declare @ColumnParam6 varchar(8000)
Declare @ColumnParam7 varchar(8000)
Declare @ColumnParam8 varchar(8000)
Declare @ColumnParam9 varchar(8000)
Declare @ColumnParam10 varchar(8000)
Declare @ValueParam1 varchar(8000)
Declare @ValueParam2 varchar(8000)
Declare @ValueParam3 varchar(8000)
Declare @ValueParam4 varchar(8000)
Declare @ValueParam5 varchar(8000)
Declare @ValueParam6 varchar(8000)
Declare @ValueParam7 varchar(8000)
Declare @ValueParam8 varchar(8000)
Declare @ValueParam9 varchar(8000)
Declare @DOB datetime
Declare @ValueParam10 varchar(8000)
Set @QueueParam =
'police'
Set @DBNameParam = db_name()
Set @TableParam = 'LoPerson'
Set @TypeParam =
'I'
Set @ColumnParam1 = 'Person_ID'
Set @ColumnParam2 = 'Firstname'
Set @ColumnParam3 = 'Familyname'
Set @ColumnParam4 = 'Address_State'
Set @ColumnParam5 = 'Address_City'
Set @ColumnParam6 = 'Address_Street'
Set @ColumnParam7 ='DOB(yyyy-mm-dd hh:nn:ss.ttt)'
Set @ColumnParam8 = 'SSN'
Set @ColumnParam9 = 'Descriptions'
set @ColumnParam10 ='ADDRESS_ZIP'
Declare Table_Cursor
Cursor
Forward_Only
For
Select Person_ID, firstname,
Familyname, Address_State, Address_City, Address_Street,
DOB, SSN, DESCRIPTIONS, ADDRESS_ZIP From Inserted
Open Table_Cursor
Fetch Next From Table_Cursor
Into @ValueParam1,@ValueParam2, @ValueParam3,
@ValueParam4,
@ValueParam5, @ValueParam6,@DOB,@ValueParam8,@ValueParam9,@ValueParam10
While @@FETCH_STATUS <> -1
Begin
Set @ValueParam1 = Convert(varchar, @ValueParam1)
If
Len(@ValueParam1) > 255
Begin
Print 'Parameters are
longer than 255 characters...'
Return
End
If Len(@ValueParam2) > 255
Begin
Print 'Parameters are
longer than 255 characters...'
Return
End
If Len(@ValueParam3) > 255
Begin
Print 'Parameters are
longer than 255 characters...'
Return
End
If Len(@ValueParam4) > 255
Begin
Print 'Parameters are
longer than 255 characters...'
Return
End
If Len(@ValueParam5) > 255
Begin
Print 'Parameters are
longer than 255 characters...'
Return
End
If Len(@ValueParam6) > 255
Begin
Print 'Parameters are
longer than 255 characters...'
Return
End
Set @ValueParam7= Convert (varchar, @DOB, 121)
If Len(@ValueParam7) > 255
Begin
Print 'Parameters are longer than 255
characters...'
Return
End
Print 'Creating Message'
exec master.dbo.xp_triggermsg
@DBNameParam, @QueueParam,
@TableParam, @TypeParam,
@ColumnParam1, @ValueParam1,
@ColumnParam2,
@ValueParam2,
@ColumnParam3,
@ValueParam3,
@ColumnParam4,
@ValueParam4,
@ColumnParam5, @ValueParam5,
@ColumnParam6,
@ValueParam6,
@ColumnParam7,
@ValueParam7,
@ColumnParam8,
@ValueParam8,
@ColumnParam9,
@ValueParam9,
@ColumnParam10,
@ValueParam10
Print 'Creating Message'
Fetch Next From Table_Cursor Into @ValueParam1,@ValueParam2, @ValueParam3,
@ValueParam4,
@ValueParam5, @ValueParam6,@DOB,@ValueParam8,@ValueParam9,@ValueParam10
End
Close Table_Cursor
Deallocate
Table_Cursor
Delete Trigger
CREATE TRIGGER [dbo].[DeleteLoPerson]
ON
[dbo].[LOPERSON]
After Delete
As
Declare @DBNameParam
varchar(128)
Declare @QueueParam
varchar(128)
Declare @TableParam
varchar(50)
Declare @TypeParam varchar(5)
Declare @ColumnParam1 varchar(8000)
Declare @ColumnParam2 varchar(8000)
Declare @ColumnParam3 varchar(8000)
Declare @ColumnParam4 varchar(8000)
Declare @ColumnParam5 varchar(8000)
Declare @ColumnParam6 varchar(8000)
Declare @ColumnParam7 varchar(8000)
Declare @ColumnParam8 varchar(8000)
Declare @ColumnParam9 varchar(8000)
Declare @ColumnParam10 varchar(8000)
Declare @ValueParam1 varchar(8000)
Declare @ValueParam2 varchar(8000)
Declare @ValueParam3 varchar(8000)
Declare @ValueParam4 varchar(8000)
Declare @ValueParam5 varchar(8000)
Declare @ValueParam6 varchar(8000)
Declare @ValueParam7 varchar(8000)
Declare @ValueParam8 varchar(8000)
Declare @ValueParam9 varchar(8000)
Declare @ValueParam10 varchar(8000)
Declare @DOB datetime
Declare @Person_ID
int
Set @QueueParam='police'
Set @DBNameParam = db_name()
Set @TableParam = 'LoPerson'
Set @TypeParam =
'D'
Set @ColumnParam1 = 'Person_ID'
Set @ColumnParam2 = 'Firstname'
Set @ColumnParam3 = 'familyname'
Set @ColumnParam4 = 'SSN'
Set @ColumnParam5 = 'Address_State'
Set @ColumnParam6 = 'Address_City'
Set @ColumnParam7 = 'Address_Street'
Set @ColumnParam8 ='DOB(yyyy-mm-dd hh:nn:ss.ttt)'
Set @ColumnParam9 ='Descriptions'
Set @ColumnParam10 ='Address_ZIP'
Declare Table_Cursor
Cursor
Forward_Only
For
Select Person_ID, firstname,
Familyname, SSN, Address_State,Address_City,Address_Street,DOB,ADDRESS_ZIP,Descriptions
From Deleted
Open Table_Cursor
Fetch Next From Table_Cursor
Into @Person_ID,@ValueParam2, @ValueParam3,
@ValueParam4,
@ValueParam5, @ValueParam6, @ValueParam7, @DOB, @ValueParam9,
@valueParam10
While @@FETCH_STATUS <> -1
Begin
Set @ValueParam8 = Convert
(varchar, @DOB, 121)
Print 'Creating Message'
exec master.dbo.xp_triggermsg @DBNameParam,
@QueueParam,@TableParam, @TypeParam,
@ColumnParam1,@Person_ID,
@ColumnParam2,
@ValueParam2,
@ColumnParam3,
@ValueParam3,
@ColumnParam4,
@ValueParam4,
@ColumnParam5,
@ValueParam5,
@ColumnParam6,
@ValueParam6,
@ColumnParam7,
@ValueParam7,
@ColumnParam8,
@ValueParam8,
@ColumnParam9,
@ValueParam9,
@ColumnParam10,
@valueParam10
Fetch Next From Table_Cursor Into @Person_ID,@ValueParam2,
@ValueParam3, @ValueParam4,
@ValueParam5,
@ValueParam6, @ValueParam7, @DOB, @ValueParam9, @ValueParam10
End
Close Table_Cursor
Update Trigger
CREATE TRIGGER [dbo].[UpdateLoPerson]
ON
[dbo].[LOPERSON]
After Update
As
Declare @DBNameParam
varchar(128)
Declare @QueueParam
varchar(128)
Declare @TableParam
varchar(50)
Declare @TypeParam varchar(5)
Declare @ColumnParam1 varchar(8000)
Declare @ColumnParam2 varchar(8000)
Declare @ColumnParam3 varchar(8000)
Declare @ColumnParam4 varchar(8000)
Declare @ColumnParam5 varchar(8000)
Declare @ColumnParam6 varchar(8000)
Declare @ColumnParam7 varchar(8000)
Declare @ColumnParam8 varchar(8000)
Declare @ColumnParam9 varchar(8000)
Declare @ColumnParam10 varchar(8000)
Declare @DOB1 datetime
Declare @DOB2 datetime
Declare @ValueParam1 varchar(8000)
Declare @ValueParam2 varchar(8000)
Declare @ValueParam3 varchar(8000)
Declare @ValueParam4 varchar(8000)
Declare @ValueParam5 varchar(8000)
Declare @ValueParam6 varchar(8000)
Declare @ValueParam7 varchar(8000)
Declare @ValueParam8 varchar(8000)
Declare @ValueParam9 varchar(8000)
Declare @ValueParam10 varchar(8000)
Declare @ValueParam11 varchar(8000)
Declare @ValueParam12 varchar(8000)
Declare @ValueParam13 varchar(8000)
Declare @ValueParam14 varchar(8000)
Declare @ValueParam15 varchar(8000)
Declare @Person_ID1 int
Declare @Person_ID2 int
Declare @ValueParam16 varchar(8000)
/*for description column*/
Declare @ValueParam17 varchar(8000)
/*for description column*/
Declare @ValueParam18 varchar(8000)
/*for Zip column*/
Declare @ValueParam19 varchar(8000)
/*for ZIp column*/
Set @QueueParam='police'
Set @DBNameParam = db_name()
Set @TableParam = 'LoPerson'
Set @TypeParam =
'U'
Set @ColumnParam1 = 'Person_ID'
Set @ColumnParam2 = 'firstname'
Set @ColumnParam3 = 'familyname'
Set @ColumnParam4 = 'SSN'
Set @ColumnParam5 = 'Address_State'
Set @ColumnParam6 = 'Address_City'
Set @ColumnParam7 = 'Address_Street'
Set @ColumnParam8 = 'DOB(yyyy-mm-dd hh:nn:ss.ttt)'
Set @ColumnParam9 = 'Descriptions'
set @ColumnParam10 ='ADDRESS_ZIP'
Declare Table_Cursor
Cursor
Forward_Only
For
Select d.Person_ID, d.Firstname, d.Familyname, d.SSN, d.Address_State, d.Address_City, d.Address_Street,d.dob,d.Descriptions,d.ADDRESS_ZIP,
i.Person_ID,
i.Firstname, i.Familyname, i.SSN, i.Address_State, i.Address_City, i.Address_Street,i.dob,i.Descriptions,i.ADDRESS_ZIP
From Inserted i Inner Join deleted d On i.Person_ID = d.Person_ID
Open Table_Cursor
Fetch Next From Table_Cursor
Into @Person_ID1,@ValueParam2,
@ValueParam3, @ValueParam4,
@ValueParam5,@ValueParam6,
@ValueParam7, @DOB1, @ValueParam16,@ValueParam18, @Person_ID2,
@ValueParam9,@ValueParam10,
@ValueParam11, @ValueParam12, @ValueParam13,
@ValueParam14, @DOB2, @ValueParam17,@ValueParam19
While @@FETCH_STATUS <> -1
Begin
Set @ValueParam8 = Convert
(varchar, @DOB1, 121)
Set @ValueParam15 = Convert
(varchar, @DOB2, 121)
Print 'Creating Message'
exec master.dbo.xp_triggermsg
@DBNameParam, @QueueParam,
@TableParam,
@TypeParam,
@ColumnParam1, @Person_ID1, /* Person_ID */
@ColumnParam2, @ValueParam2,/* FirstName */
@ColumnParam3, @ValueParam3,/* FamilyName */
@ColumnParam4, @ValueParam4,/* SSN */
@ColumnParam5, @ValueParam5,/* Address_State*/
@ColumnParam6, @ValueParam6,/* Address_City*/
@ColumnParam7, @ValueParam7,/* Address_Street*/
@ColumnParam8,
@ValueParam8,/* DOB */
@ColumnParam9,
@ValueParam16,/* Descriptions*/
@ColumnParam10,
@ValueParam18,/* ZIP*/
@ColumnParam1, @Person_ID2,/* Person_ID */
@ColumnParam2, @ValueParam9,/* FirstName */
@ColumnParam3, @ValueParam10,/* FamilyName */
@ColumnParam4, @ValueParam11,/* SSN */
@ColumnParam5, @ValueParam12,/* Address_State*/
@ColumnParam6, @ValueParam13,/* Address_City*/
@ColumnParam7, @ValueParam14,/* Address_Street*/
@ColumnParam8, @ValueParam15,/* DOB */
@ColumnParam9,
@ValueParam17,/* Descriptions*/
@ColumnParam10,
@ValueParam19/* ZIP*/
Fetch Next From Table_Cursor Into @Person_ID1,@ValueParam2,
@ValueParam3, @ValueParam4,
@ValueParam5, @ValueParam6,@ValueParam7, @DOB1, @ValueParam16,@ValueParam18,
@Person_ID2, @ValueParam9, @ValueParam10,
@ValueParam11, @ValueParam12,
@ValueParam13, @ValueParam14, @DOB2, @ValueParam17,@ValueParam19
End
Close Table_Cursor
Deallocate
Table_Cursor
MSMQ is the intermediary messaging system between data
source monitoring systems (in this case the extended stored procedure called by
the triggers) and EIQ RTIS. The stored procedure writes the messages, and EIQ
RTIS monitors the queue to find messages and update the EIQ
Indexes.
To set up a message queue, follow these steps:
·
Go to Control Panel->Administrative
Tools->Computer Management
·
Connect to the machine where the triggers are
located. If it's not local, right-click on Computer Management, select ‘Connect
to another computer…’, and provide the machine name.
·
Expand 'Services and Applications' in the left
pane of the Computer Management window.
·
Expand ‘Message Queuing’.
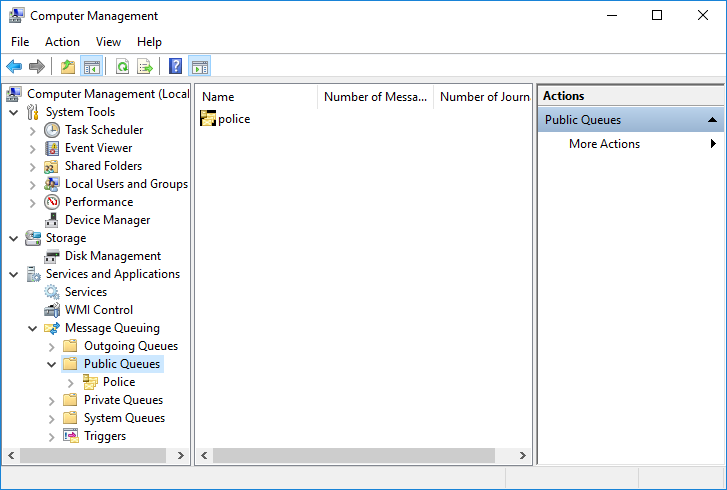
·
Right click on public queues and select
new->public queue.
·
Give queue name as 'Police' (same name as given
in triggers 'QueueParam') and click 'OK'.
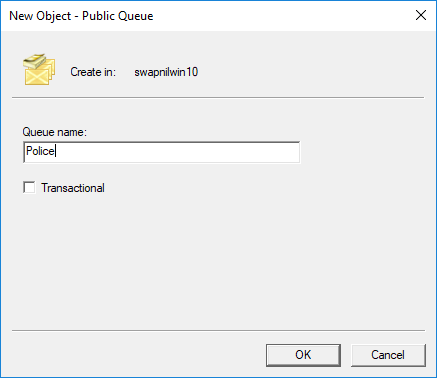
You should see the queue name (Police) inside public queues
in the left pane of the Computer Management window.
·
Now click on Public Queues and you will see all
the queues in the right pane of Computer Management window.
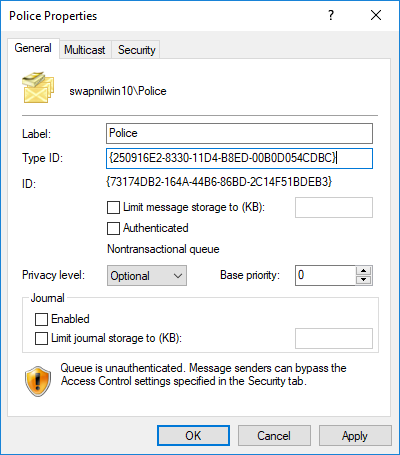
·
Right click on Police and select 'Properties'.
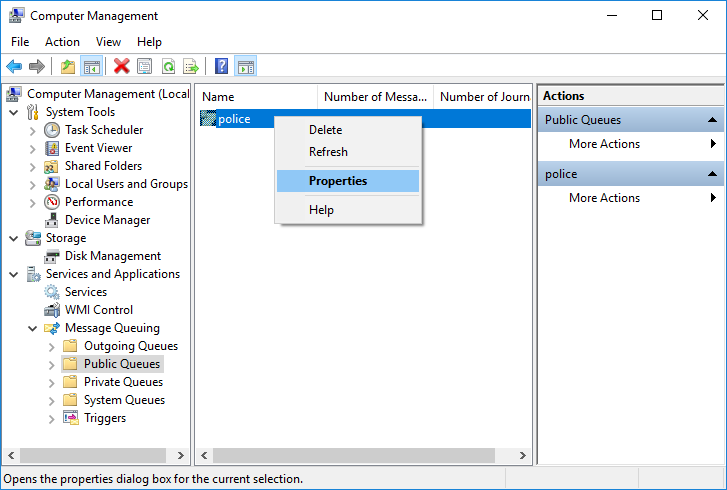
In the Type-ID box, enter
{250916E2-8330-11D4-B8ED-00B0D054CDBC} including the parenthesis. In
the security tab, make sure you have the MSMQ user group added to it.
Before
configuring EIQ RTIS, it is important to check whether the message queue
receives messages from triggers or not.
If EIQ RTIS is running:
·
Stop it by going to Control Panel and opening
Administrative Tools.
·
Open "Services". Right-click on
"WhamTech EIQ RTIS " (see the right-pane) and select 'Stop'.
Test the message queue:
·
Insert, Update, or Delete a row in the LOPERSON table
of the POLICE database using the SQL Server Management Studio and you should be
able to see those messages under the MSMQ public queue 'police' in:
Control Panel->Administrative Tools->Computer Management.
·
After ensuring that the Message Queue is
working, start EIQ RTIS by going to Control Panel->Administrative
Tools->Services, right-clicking on "WhamTech EIQ RTIS", and
selecting "Start".
If users are experiencing issues with public queues, private
queues can be created instead. See MSMQ
Private Queues for detailed steps on setting up a private
queue.
For troubleshooting issues with public queues, see MSMQ
Public Queues.
Configure EIQ RTIS to monitor for update messages at the
specified MSMQ queue and update the corresponding EIQ Indexes.
First, check whether "WhamTech RTIS" is running.
If not, start the service.
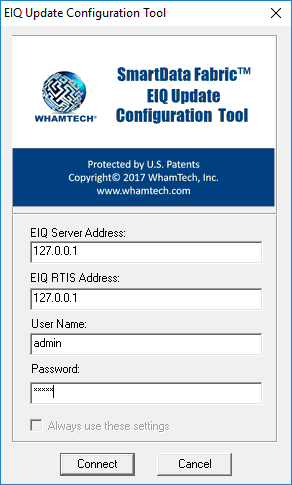
·
Open the EIQ Update Configuration Tool.
·
Enter the EIQ Server Address and EIQ RTIS
Address. Type in the Username and Password and click 'Connect'.
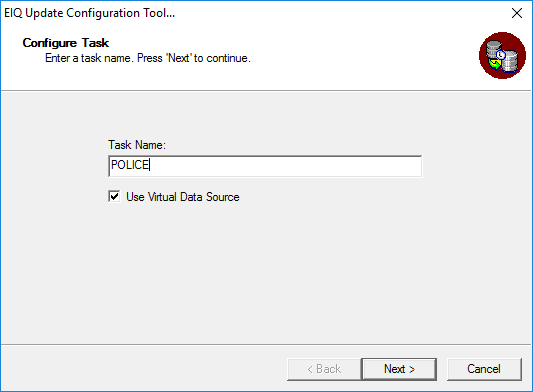
·
Right-click 'Tasks' and select 'New
Task'.
·
Enter "POLICE" as the task
name and click 'Next'.
·
Select the POLICE_VDS and click 'Finish'.

Note:
If you get the error "Failed to connect to EIQ Server. Please restart
the EIQ Update Configuration Tool", check if the EIQ Server
Configuration Tool is open. If it is open, close it and restart the EIQ Update
Configuration Tool.
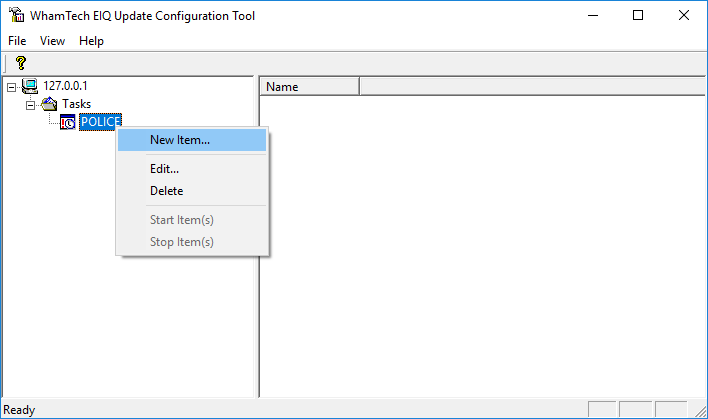
·
Right- click POLICE and select 'New
Item'.
·
Enter POLICE as the task item name.
·
Select the POLICE data source from the list.
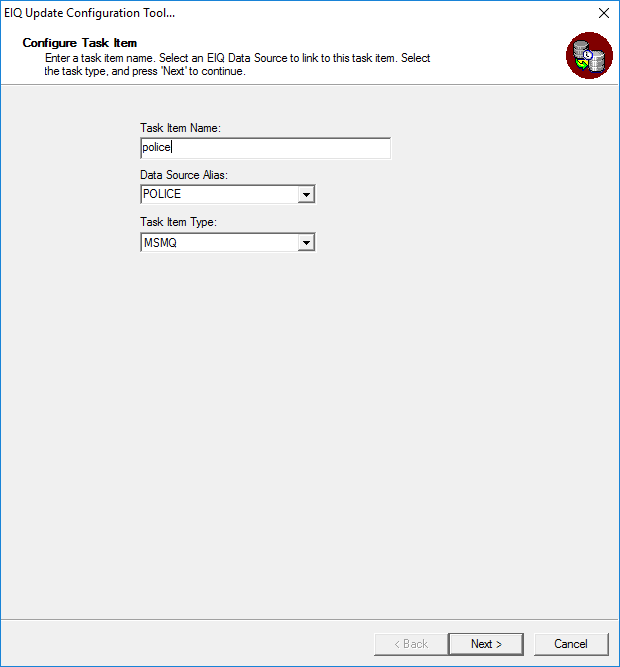
·
Select 'MSMQ' as the task item
type and click 'Next'.
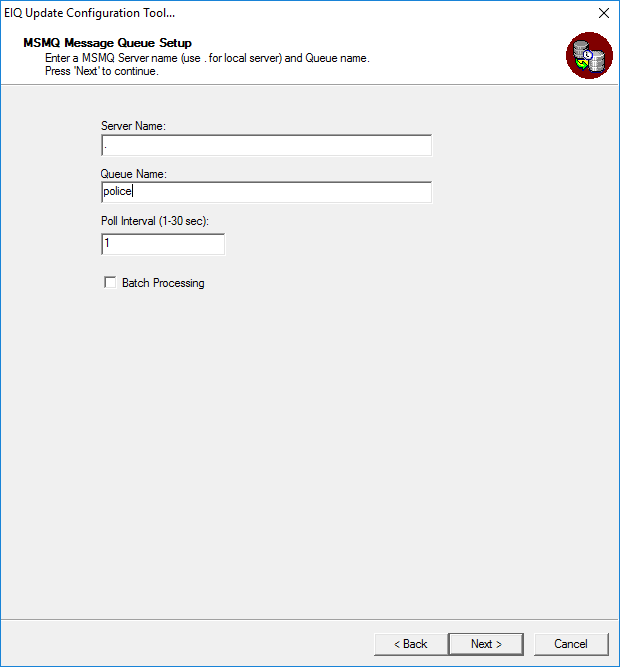
·
Enter "." (a period) as the server
name if it is a local server; otherwise, enter the appropriate server
name.
·
Enter 'police' as the Queue name (the name
assigned to the queue) and click 'Next'.
·
Select the tables you want EIQ RTIS to
monitor by selecting the table and clicking 'Add' or add all the tables by
clicking 'Add All'.
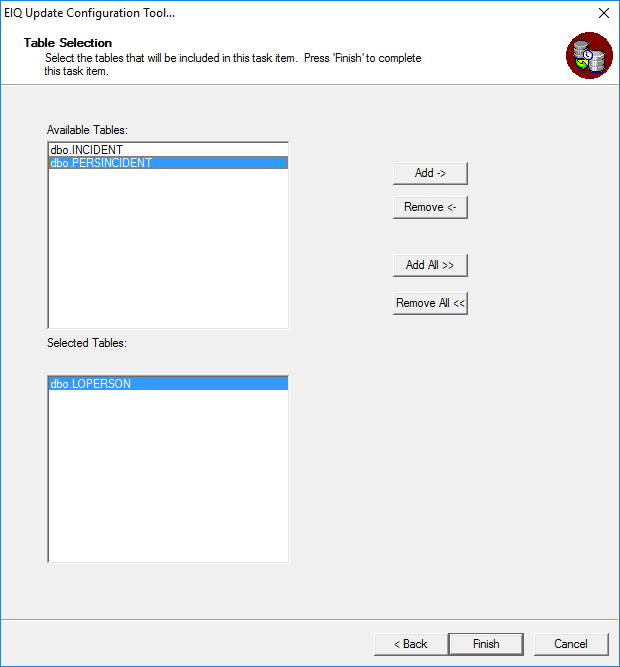
·
Click 'Finish'.
·
Right-click the POLICE task item and you can see
options to start and stop. Once you start EIQ RTIS, you should able to see
the following window.

If you insert/update/delete a row in POLICE database
LOPERSON table now, the change should reflect in POLICE_INDEX also.
Similarly, configure task items for the other tables in
POLICE.
This step will show you how to run a sample query before and
after modifying data in the POLICE database.
Execute sample queries:
·
In the EIQ Server Query Tool, connect to the
POLICE_VDS with 'SchemaInterface = StandardDataView'.
·
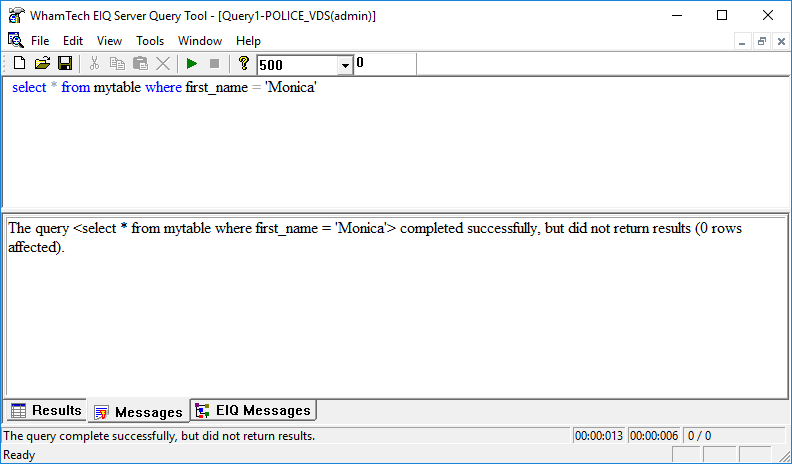
Execute the following query:
SELECT * FROM Mytable WHERE first_name = 'Monica'
It doesn't return any rows because there are no
records where the first name is 'Monica' in the PERSON
table of the POLICE data source.
Next, you will Insert, Update, and Delete a sample row from
the data source using the Query Analyzer and see the changes reflect when
querying with the EIQ Server Query Tool.
Inserting a Record into the LOPERSON Table of the POLICE
Data Source
·
Execute the following query in the Query
Analyzer of Microsoft SQL Server in the POLICE database.
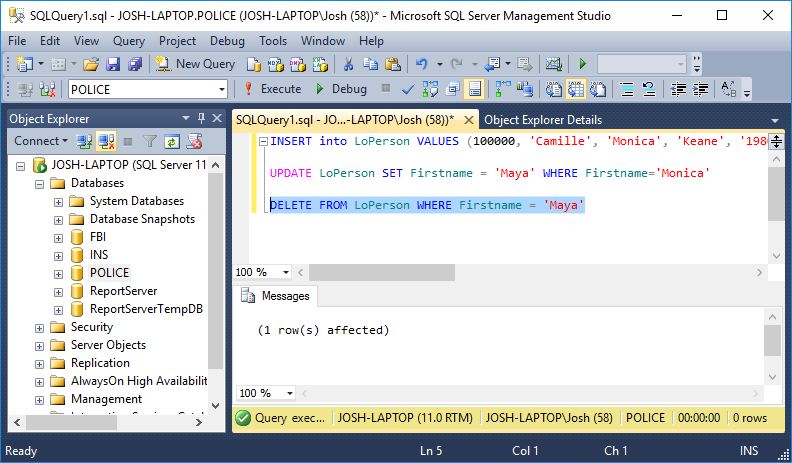
INSERT into LoPerson VALUES
(100000, 'Camille', 'Monica', 'Keane', '1980-01-01','123456789','TX','7654321','1990-01-01','312
UTA Blvd', 'Arlington', 'TX', '76010','Record inserted',NULL);
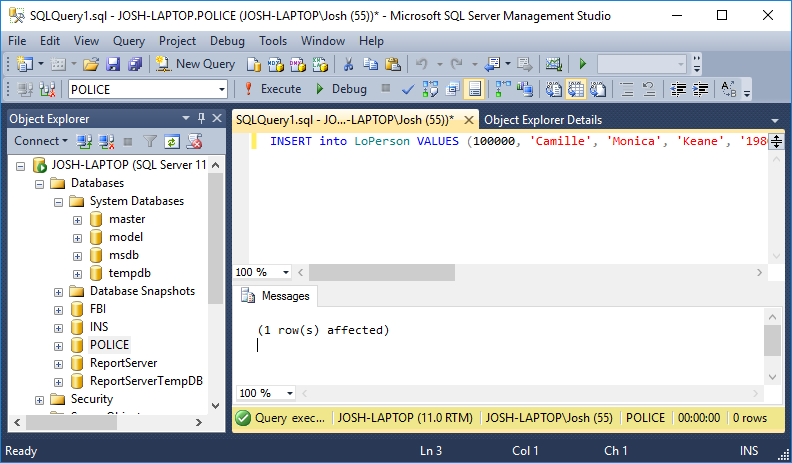
Inserting the above row in the data source should have
updated the index through MSMQ and EIQ RTIS.
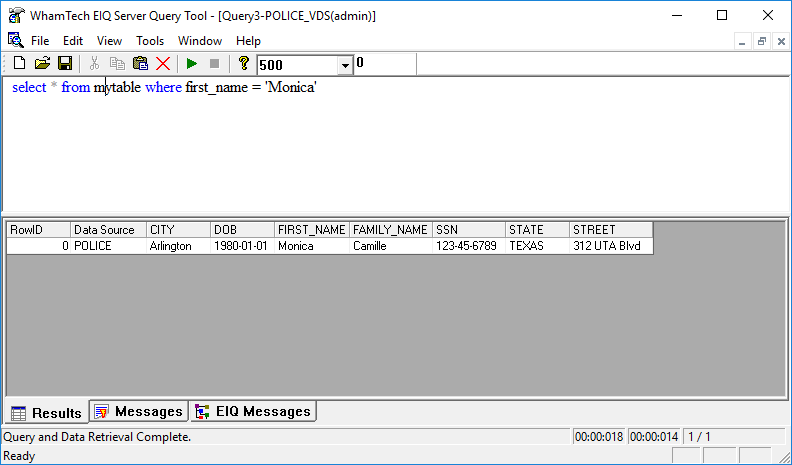
·
Now, execute the query in the EIQ Server Query
Tool.
SELECT * FROM Mytable WHERE first_name = 'Monica'
Now, it returns a record with the first name 'Monica';
a record that was not there previously.
Updating a record in the LOPERSON table of
the POLICE data source
·
Execute the following query in the Query
Analyzer of Microsoft SQL Server in the POLICE database.
UPDATE LoPerson SET Firstname = 'Maya' WHERE Firstname='Monica'
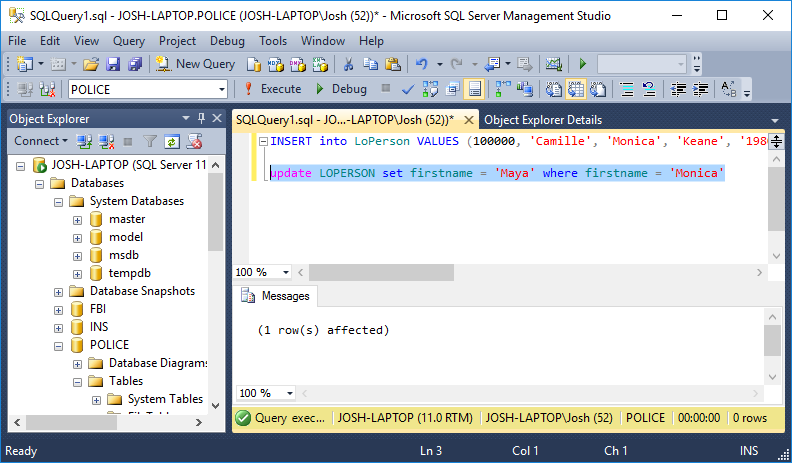
It says that one row is updated.
·
Now, execute the query in the EIQ Server Query
Tool.
SELECT * FROM Mytable WHERE first_name = 'Maya'

It should return the record with the first name changed
from 'Monica' to 'Maya'. All the other details remain the same.
Deleting a record from the LOPERSON table of the
POLICE data source
·
Execute the following query in the Query
Analyzer of Microsoft SQL Server in the POLICE database.
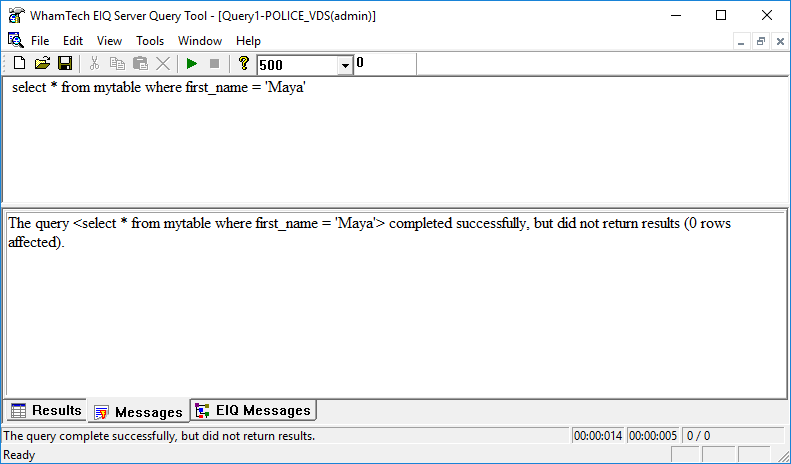
DELETE FROM LoPerson WHERE Firstname = 'Maya'
It says one row is affected which means that the record is
deleted.
·
Now, execute the query in the EIQ Server Query
Tool.
It should say
that the query did not return results. This means that the record has been
deleted from EIQ Index as well.