
EIQ Mainframe Data File (MDF) Access and Query System
Structure of the MDF DSN Configuration File
Creating the MDF DSN Configuration File
Step 1: Information Collection
Notes on Converting ASCII Copybooks to XML
Step 3: MDF DSN Configuration File Editing.
Step 4: Configuration File Location Paths
Go through the remaining dialog(s) and click 'Finish' on the last dialog.
EIQ RTI Tool for creating Indexes on MDF data
Virtual vs. Non-Virtual Keyed Indexes
Primary Key(PK) - Foreign Key (FK) Assignment
EIQ Query Tool to execute queries on MDF Data
Maintenance and Backup for Administrators
Rebuilding indexes while system is in production.
Miscellaneous System Optimization procedures
WhamTech's EIQ Mainframe Data File (MDF) Access and Query system enables access to hierarchical data stored in mainframe data files, helps to interpret the schema as a relational model, and enables users to build indexes and execute complex SQL queries against the data without using a mainframe system.
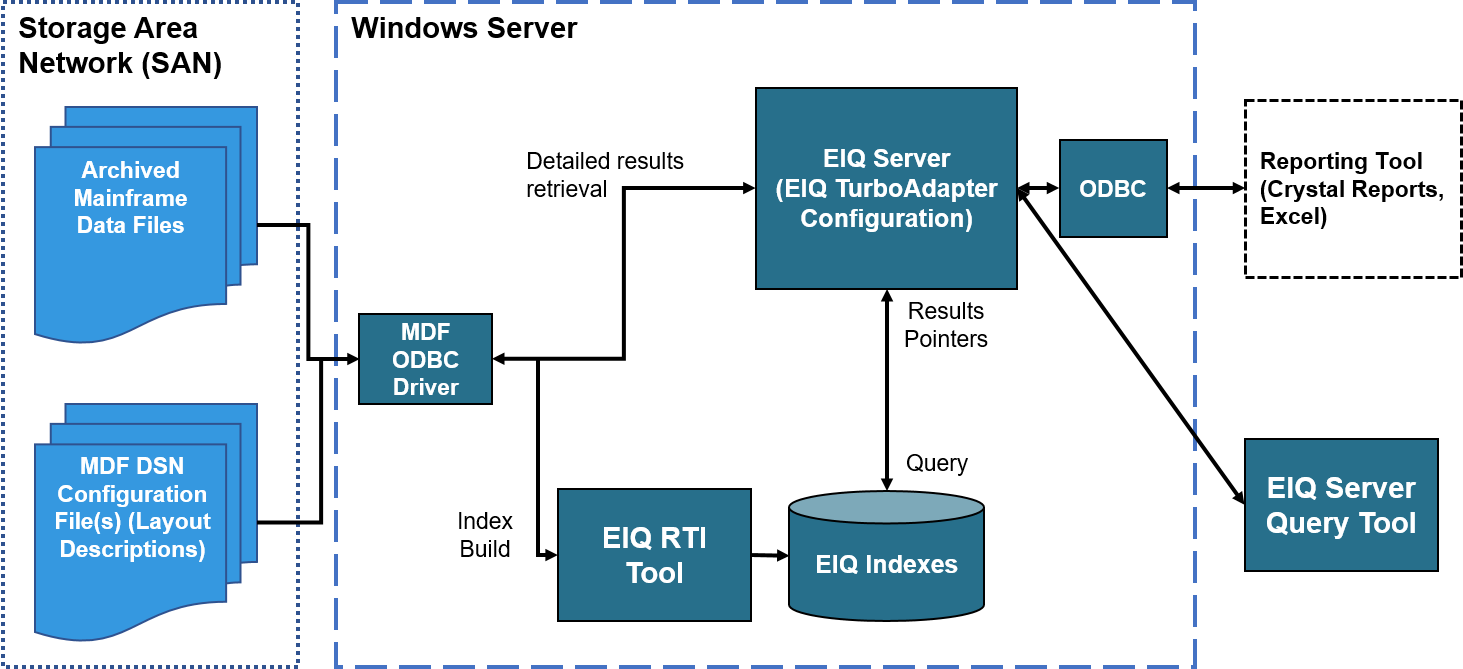
Figure: EIQ Product Configuration Context Diagram
The EIQ Server RTI Tool and the EIQ Server use the WhamTech Mainframe Data File Driver to access mainframe data files through an ODBC interface. Data admins need to configure an MDF DSN (Data Source Name) for each set of logically related mainframe data files to form a single data source and point the EIQ Product Tools to the DSN.
There can be more than one MDF DSN configured at an MDF ODBC Driver. The EIQ Product Tools consider each DSN as a separate data source. Users must use an EIQ Federation Server or Attach mode configuration to make queries across DSNs.
Each MDF DSN has an associated MDF DSN configuration file containing all the information the EIQ Product Tools need to identify the mainframe data files, understand the record layouts, read the relevant data, build EIQ Indexes, and retrieve the results.
The MDF DSN configuration file is an important component for setting-up WhamTech's EIQ Products to access mainframe data files. The MDF DSN Configuration file is an XML file created by data admins that contain various sections and tags. They describe all the information needed by the EIQ Tools.
The Configuration File can be broadly divided into four sections:
This section appears within the <Data_File_List> tag in the configuration file. It lists every mainframe data file that needs to be configured as part of a DSN in the ODBC driver.
Each file has its own <File> tag with the following attributes:
The DataSets section contains one or more <DataSet> tags. Each DataSet tag contains information that links one or more Data Files to relevant Copybook sections. The DataSet information is classified into three sections, represented by the following tags:
For example:
<FileSet>
<File tag="D0950_FILE_ONE"/>
<File tag="D0950_FILE_TWO"/>
</FileSet>
If Multiple_Records is TRUE, the following syntax is followed to specify the configuration information:
a. The <Field_Decode> tag lists the copybook field level and the Header name to locate the corresponding records. For example, <Field_Decode level="01" Header="REC-HEADER">.
b. The <Identifier> tag is used to specify the Identifier (Record Type) field name within the header and to evaluate the record. For example, <Identifier name="REC-HEADER" />.
c. The <case> tag: Multiple <case> tags are used to specify all possible values of the identifier field, along with extra information needed to decode the rest of the record when the value being read matches a possible value. For example, <case value="BB">.
For each value in the identifier field, the following information is needed with the <Subsections> tag:
- Each subsection is indicated by an <item> tag with attributes 'section', 'level' and 'value'. For example, <item section="D2486" level="01" value="BB-REC" />.
The 'Section' attribute value refers to the copybook name that appears one level under the <CopyBooks> section of the configuration file that contains information about this type of record. The 'level and 'value' tags refer to the beginning of the corresponding record in the copybook layout.
The <item> tags should specify every parent level that is part of the remaining record layout. You do not need to specify the children nodes if the parent is already included.
If Multiple_Records is FALSE, the following syntax is followed:
a. <Subsections> tag: This tag is used to indicate the relevant copybook name and information on subsections within the copybook that the record type refers to. The syntax is similar to the one shown above for Multiple Records under point (c).
'Schema' is an optional attribute of the <DataSet> tag. You can assign a schema name to the tables and columns that comprise a Data Set. For example, <DataSet schema="DBO">
This section contains XML representations of the COBOL copybooks that describe the layout of records in the data files. This section contains additional information than regular copybook files, including the calculated offsets and the calculated field widths.
This section contains information about the data source table sizes like the number of records. This tag is created automatically by the MDF ODBC driver the first time the configuration file is used by the EIQ Server RTI Tool to build indexes.
|
Note: If you make changes later to the configuration file, especially to the DataSets or File List sections that can cause a change in Table sizes, you MUST delete the <Table_Size_info> tag before re-connecting to the DSN through the EIQ Server RTI Tool. |
Creating the MDF DSN Configuration file involves the following steps:
Admins can prepare by collecting all the relevant information needed about the mainframe data files to create the MDF DSN configuration files. Most of the information can be obtained from a person knowledgeable of the mainframe data files by using the "Mainframe Data File Information Template". The template provides the list of properties needed for each data file being configured.
The XML representation of the COBOL copybooks needed for the CopyBooks section of the DSN configuration files are obtained from the existing copybooks by, first, converting the copybooks from EBCDIC to the ASCII format. WhamTech provides a tool used for this purpose. It can be found under "<WhamTech Installation Folder>\EIQ Server SDK\Tools\ EBCDIC-to-ASCII Converter".
Next,
use a copybook to XML convertor. A tool to convert copybook (ASCII) to XML,
CB2XML, is found at: http://sourceforge.net/projects/cb2xml/. Once installed,
use the command-line prompt to change the directory to "<cb2xml install
folder>\bin", and execute the following command:
"cb2xml.bat <input-ASCII-copybook-file> > <outputfilename.txt>"
This command redirects the XML output to a file. Some COBOL copybooks may need pre-editing to remove any problem text not recognized by the CB2XML tool.
When converting the ASCII copybooks to XML, follow the steps below. This ensures that the CB2XML application converts the files successfully:
CB2XML (Copybook to XML) Tool Properties:
Copybook Pre-editing Tips:
Special Note for Date Fields
If you wish to query on a group of fields in the Copybook as a DATE field in the EIQ indexes, you would have to make the following changes to the XML representation of the copybook:
If the old fields are represented as:
<item display-length="8" level="10" name="T0901-IN-DATE" position="59" storage-length="8">
<item display-length="2" level="15" name="T0901-IN-CC" picture="X(02)" position="59" storage-length="2"/>
<item display-length="2" level="15" name="T0901-IN-YY" picture="X(02)" position="61" storage-length="2"/>
<item display-length="2" level="15" name="T0901-IN-MM" picture="X(02)" position="63" storage-length="2"/>
<item display-length="2" level="15" name="T0901-IN-DD" picture="X(02)" position="65" storage-length="2"/>
</item>
Replace the above with:
<item dateField="true" dateFormat="YYYYMMDD" display-length="8" level="10" name="T0901-DATE-NEW" picture="X(08)" position="59" storage-length="8"/>
|
Note: 1. Ensure that you update the display-length, level, picture, and storage-length correctly as shown above. 2. The dateField="true" attribute is required for a field that you wish to index as DATE. 3. The dateFormat="YYYYMMDD" attribute is optional. If the original format does not contain dashes or slashes, or is not one of the standard formats, you need to use YYYYMMDD. It is currently the only supported non-standard format. |
Once the data file information and XML representation of the copybooks are ready, use an XML editor such as XMLPad to create and populate a MDF DSN configuration file - the structure of which is described in detail above.
Now that the MDF DSN configuration file has been created and populated, there is one final step. Right-click the XML file and open it in Notepad to look at the location path.
Make sure the location path for the data files are correct. If the files are moved to a different folder, this path needs to be updated.
For every configuration XML file that you want to create, you need to create a corresponding ODBC DSN in the ODBC Data Source Administrator.
To create an MDF DSN, register the WhamTech MDF ODBC Driver with Windows through the EIQ Product Suite Installation Media. The WhamTech MDF ODBC Driver only needs to be registered once.
Next, open the Windows ODBC Data Source Administrator and click 'Add' to select 'WhamTech MDF File Driver'.
Follow the directions in the MDF ODBC driver configuration dialog. Enter the MDF DSN name and full path to the associated MDF DSN configuration file.
The EIQ Server RTI Tool uses MDF ODBC Driver to access and translate the hierarchical MDF schema into a relational one. This allows admins to select the tables and columns of interest and build indexes on them.
A
complete description of the EIQ Server RTI Tool is available in the EIQ Product
Suite Help documentation.
A few features or steps of interest to MDF users are detailed below.
Open the EIQ Server RTI Tool and enter the login credentials to create a new index. Specify the DSN information corresponding to the one created earlier where to save the index files. The tables and columns from the MDF Data are loaded and displayed in the left pane of the EIQ Server RTI Tool. The tables and columns seen are as per the layouts specified in the Copybooks. The right-hand pane shows the tables and columns that an admin wants to index.
The EIQ Server RTI Tool initially loads in Profiling mode. This mode provides basic data profiling features to aid in data cleansing before building a final index. However, Mainframe Data Files make little use of Profiling mode. Skip Profiling mode and go to RTI mode in order to build and save the EIQ indexes that are better utilized for MDF data sources.

When
you add a column to the index, the index is assigned as a Virtual Keyed index
by default. This means that the data for the column is not stored with the
index. However, the column can be used for isolation conditions in SQL
queries. If you want to use a column for JOIN queries, aggregates, or
GROUP BY clauses, it is highly recommended that you add it to the index as a
Non-Virtual Keyed index. In a Non-Virtual Keyed field, the data is also stored
with the indexes. All RowID fields, Primary keys, and
Foreign keys that are assigned through the EIQ Server RTI Tool are stored as
Non-Virtual keys. A RowID field is a column or group
of columns that make a record within a table unique.
Any column that is NOT added to the right pane is stored as a Virtual Non-Key. Such columns can only be used in the SELECT list of a query and are termed as 'RESULTS ONLY' columns.
To change the default key mode, select 'Options' from the 'Tools' menu and click on the 'Default Key' tab.
Note: Changing the default key type does not change the key type for any previously added columns. You need to remove the columns and re-add them to the index or right-click on the column name and select 'Non-Virtual Key'.
The MDF ODBC driver uses the Data File offset as a unique identifier within every table to track a record in the index back to the Data File location. In the EIQ index, it is called as PLOC. When you create a new index, you must assign all PLOC fields as Primary ROWID fields. If the original layout of the data demands that a table be split into multiple child tables (for example, due to an OCCURS clause), then every child table will also have a 'ParentPLOC' field. In such a case, the PLOC field in the parent table would be a Primary Key for the 'ParentPLOC' field in the child table. Indicate this in the EIQ Server RTI Tool by assigning the parent table PLOC field as 'Primary Key'. Right-click on column name, click on 'Modify Flags', and click 'Primary Key'.
Next, assign the ParentPLOC field in the child table as Foreign key for the above field. Right-click the column name, click on 'Modify Flags', click 'Foreign Key for', and choose the appropriate Primary Key.
Once the required tables are added, the necessary columns are indexed, and the correct PK-FK and Virtual/Non-Virtual Key assignments are made, the index is ready to be built. Click 'Build EIQ Index' on the toolbar, or through 'Tools' > 'Build'.
The EIQ Server RTI Tool also offers a feature to build only specific changes to the index at a later time. For example, if new MDF files are added to the system resulting in new tables to the original schema, these tables can be added later and the index built in a discrete fashion. Also, depending on the queries that may be executed against the index, a group of fields could change from Virtual to Non-Virtual or vice-versa. Also, columns and tables could be removed from the existing index. These kinds of changes can be selectively applied to the index through the discrete build process. For more information, see the EIQ Server RTI Tool help.
To perform a discrete build while the EIQ Server system is in production and the index is being used, you have to take the relevant Virtual Data Source and Index offline. This is done through the EIQ Server Configuration Tool. After the build, bring the VDS and Index back online. Specific steps to perform these operations are provided below under the section "Maintenance and Backup".
See the EIQ Server Configuration Tool for more information on session management.
Once the EIQ Index has been built, the MDF Data source can be configured as an EIQ TurboAdapter.
For complete description of the EIQ Server and its configurations, see the EIQ Server Configuration Tool and EIQ Product Server Introduction.
Open the EIQ Server Configuration Tool and click on the Data Sources tab. Here, you can create a new EIQ Data Source and point it to the MDF ODBC DSN created earlier.
Next, create a new Virtual Data Source (VDS) through the VDS tab. This should include the Index-Data Source pair, both which were created in the steps above.
To query on the original data source as an EIQ TurboAdapter, you can assign alias names to the Tables and columns in the original schema. This is done through the 'TurboAdapter Alias Mapping' tab. For more information, see the EIQ Server Configuration Tool under "Configuring EIQ Server".
The EIQ Server also provides Session Management capabilities. To read more about these capabilities and how they can take data source and index connections offline and online or monitor client connections, see the EIQ Server Configuration Tool under "EIQ Server Session Management".
The EIQ Server Query Tool is an end-user client application that used to connect to the EIQ Data Source to execute queries against the data source or indexes. The indexes built earlier speed up query processing to a large extent if built optimally. To connect to the EIQ Server Data Source, enter the login credentials, specify the VDS name configured through the EIQ Server Configuration tool, and use the 'SchemaInterface = Native' connection string.
See EIQ Server Query Tool for a complete description.
Users can query "SCHEMA TABLES" or "SCHEMA COLUMNS" to get an understanding of the schema in the index and the data source. Then, they can use this information when executing other queries.
Users can also set a limit on the number of results that are displayed. The limit is 2000 results by default. To change the limit, open the 'Options' dialog from the 'Tools' menu and change the ' Results Retrieval Limit'. A value of '0' (zero) for this field indicates there is no limit and all results are returned by the server.
The EIQ query processing engine supports ANSI SQL 92 standards. For more information on the supported SQL syntax, see WhamTech Native API (WhamNAPI).
Note: If tables and columns were assigned alias names through a TurboAdapter configuration, only the alias names can be used in the queries. For aliased tables and columns, the original schema names cannot be used in the queries.
Query results can be exported to HTML or ASCII delimited text files by using "Export Results As" from the File menu.
Queries can also be saved (as .QTF files) and retrieved at a later point.
The EIQ Diagnostics Tool is used to view diagnostic messages from EIQ Server Suite components. This diagnostic trace helps EIQ Server users and developers track down and diagnose any issues with EIQ Server Suite components.

The EIQ Diagnostics Tool allows users to open more than one window in order to view messages from multiple applications, or different facets of the same application, at the same time.
To clear the messages from all the windows
open in the current session, click the ![]() icon on the toolbar. To clear messages from
the currently selected window, click the
icon on the toolbar. To clear messages from
the currently selected window, click the ![]() icon.
icon.
Applications that are typically monitored for diagnostic messages involving Mainframe Data Files are EIQ_RTI_TOOL, WhamNAPI_EIQ_RTI, and MDF_ODBCDriver_EIQ_RTI during Index building; and EIQ_Server and WhamNAPI_EIQServer during EIQ TurboAdapter configuration and query execution and retrieval.
See EIQ Diagnostics Tool for more information.
This section discusses the issues related to EIQ Server Suite configuration backup-and-restore procedures. EIQ Admins should back-up related files regularly to enable a quick recovery of the most recent working state in case of failures.
It is a good practice to backup important and necessary EIQ Server Suite Configuration related files at regular intervals.
Before copying configuration files, make sure that the EIQ Servers are stopped. These include WhamTech EIQ Server and WhamTech EIQ RTIS. Stop them in the Windows Services menu.
The following are the EIQ Server Suite files to back-up:
EIQ Index Files: The index files built through EIQ Server RTI Tool in "Profiling" and "RTI" mode are placed in "C:\Program Files\WhamTech\Data" by default under folders named after the respective index names. If you chose a folder other than default folder when building indexes, copy the index files from that folder.
EIQ Index-Map Files: These are the .RTI.XML files that are saved when you build an index using the EIQ Server RTI Tool. If they are in a different location from the index files, ensure that you back these up too.
EIQ Server Configuration Files: All the EIQ Server configuration information such as Virtual Data Sources, registered Data Sources, Data Source-Index pairings, and TurboAdapter alias mappings are stored in the "Settings\EIQConfig" folder in the EIQ Server Installation folder. This is stored in the " C:\Program Files\WhamTech\ " folder by default. The "EIQConfig" folder needs to be backed up.
MDF DSN Configuration Files: These are the configuration files (XML) created in the first step by using information from the Mainframe Data Files and copybooks.
EIQ Server Query Tool Files: The query files saved from EIQ Server Query Tool can be stored anywhere, but it is recommended to them store with the index files in the respective index folders. Make a copy of these files.
See Maintenance and Backup for more information.
If the EIQ Server is maintaining connections to several indexes and you want to rebuild one of them to add new data files to an existing configuration or add a new table or column to the index, you only need to take the relevant Virtual Data Source and Index offline, build the indexes, and bring the VDS and Index back online. The detailed steps in an MDF configuration are:
Before you build indexes on the data and query them, make sure you have the following settings and tools in place:
Apart from the above steps, go to ‘Windows Services’ and disable the 'Indexing Service'.
HKEY_LOCAL_MACHINE\Software\Whamtech\Engine\TempPath
The format of the data for the TempPath parameter is <TempFolder1>;<TempFolder2>; For example, C:\temp;D:\temp or "C:\temp";"D:\temp"
Preferably, <TempFolder1> should be on the alternate HD from where the EIQ Index files are located.
Specifying this significantly improves query performance.
Additionally, defragment your disk drives periodically to keep the system running optimally. Fragmented disk drives could adversely affect query performance.
Copyright © 2019 , WhamTech, Inc. All rights reserved. This
document is provided for information purposes only and the contents hereof are
subject to change without notice. Names may be
trademarks of their respective owners.