
Tutorial Scenario: EIQ Federation Server Configuration
Step 1: Configure SuperAdapter VDSs for the other sample data sources
Step 2: Configure Federation Server VDS
Register Remote EIQ SuperAdapter VDSs
Configuring Federation Server VDS
Step 3: Execute sample queries
An EIQ Federation Server configuration provides a single interface to access multiple data sources. It connects to each of the configured data sources through their EIQ SuperAdapter VDS.
For more details regarding various configurations, see the EIQ Product Server Introduction.
This scenario takes you through the following major steps:
Step 1: Configure SuperAdapter VDSs for the other sample data sources.
Step 2: Configure the Federation Server VDS.
Step 3: Execute sample queries.
In a typical EIQ Federation Server deployment, EIQ SuperAdapters reside on separate machines each dedicated to a single data source. An EIQ Federation Server then connects with them remotely. In this tutorial, the EIQ SuperAdapters and EIQ Federation Server are configured on a single machine.
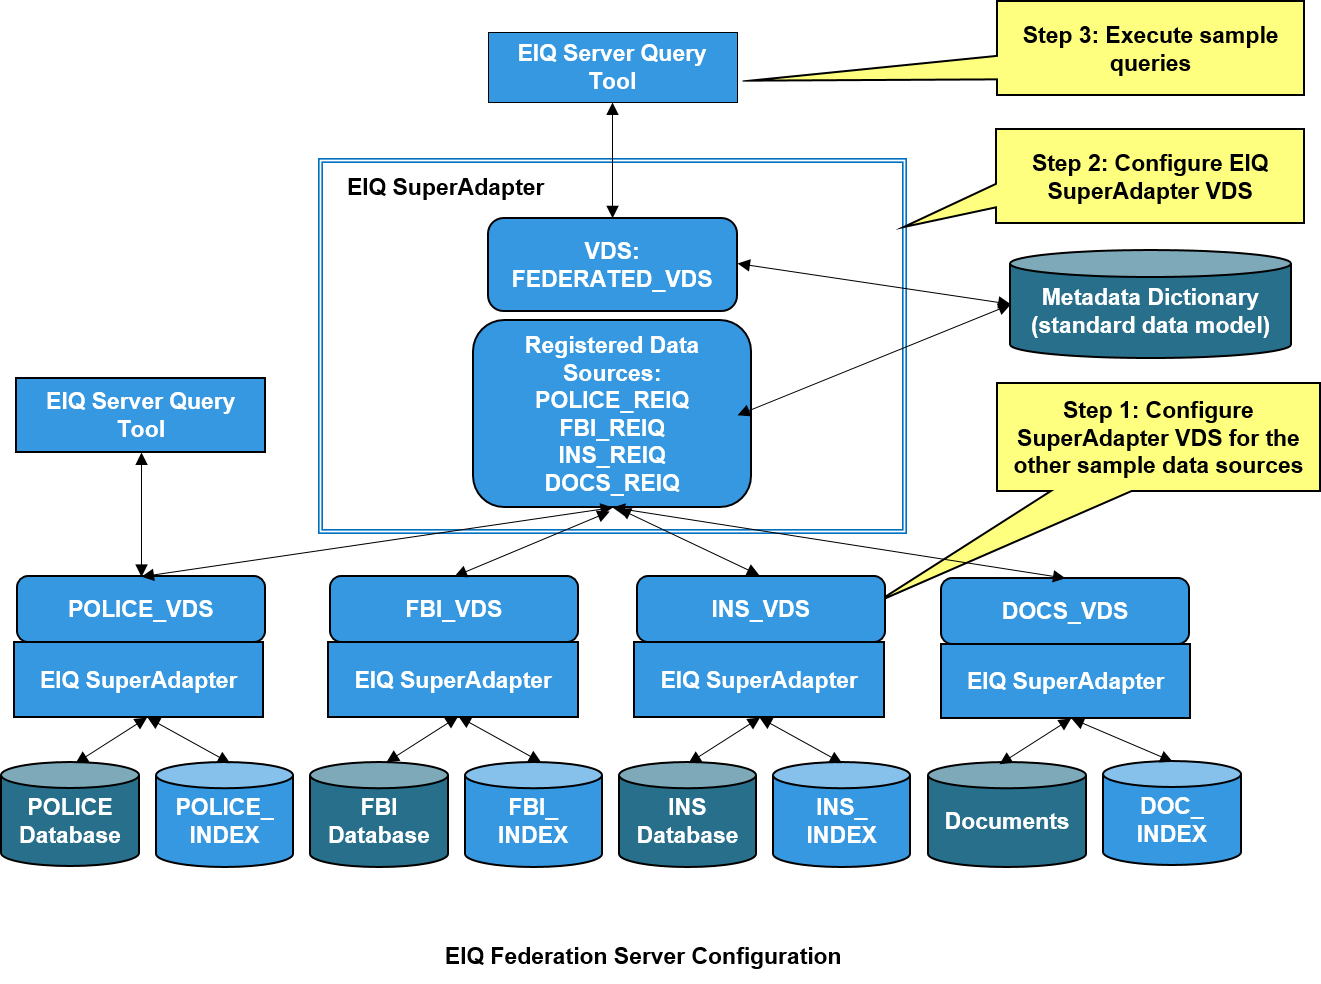
First, you need to set up an EIQ SuperAdapter VDS for the other sample data sources (FBI, INS, and Documents). For FBI and INS, the procedure is similar to setting up the POLICE EIQ SuperAdapter VDS outlined in Scenario 1. The Documents data source requires different steps for index building and configuration. See below for more instructions for each data source.
Build an EIQ Index for FBI:
· Open the EIQ Server RTI Tool.
· Connect to the 'FBI' DSN and create a new EIQ Index called 'FBI_INDEX'.
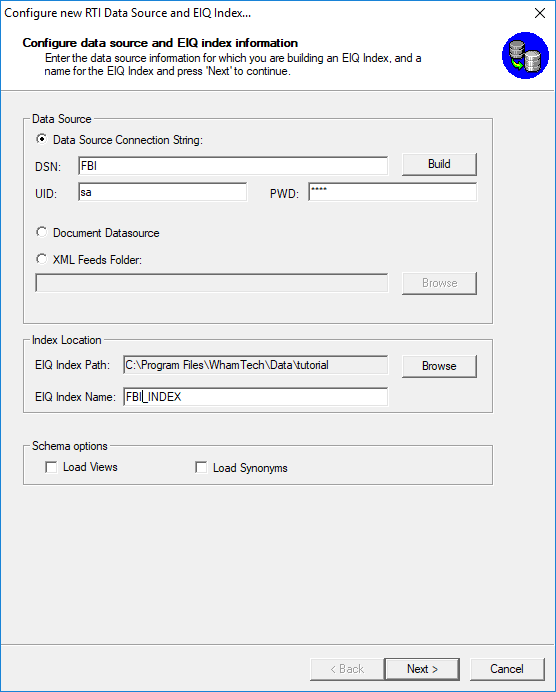
· On the 'Configure Data Type Map' window, you can leave the EIQ Index Data Types as their default. Click 'Finish'.
· Add the PERSON, ADDRESS, VEHICLE and VEHICLE_LINK tables.
·
Build the profile by clicking the 'Build
Profile' icon ![]() and clicking
'Full Build'.
and clicking
'Full Build'.
· Analyze the data.
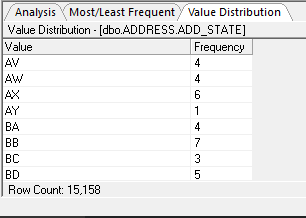
· Right-click 'ADD_STATE'. Click 'Analyze Data'
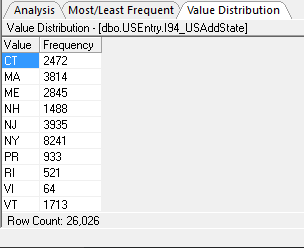
· Notice under the 'Value Distribution' tab that state names and abbreviations have no format.
· Right-click 'ADD_STATE' and click 'Transformations'.
· Change the data length to 30.
· Click the 'Transformations' tab.
· Double-click 'Lookup(!#EDIT_VALUES#!)' in the 'Default Transforms' box to select it.
· Double-clcik 'Lookup(!#EDIT_VALUES#!)' in the 'Selected Transforms' box to browse for the 'LookUpStates.csv' file.
· Click 'OK' and then click 'OK' again.
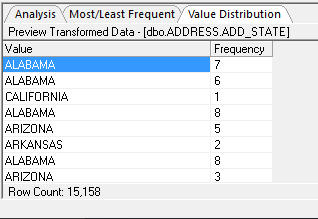
· Preview the transform by right-clicking 'ADD_STATE' and selecting 'Preview Transform Data'
·
Build the profile again by clicking the 'Build
Profile' icon![]() and clicking
'Full Build'.
and clicking
'Full Build'.
· Save the profiling session.
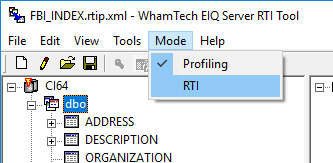
· Switch from 'Profiling' to 'RTI' mode.
· Each of the tables should get a ROWID column designation automatically. Verify that the tables have ROWIDs and if not, designate their primary key columns as ROWIDs.
· Designate PER_ID under the ADDRESS table as the foreign key for 'dbo.PERSON.PER_ID'. This will link the two tables.
· The VEHICLEID under the VEHICLE_LINK table should be designated as a foreign key for ‘dbo.VEHICLE.VEHICLEID’ automatically.
· Designate PER_ID under the VEHICLE_LINK table as a foreign key for ‘dbo.PERSON.PER_ID’. This will link all of the tables.
Note: A) If dbo.PERSON.PER_ID is not available in the list of columns when setting a foreign key, the data type may be wrong. If dbo.PERSON.PER_ID is ‘CHAR’ in the index, use the ‘Transformations’ tab to change the data type to ‘INT’.
B) If the foreign key selection for dbo.ADDRESS.PER_ID is grayed-out, preform the same step as part A. Change the data type of dbo.ADDRESS.PER_ID from CHAR to INT.
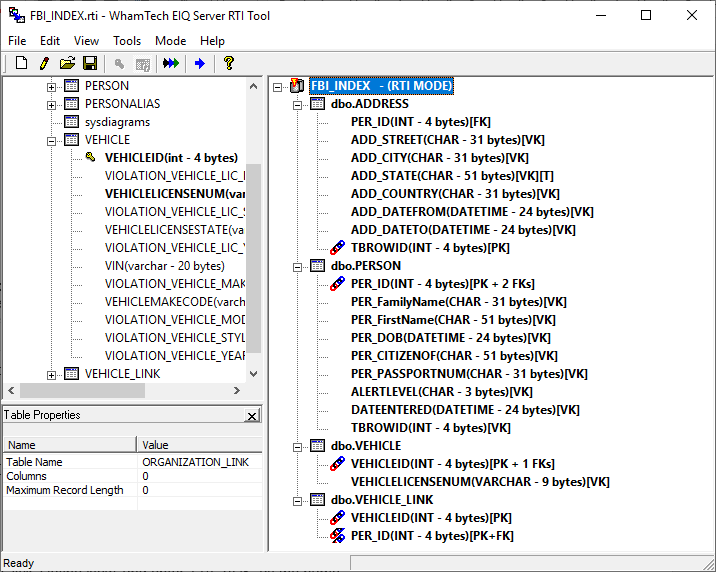
· Save the RTI map for the index.
·
Proceed to build the index by clicking the
'Build Index' icon ![]() and clicking 'Full Build'.
and clicking 'Full Build'.
Configure an EIQ SuperAdapter VDS for FBI:
· Register the 'FBI' ODBC DSN with the EIQ Product Server by opening the EIQ Server Configuration Tool.
· Click on the 'Data Sources' tab and click 'Add Data Source'.
· Enter 'FBI' as the Alias name and make sure the ID is different than the ID for POLICE.
· Create a new VDS by going to the 'EIQ Virtual Data Sources' tab.
· Click 'Define New' and enter 'FBI_VDS' as the name.
· Pair the FBI_INDEX and the FBI data source.
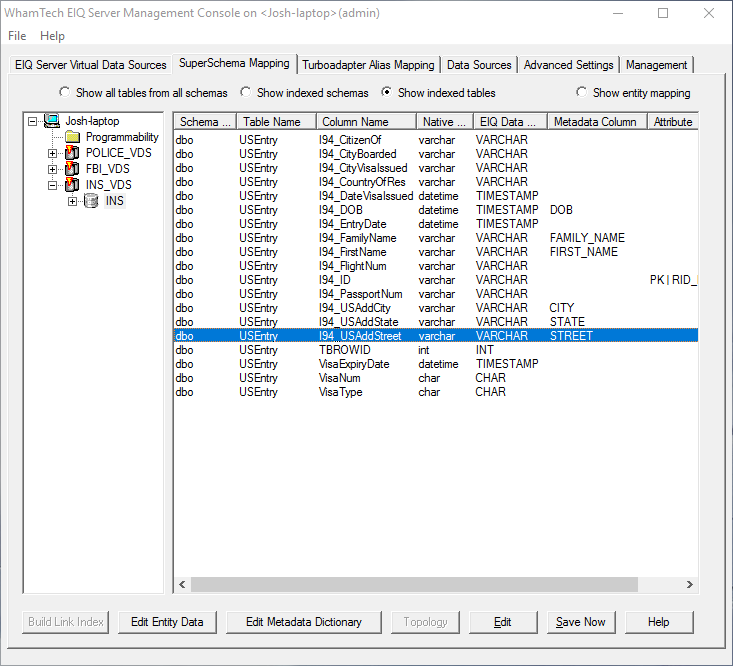
· Map data source columns to the standard data model names below through the ‘SuperSchema Mapping' tab:
Data Source Column Standard Data Model Column
ADD_CITY CITY
ADD_STATE STATE
ADD_STREET STREET
PER_DOB DOB
PER_FamilyName FAMILY_NAME
PER_FirstName FIRST_NAME
VEHICLEID VEHICLE_ID
VEHICLELICENSENUM LICENSE_NUMBER
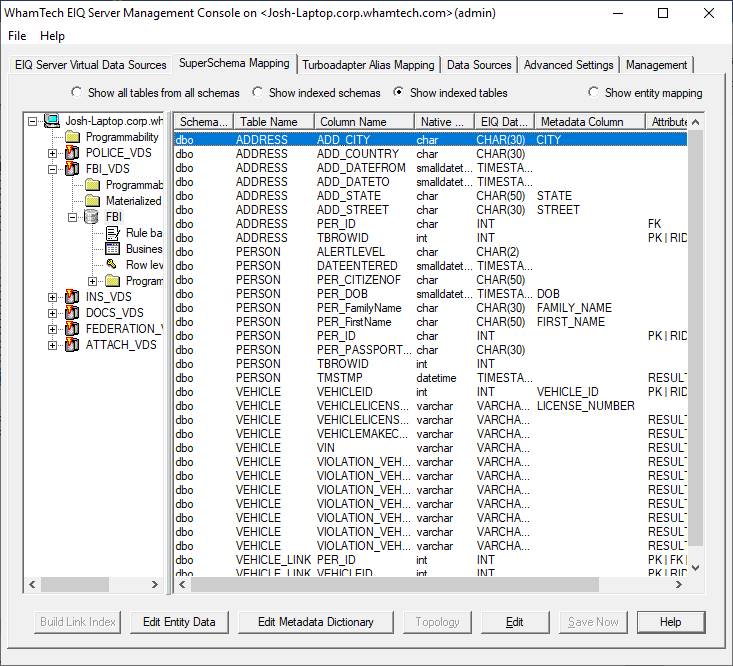
· Click 'Save Now'.
Build an EIQ Index for INS:
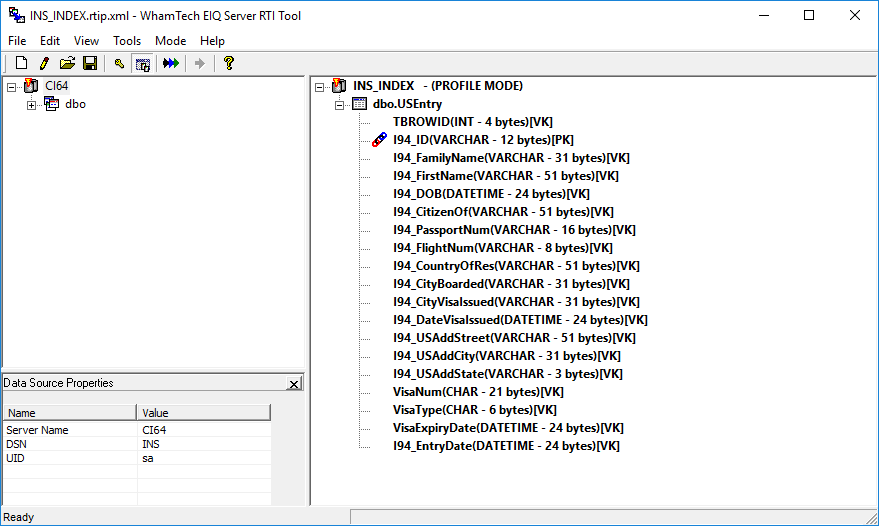
· Connect to the 'INS' DSN and create a new EIQ Index called 'INS_INDEX'.

· On the 'Configure Data Type Map' window, you can leave the EIQ Index Data Types as their default. Click 'Finish'.
· Select 'USEntry' for building indexes by right-clicking and selecting "Add All".
·
Build the profile by clicking the 'Build
Profile' icon ![]() and clicking
'Full Build'.
and clicking
'Full Build'.
· Don't forget to analyze the data.
· Right-click 'I94_USAddState'. Click 'Analyze Data'
· Notice under the 'Value Distribution' tab that state names and abbreviations have no format.
· Apply the same transformation from above.
· Right-click 'I94_USAddState' and click 'Transformations'.
· Change the data length to 30.
· Click the 'Transformations' tab.
· Double-click 'Lookup(!#EDIT_VALUES#!)' in the 'Default Transforms' box to select it.
· Double-clcik 'Lookup(!#EDIT_VALUES#!)' in the 'Selected Transforms' box to browse for the 'LookUpStates.csv' file.
· Click 'OK' and then click 'OK' again.
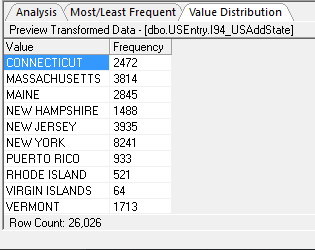
· Preview the transform by right-clicking 'I94_USAddState' and selecting 'Preview Transform Data'
·
Build the profile again by clicking the 'Build
Profile' icon![]() and clicking
'Full Build'.
and clicking
'Full Build'.
· Save the profiling session.
· Switch from 'Profiling' to 'RTI' mode.

· Designate I94_ID as the primary key of the USEntry table.
· Right-click on I94_ID and go to "Modify Flags" and select "RowID(PRIMARY) + Primary Key".
· Save the RTI map for the index.
·
Proceed to build the index by clicking the
'Build Index' icon ![]() and clicking 'Full Build'.
and clicking 'Full Build'.
Configure an EIQ SuperAdapter VDS for INS:
· Register the 'INS' ODBC DSN with the EIQ Product Server by opening the EIQ Server Configuration Tool.
· Click on the 'Data Sources' tab and click 'Add Data Source'.
· Enter 'INS' as the Alias name and make sure the ID is different than the ID for POLICE and FBI.
· Create a new VDS by going to the 'EIQ Virtual Data Sources' tab.
· Pair INS_INDEX and the INS data source.

· Map data source columns to the standard data model names below through the 'SuperSchema Mapping' tab:
Data Source Column Standard Data Model Column
I94_USAddCity CITY
I94_USAddState STATE
I94_USAddStreet STREET
I94_DOB DOB
I94_FamilyName FAMILY_NAME
I94_FirstName FIRST_NAME
· Click 'Save Now'.
Build an EIQ Index for Documents:
· Select "Document Datasource" as the Data Source.
· Use or change the default index path by using 'Browse' to find "C:\Program Files\WhamTech\Data\tutorial" and enter 'DOC_INDEX' as the EIQ Index Name.
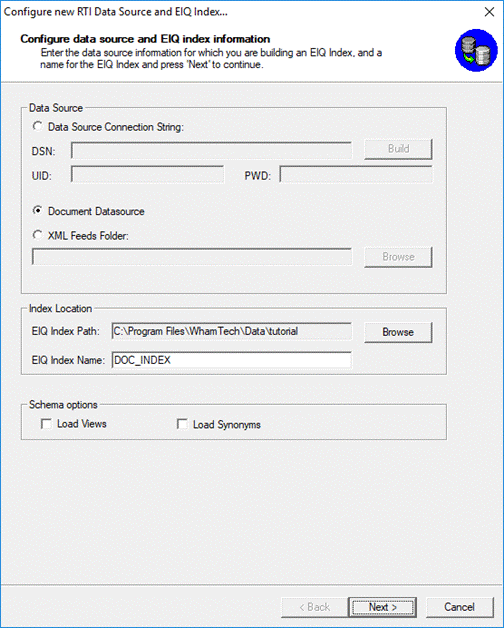
· Click 'Next'.
Now, specify the Document Types to Index.
· Select 'Others'.
· Select the following options:
o Text File (TXT)
o Word Document (DOC)
o Excel Worksheet (XLS)
o Hyper Text Markup Language (HTM, HTML, SHTML, PHTML, JHTML, STM)
o Extensible Markup Language (XML)
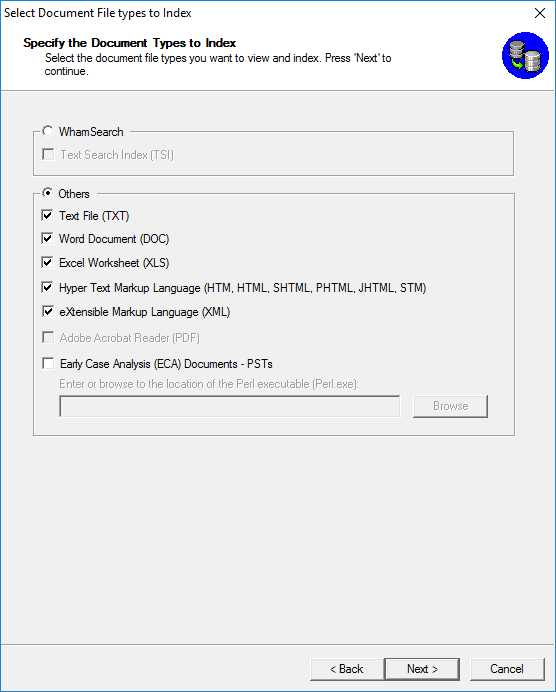
· Click 'Next'.
· Browse for the 'Docs' sub-folder under the 'Sample datasources' folder on your local machine. This folder contains various sample documents.
· Select the folder and click 'OK'.
· Click 'Finish'.
· Add all the files under the 'Docs' folder for building indexes by right-clicking on 'Docs' in the left pane and selecting 'Add All'.
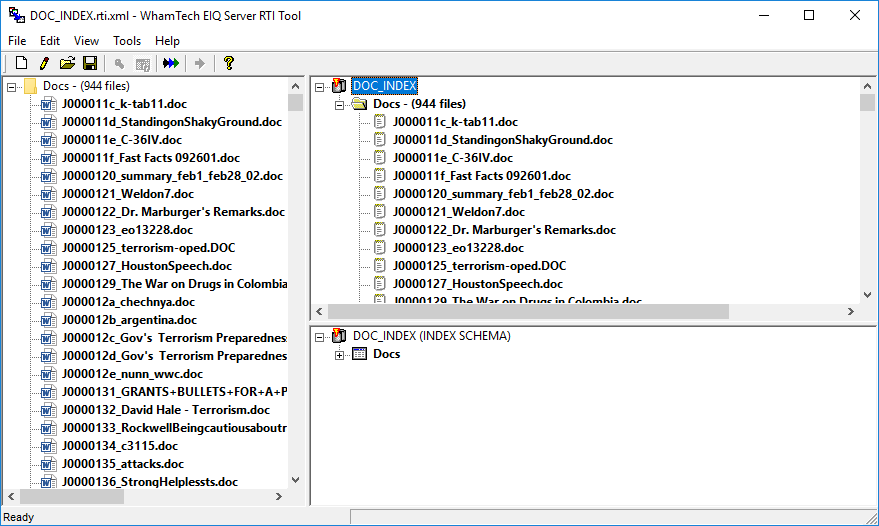
· Right-click on 'Docs' in the right pane and go to 'Text Search Options'.

· Select the options in the picture below:
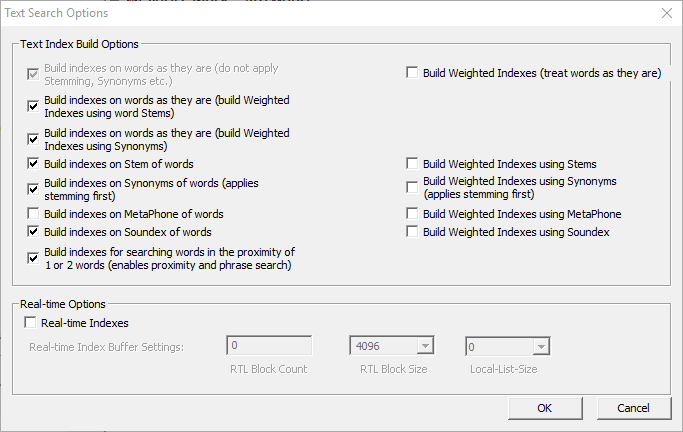
· Click 'OK'.
· Save the RTI map for the index.
· Proceed to build the index.
Configure an EIQ SuperAdapter VDS for Documents:
· Register the 'Documents' data source with the EIQ Product Server using the EIQ Server Configuration Tool.
o Enter 'DOCUMENTS' as the Alias.
o Select 'DOCUMENTS' as the Data Source Type. Click 'Browse' and find DOC_INDEX.DBD.
o Create a new VDS with 'DOCS_VDS' as its name.
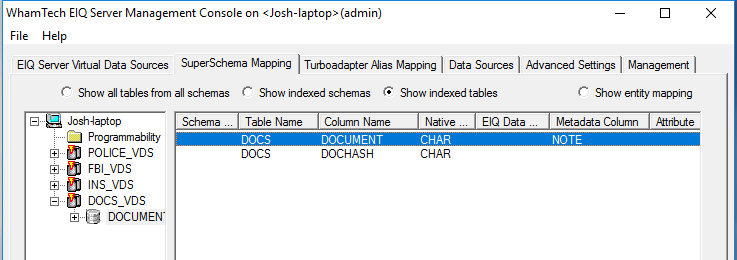
· In 'Data Source - EIQ Index Pair' window:
o Enter or select 'DOCUMENTS' from the drop down menu for the Data Source field. The EIQ Server Index field should be automatically filled with the index path as the DOC_INDEX serves as both the data source and EIQ Index.

· Map the data source column to the standard data model column below:
Data Source Name Standard Data Model Name
DOCUMENT NOTE
· Click 'Save Now'.
In a typical deployment, EIQ Federation Server remotely accesses EIQ SuperAdapter VDSs running on dedicated machines. In this tutorial setup, the EIQ SuperAdapter VDSs and the EIQ Federation Server are configured on a single EIQ Product Server.
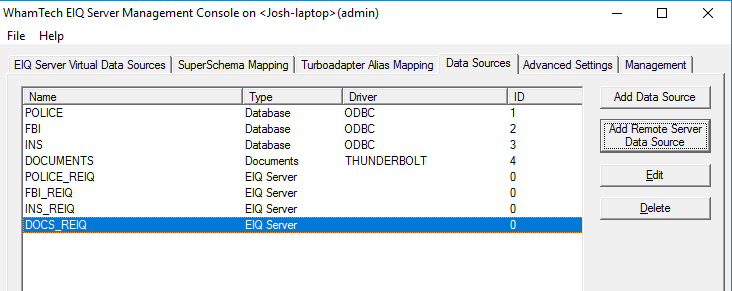
Use the EIQ Server Configuration Tool's 'Data Sources' tab to register the EIQ SuperAdapter virtual data sources (POLICE_VDS, FBI_VDS, INS_VDS and DOCS_VDS) as remote data sources.
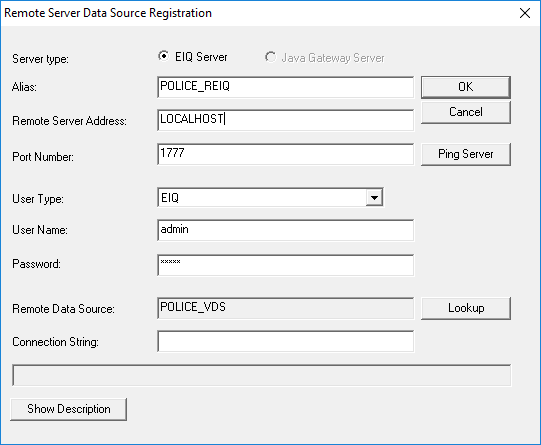
Register POLICE_VDS as Remote Data Source
· Click 'Add Remote Server Data Source' under the 'Data Sources' tab.
· Enter 'POLICE_REIQ' as the Alias (REIQ for Remote EIQ Server).
· Enter 'LOCALHOST' as the Remote EIQ Server Address (or IP Address).
· Type in the Username and Password.
· Click 'Lookup' and select 'POLICE_VDS'.
Register Others
Similarly, register the FBI_VDS, INS_VDS and DOCS_VDS remote EIQ SuperAdapter data sources as FBI_REIQ, INS_REIQ, and DOCS_REIQ respectively.
You should see all the remote virtual data sources on the data sources tab.
· Go to the 'EIQ Server Virtual Data Sources' tab.
· Click 'Define New' to open the 'EIQ Server Virtual Data Sources' dialog.
· Enter "FEDERATED_VDS" as the name.
· Go to the 'Data Source - EIQ Index Pairs' group box.
· Click 'Add' to add each of the four remote data sources (POLICE_REIQ, FBI_REIQ, INS_REIQ and DOCS_REIQ).
· Click 'OK'.
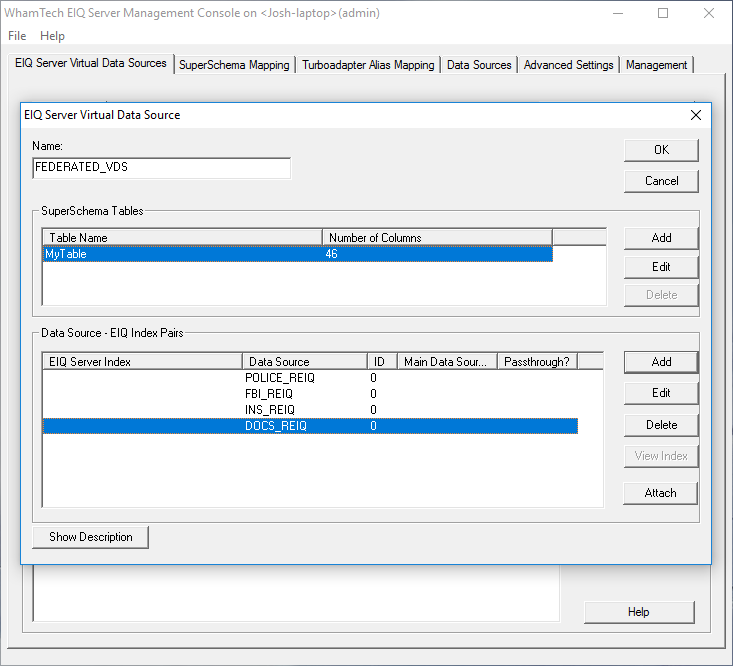
Note that EIQ Federation Server VDS does not require a SuperSchema mapping because it is using the same mappings as the EIQ SuperAdapters. The mapping is automatic and the FEDERATED_VDS presents a virtual schema view based on the combined views from each EIQ SuperAdapter.
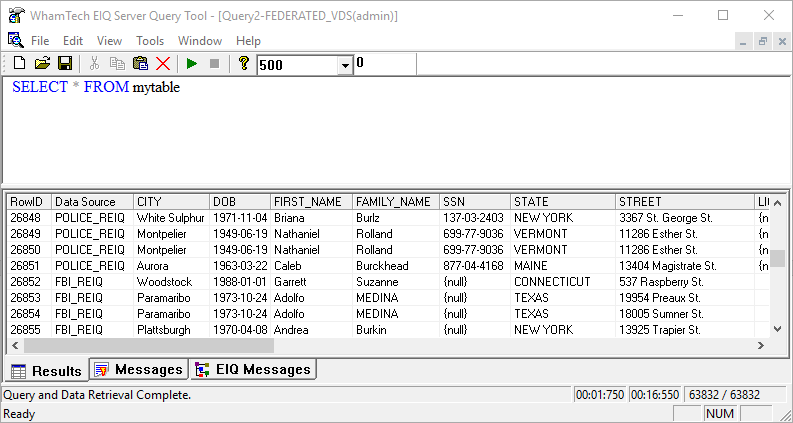
Now we are all set to query the FEDERATED_VDS. The results contain matching records from each data source and are presented in UNION fashion by default.
See SQL Syntax for the supported syntax on the virtual schema view.
The following are some of the example queries and their results:
SELECT * FROM mytable;
The resultant screen looks like the following.
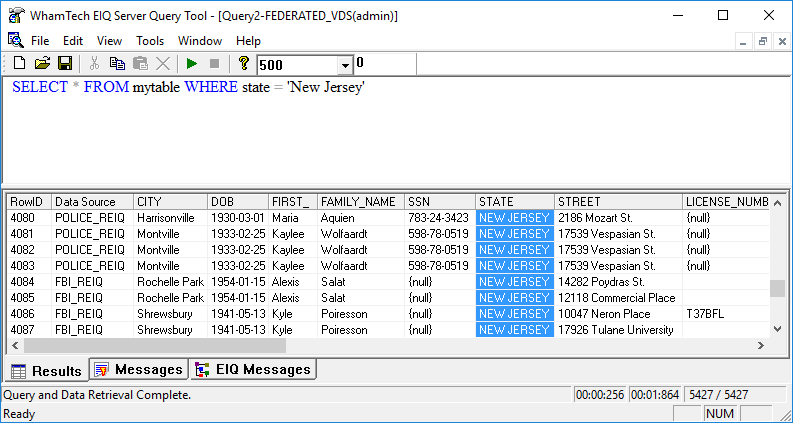
SELECT * FROM mytable WHERE
state ='
This query selects all the records from all the four data
sources where the state is "
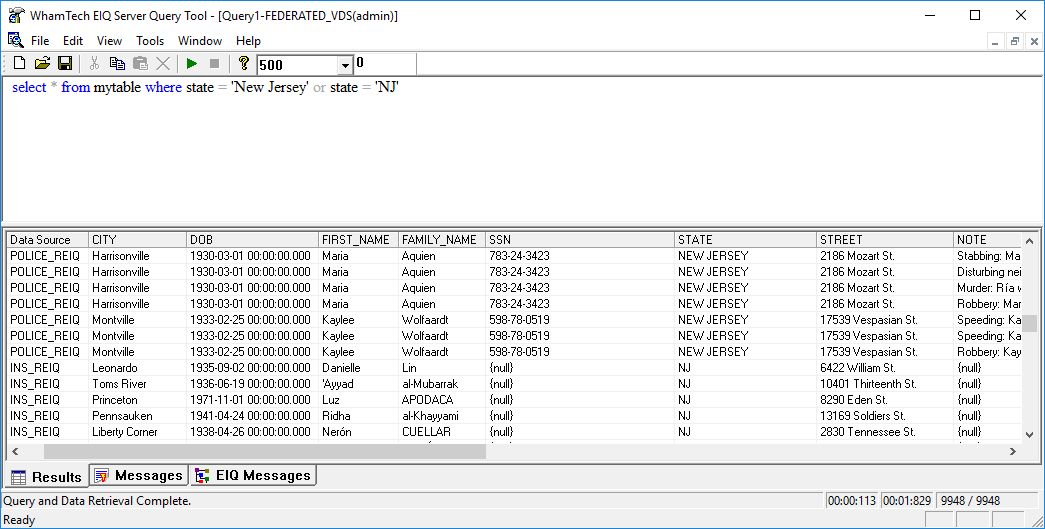
If two different data sources have states formatted in a different way, you can find both at the same time by querying:
SELECT * FROM mytable WHERE state = 'New Jersey' or state = 'NJ'
Text search queries
We can search for a word based on the following functions:
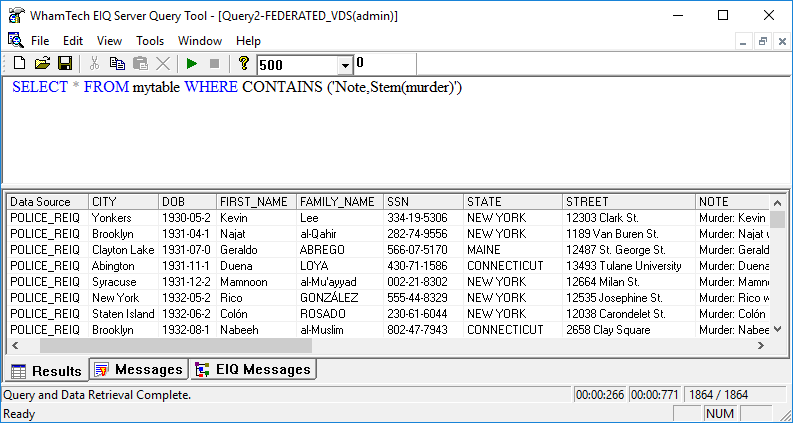
Stem : When stemming is used, EIQ server retrieves words or documents containing words that arise from a common stem (root). For instance, "Stem(Muder)" would retrieve results with the words 'Murders' and 'Murdered' as both have the same stem 'Murder'.
Syntax:
SELECT * FROM TABLE1 WHERE CONTAINS ('TextColumnName, Stem (Word)')
Example:
Select * FROM mytable WHERE CONTAINS ('Note,Stem(murder)')
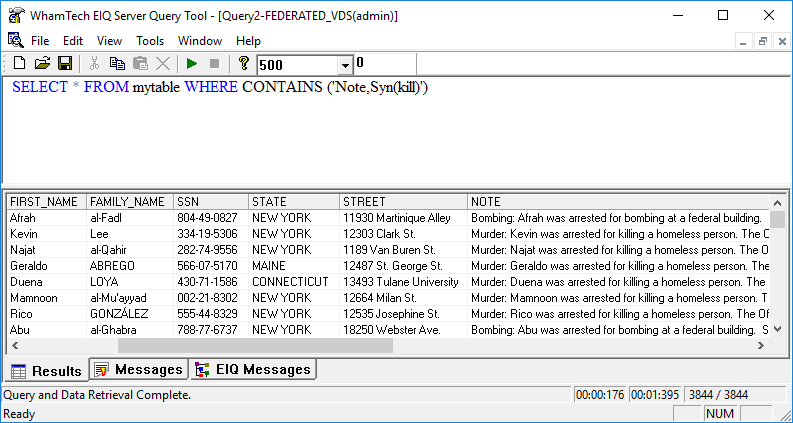
Synonym : When Synonym is applied, EIQ Server retrieves words or documents containing synonyms of the specified word. For instance, "Syn(Kill)" returns results that contain "murder", "assassinate", and other synonyms of Kill.
Syntax:
SELECT * FROM TABLE1 WHERE CONTAINS('TextColumnName, Syn(Word)')
Example:
Select * FROM mytable WHERE CONTAINS ('Note,Syn(Kill)')
Soundex : When Soundex is applied, EIQ Server retrieves words or documents containing words that sound similar to the search word. For instance, "Soundex(Omar)" would return results containing 'Omeir' as they are similar-sounding words.
Syntax:
SELECT * FROM TABLE1 WHERE CONTAINS('TextColumnName, Soundex(Word)')
Example:
Select * FROM mytable WHERE CONTAINS ('Note,Soundex(Kyle)')
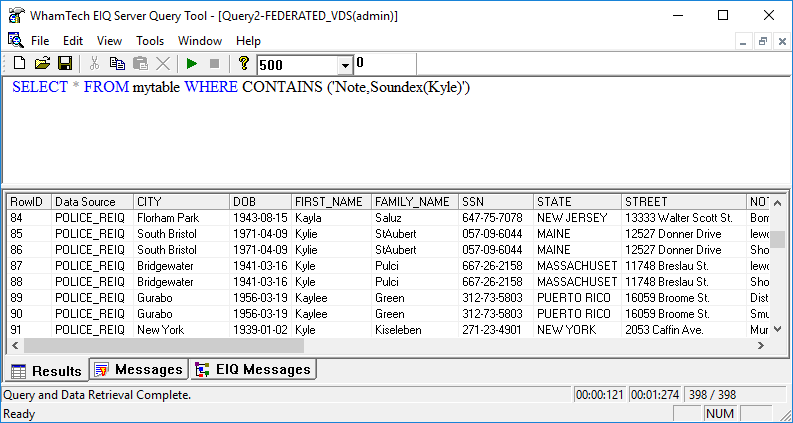
Notice that 'Soundex(Kyle)' returns results for Kyle, Kayla, Kylie and Kaylee because the words all sound similar.
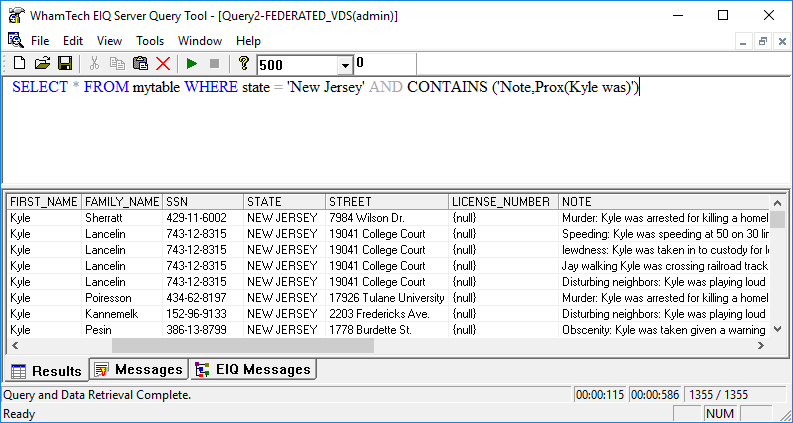
Proximity : The proximity function retrieves results
in which "Word1" and "Word2" appear in close proximity to
each other in a given document or record. For instance, "Prox(United Canada)" displays documents and
records containing ".
Syntax:
SELECT * FROM TABLE1 WHERE CONTAINS('TextColumnName, Prox(Word1 Word2)')
Example:
SELECT * FROM mytable WHERE CONTAINS ('Note, Prox(Kyle was)')

Mixed Structured and Unstructured (text) Search
The following query retrieves all records where
the state is '
SELECT * FROM mytable WHERE
state='
Copyright © 2019 , WhamTech, Inc. All rights reserved. This
document is provided for information purposes only and the contents hereof are
subject to change without notice. Names may be
trademarks of their respective owners.