
CREATING Private Queues For MSMQ
The EIQ Product Suite utilizes MSMQ to send messages to EIQ RTIS when indexes are updated or changed. This is usually done through the creation of a public queue in MSMQ. However, certain instances require setting up a private queue rather than a public queue. This could be a result of issues connecting to a domain, permission settings, or being in workgroup mode. Whatever the case, private queues can be created to do the same thing a public queue would. With private queues, the database server, the EIQ Server, and EIQ RTIS can all run on the same computer.
Setting up private triggers is very similar to regular trigger set up. First:
· Copy ‘xpWhamTx.dll’ to the SQLServer ‘Binn’ folder. You can find the ‘xpWhamTx.dll’ file in the “C:\Program Files\WhamTech\bin\” folder on your machine.
· Next, register the Extended Stored Procedure with the ‘master’ database of SQL Server using the ‘sp_addextendedproc’ script.
· Right-click on ‘master’ database and select ‘New Query’.
· Run the following query:
sp_addextendedproc 'xp_triggermsg', 'xpwhamtx.dll'
‘xp_triggermsg’ is the exported function called by the trigger and ‘xpWhamTx.dll’ is the DLL. Executing the above statement registers the function and DLL with SQL Server.
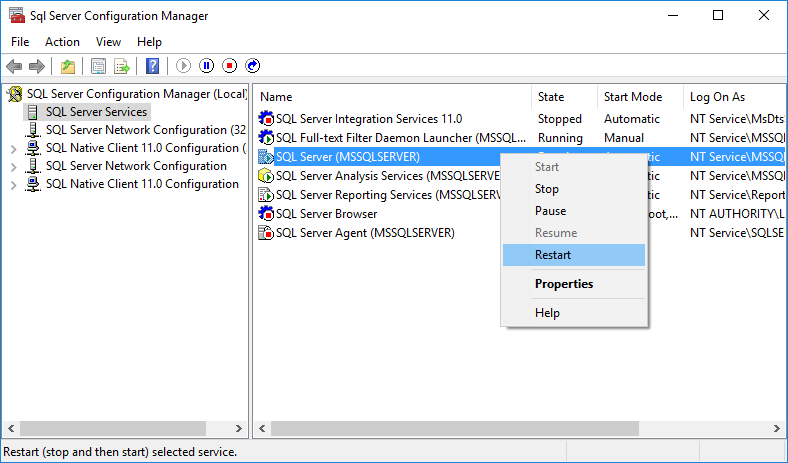
· Now, stop and restart SQL Server. This can be done using the SQL Server Configuration Manager.
· Click Start -> All Programs -> Microsoft SQL Server -> Configuration Tools -> SQL Server Configuration Manager.
· Select "SQL Server 2005 Services" under the SQL Server Configuration Manager.
· Right-click ‘SQL Server (MSSQLSERVER)’ and select "Restart".
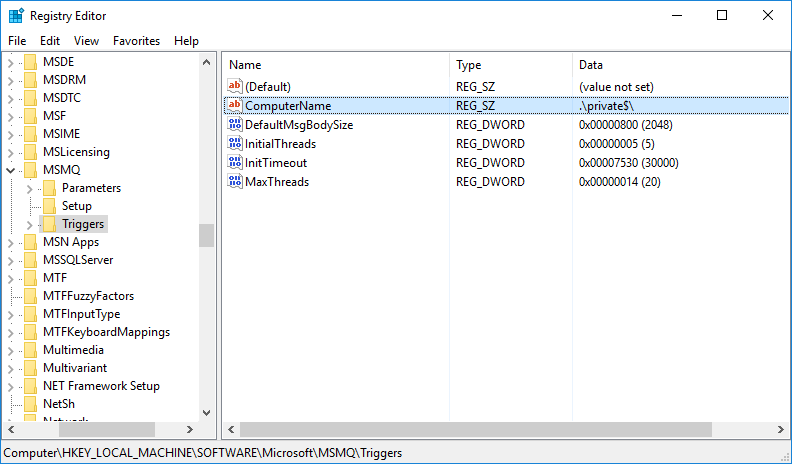
· Next, create a registry key for private queues.
· Open the registry editor by searching for ‘Regedit’ and running the command.
· Go to key “HKEY_LOCAL_MACHINE\SOFTWARE\MICROSOFT\MSMQ\TRIGGERS\”.
· Create a new “String value” key with the following entry:
ComputerName REG_SZ .\private$\
· Note the name; it has an uppercase C and N.
· Next, update the triggers.
· Go to ‘SQL Server Management Studio’ and select the ‘Police’ database.
· Open the ‘Tables’ folder and double-click the LOPERSON table.
· Open the ‘Triggers’ folder.
· Change the queueparam name with the following line by right-clicking each of the triggers and selecting ‘Modify’:
Set @QueueParam='private$\Queuename'
The Queuename is user defined.

· Execute the updated trigger body and the trigger will update.
· Do this for every trigger in the table.
Once the triggers are updated, the next step is to set up MSMQ. MSMQ tracks changes made to the tables mentioned in the triggers. Then, it sends messages to EIQ RTIS whenever there is a change in the table. EIQ RTIS will make the corresponding changes in Index.
· Go to Control Panel -> Administrative Tools -> Computer Management.
· Connect to the machine where the triggers are located. If the machine is not local, right-click on computer management, select ‘Connect to another computer…’, and provide the machine name.
· Expand the ‘Services and Applications’ link in the left pane of the ‘Computer Management’ window.
· Expand ‘Message Queuing’.
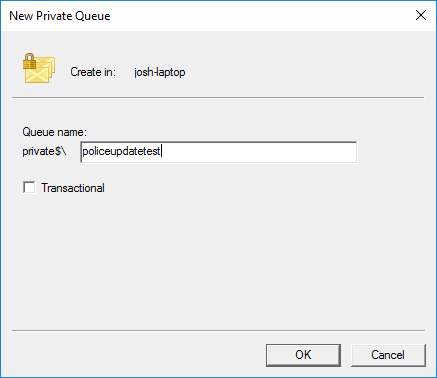
· Right-click ‘Private Queues’, select ‘New’, and then ‘Private Queue’.
· Enter the queue name that you specified in the updated triggers, for example, ‘Policeupdatetest’.
· Click "OK".
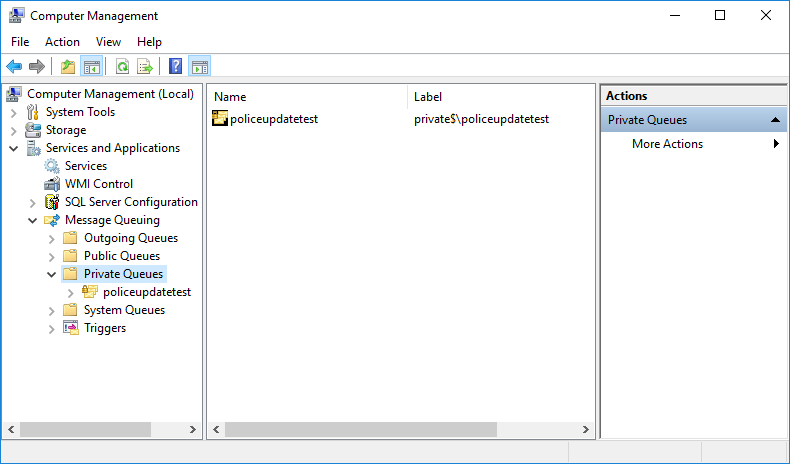
You should see the queue name ‘Policeupdatetest’ inside the ‘Private Queues’ folder in the left pane of the ‘Computer Management’ window. Click on ‘Private Queues’ to see all of the configured private queues in the right pane of the ‘Computer Management’ window.
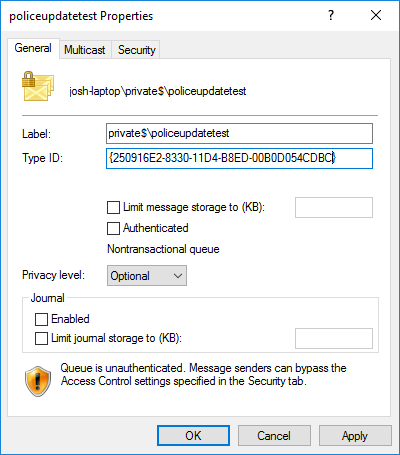
· Right-click on ‘Policeupdatetest’ and select ‘Properties’.
· In the Type-ID box, enter {250916E2-8330-11D4-B8ED-00B0D054CDBC} including the parenthesis.
· Click ‘OK’.
Note: You may need to make sure the dependent DLL files for "xpWhamTx.dll" exist on the machine. If they don’t exist, then, while inserting or deleting rows, you may receive and error due to the absence of DLL files that the triggers require. If you encounter these errors later, follow these steps:
· Download and install dependency walker from http://www.dependencywalker.com/depends20_alpha.zip
· Open the "xpWhamTx.dll". If there are any dependent DLL files missing, the name of the missing DLL files will appear as an error in the message window.
To set up EIQ RTIS to update the index using triggers and message queues, see Trigger DLL Setup.
· Click on Step 4: Configuring EIQ RTIS.
· Whenever ‘Queuename’ is mentioned, specify it as “private$\QueueName”.
Copyright © 2019 , WhamTech, Inc. All rights reserved. This
document is provided for information purposes only and the contents hereof are
subject to change without notice. Names may be
trademarks of their respective owners.